Home → Contents → Chapter 3 → Page 1 / 2 / 3 / 4 / 5 / 6 / 7 / 8 / 9 / 10 / 11 / 12 / 13 / 14 / 15 / 16
Admin Tab
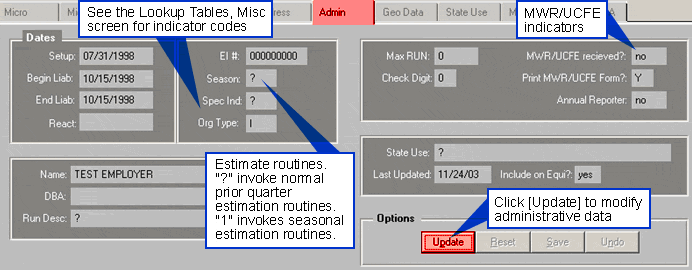
The Admin tab displays administrative data for an account. This is non-quarterly information.
To Change/Update Admin Data:
- Click the [Update] button to access the data fields.
- Click the field you wish to change and type the new information. Press [Tab] to move among fields or double-click on the field to make changes. All data entered is capitalized automatically when saved.
- If you make errors and wish to start over, click the [Reset] button. This will return you to information before the changes. Click the [Save] button when your changes are complete. If you decide that you do not want to make any changes to the account, click [Undo] to leave the "update" mode.

MWR/UCFE Received Indicator
A first run of MWR/UCFE forms for printing sets the MWR/UCFE Received Indicator to N (No, a form has not been received). The MWR/UCFE Received Indicator cannot be changed using the Admin Screen. The MWR/UCFE Received Indicator is set/changed to Y (Yes) by subunit data being entered to the system either via the MWR data entry screen or the quarterly data load.
When the second requests of the MWR/UCFE forms is run, records that have the MWR/UCFE Received Indicator set to Y (Yes) will not have a form printed and records that have the MWR/UCFE Received Indicator set to N (No) will have a form printed.
Print MWR/UCFE Form Indicator
A record create automatically sets the "Print MWR/UCFE Form" indicator to Y (Yes). The "Print MWR/UCFE Form" indicator will change to N (No) by either loading an EDI record via the EDI load program or by an analyst manually updating the indicator through the Admin Screen. Analysts can also update the indicator to 1 (first quarter), 2 (second quarter), 3 (third quarter) or 4 (fourth quarter). If 1, 2, 3, or 4 is set then forms will only be printed when the quarter set is printed (i.e. if the indicator is 1 the forms will only be printed when the system prints the forms for first quarter). This feature is useful for businesses that do not report MWR/UCFE forms every quarter.
When the MWR/UCFE forms program is run, records that have the Print MWR/UCFE Form Indicator set to N (No) will not have a form printed and records that have the Print MWR/UCFE Form Indicator set to Y (Yes) will have a form printed.
Geo Data Tab
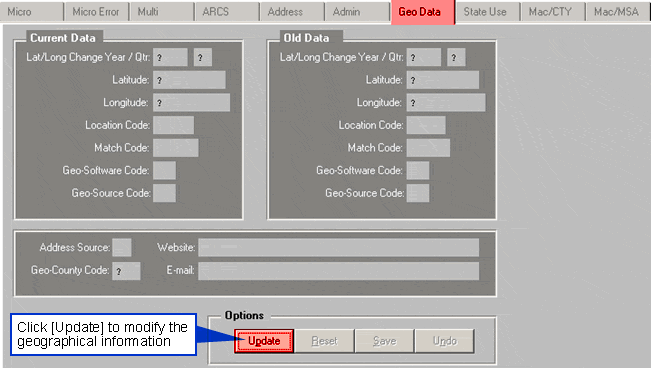
The Geo Data tab displays the geographical information related to the account. From this screen the below geo data fields can be updated. If a state does update the latitude and/or longitude then the following changes will automatically occur: geocode software will be U, geocode source will be S, match code will be M999 and location code will be A99.
- Latitude
- Longitude
- Address Source
- Website
To Update Geo Data:
- Click on the [Update] button on the Geo Data tab.
- Update the desired fields.
- Click [Save]. If you want to change your updates, click [Undo]. If you make changes and do not wish to save the changes click [Reset].

State Use Tab
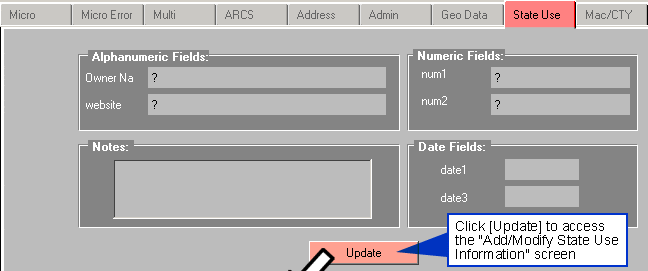
States may add two alphanumeric fields, two numeric fields, and two date fields in the WIN-202 system to help meet their specific information needs. Data may be added to or updated in these fields.
To Update State Use Data
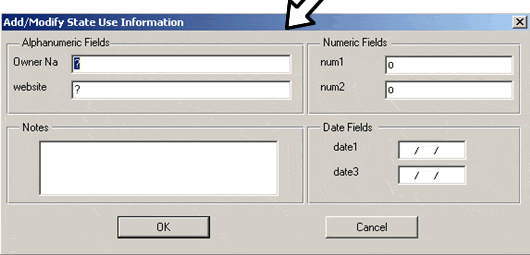
- Click the [Update] button on the ‘State Use’ Screen. The "Add/Modify State Use Information" screen appears.
- Enter data into the state use (Fields should have previously been defined. For more information on defining state use fields, see Chapter 6 Administrative.
- Click on the [OK] button to store the additions or updates. If you click the [Cancel] button, you will exit and the entries will be lost.


