Chapter 7: Reports
Click the [Reports] button on the "Main Menu" screen to access the "Reports" screen. The three selection tabs available are Reports, Auto Reports and Report Parameters.
Reports Tab
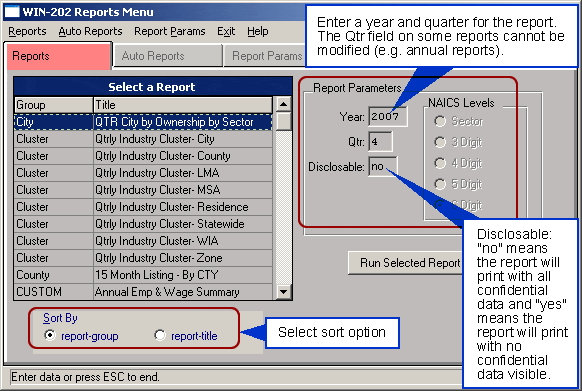
The "Reports" tab displays a selection list of the following reports: 1 city, 8 cluster, 1 county, 2 custom, 15 edit listings, 28 file creations, 3 forms, 32 listings, 1 location quotient (LQ), 1 macro, 5 NAICS, 8 size groups, and 1 statewide.
In the "Sort By" section you have a choice of sorting alphabetically by report-group or report title depending on your viewing preference.
Running a Report
To run a report:
- Click on a report in the browser to highlight it. Use the [Page Up] and [Page Down] buttons or the [↑] and [↓] arrows on your keyboard to scroll through the browser until you find the report you want.
- Input the desired report parameters. Click the [Run Selected Report]. A dialog box displays your report choice asking whether to continue. If the information is correct, click [Yes] to run the report otherwise, click [No] to cancel the job.
- Click [Exit] to return to the "Main Menu" screen.
All reports are written to the reports directory on your server and their output file names are listed in the WIN-202 Reports table following this section. Many file names contain "yyyy", "q" and "userid". These are simply general designations for year, quarter and user—specific substitutions are made when reports are run. A list of All WIN-202 Reports with Examples is provided on the last page of this chapter.
Custom Report Screen
Within the "Reports" screen, there are two reports with customizable output: Annual Employment & Wage Summary and Custom Quarterly Employment and Wage. Scroll to find the group "CUSTOM" and double-click either to access the "Enter Customized Report Parameters" screen (see figure below). In this screen you can modify the following characteristics:
- Year and quarter of the data used
- Type of UI coverage
- Geographic area
- Level of industry detail displayed
- Whether or not to include size class information
- Whether or not you want confidential data suppressed
- Output types for printing reports. In standard column delimited ASCII file (unformatted text) or highly formatted text document suitable for printing in Word or other word processing program
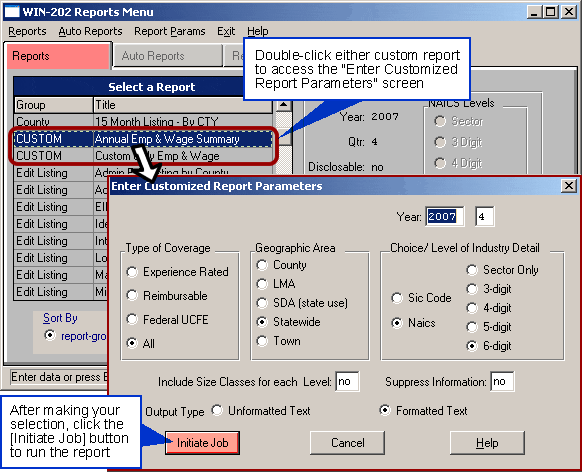
When all selections have been made, click the [Initiate Job] button. A message displays showing your selections and asking if you want to continue. Click [Yes] and a message displays about monitoring the job in the Batch Manager. Click [No] to return to the "Reports" screen. Click [Cancel] when entering parameters to return to the "Reports" screen.
NCA Flow Processing
This process consists of generating NCA forms on demand from the Reports menu. To do this, double click the "CA Forms" entry in the Reports menu to bring up the "NCA Flow Processing" screen (see figure below). Presented in this dialog box are a Range of UI #, Range of Initial Liability Date, Range of Month 3 employment, and Address Sort Selection. A user must specify range values for all three fields and decide the type of address sort for the output—Mail/Tax/Physical or Tax/Mail/Physical. After selections are made, click the [Initiate Job] button and monitor the job from the batch manager.
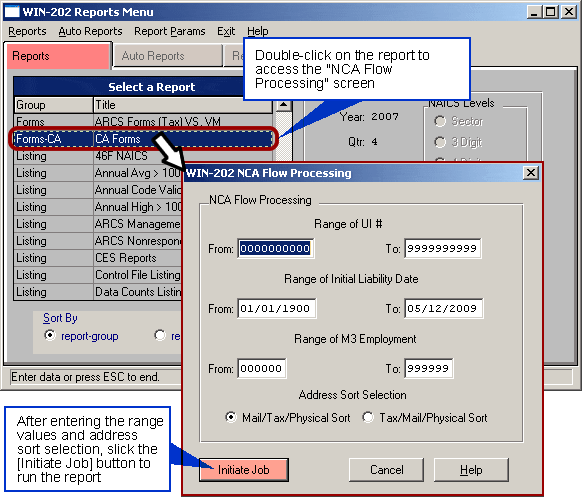
The following four files are generated in the win202\reports directory: catp1.xml (print file that is converted to PDF), IAncaDDMMYY.ot (unclassified management report for Iowa), IAnca-smrDDMMYY.ot (unformatted unclassified management report) and nca-nonrespDDMMYY.ot (list of NCA's that have not reported for three mailings). To cancel the job and lose any changes simply click the [Cancel] button.
CIPSEA Short File
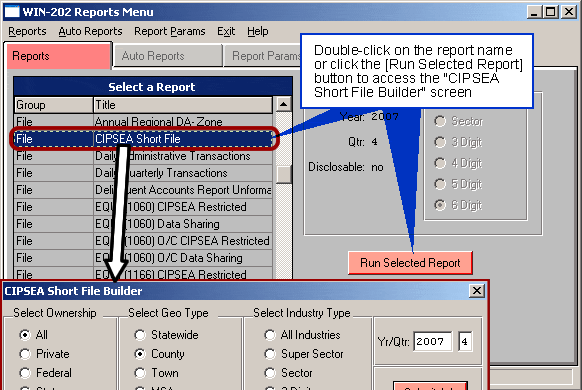
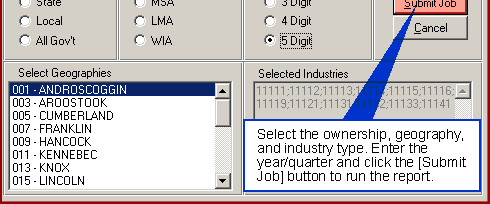
The CIPSEA Short File report gives you the ability to build a CIPSEA protected Short Format Micro file via the "Short File Builder". Double click the "CIPSEA Short File" entry in the Reports menu to bring up the "CIPSEA Short File Builder" screen (see figure below). The Short File Builder allows you to customize your report by ownership, geography, and industry type. Note: Industry selection at the 5-digit level is limited to approximately 300 selections, therefore you should choose the "All Industries" radio button instead of selecting all the industries with your mouse. See Appendix C for the detailed record layout.
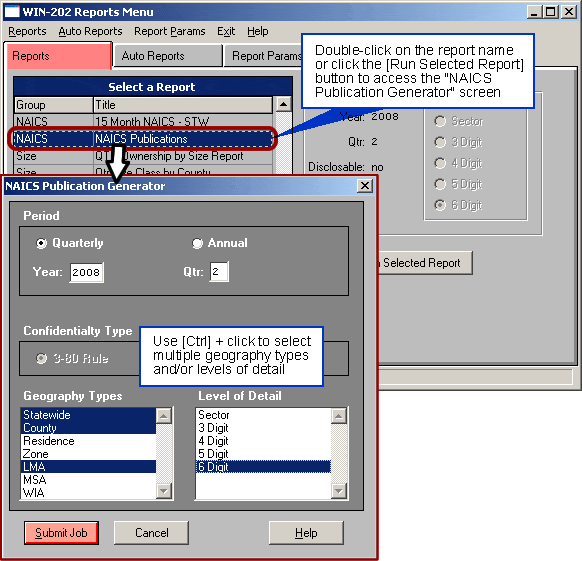
NAICS Publications
The NAICS Publications screen is used to generate annual and quarterly covered employment and wage reports customizable by geography and NAICS level. Scroll to find the group "NAICS" and double-click on the "NAICS Publications" screen (see figure below). Choose either the quarterly or annual time period and enter the year and quarter. Select a geography type and level of detail. Note: multiple geography types and levels of detail may be selected by holding down the [Ctrl] key when making your selections. Click the [Submit Job] button to run the report.
