Home → Contents → Chapter 3 → Page 1 / 2 / 3 / 4 / 5 / 6 / 7 / 8 / 9 / 10 / 11 / 12 / 13 / 14 / 15 / 16
Site Ownership Change Screen
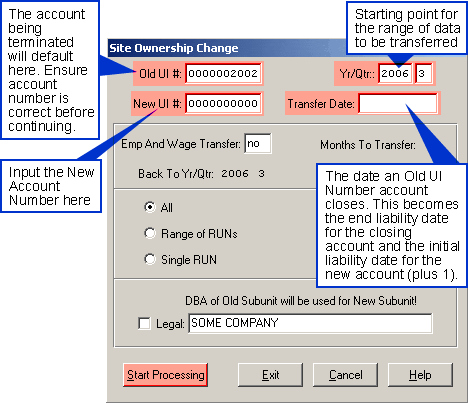
The Site Ownership Change screen, accessed via the [Site Ownership Change] button located near the bottom of the Multi tab, is used to close out (terminate) multi establishment worksites and transfer multi worksites from one account to another.

To Transfer an Account
- Ensure the account you want to work on appears in the UI Account Information Section on the Multi Screen.
- Click the [Site Ownership Change] button on the Multi tab. The "Site Ownership Change" screen will appear.
- Enter the account number the worksites will transfer to, in the ‘New UI#’ field.
- Select a Yr/Qtr (e.g., Yr=2000,Qtr=1) that is the start point. To select a different start point, double click the displayed values and enter new ones.
- Enter a transfer date for the old account (both digits for month and day are required for entry (see the figure below).
- Input ‘yes’ or ‘no’ in the ‘Emp and Wage Transfer’ field to transfer employment and wage data. If you want employment and wages transferred then double-click on the word "no" and press the [y] key.
- Input the ‘Back to Yr/Qtr’. This is only if you selected ‘yes’ in ‘Emp and Wage Transfer’.
- Input the ‘Months to Transfer’. Place the cursor in the "Months to Transfer" field and enter a number from one to three. [1] Transfers only the 3rd month [2] transfers the 2nd and 3rd months and [3] transfers all months. All options relate to a specified "Back to Yr/Qtr". If you transfer less than three months, the wages are prorated. Enter a particular "Yr/Qtr" value for the end point. This is only if you selected ‘yes’ in ‘Emp and Wage Transfer’.
- Select one of the following:
- All - moves all multi establishment worksites from the old UI account to the new account.
- Range of RUNs - moves a range of sites from the old UI account to the new account. When the "Range of RUNS" option is selected the "From" and "To" fields appear. Enter the range of reporting unit numbers you want transferred to the new account.
- Single RUN - moves only one site from the old UI account to the new account.
- Determine whether or not the new account will carry over the legal name. To do this click on the check box next to the "Legal" field. If you want to enter a different name then double-click on the box to the right of the "Legal" field and enter it in. If everything is correct, click on the Start Processing button.
- Click on the Exit button, if you are finished making site ownership changes. If you click on the Cancel button before starting processing, no changes are made.
Items to keep in mind when using the Site Ownership Change screen:
- Only active records within an unlocked quarter are transferred.
- The DBA field is no longer an option—the DBA of the old Subunit is now used for the New Subunit DBA.
- For transfers, the start date of the new owner is one day after the end of liability date of the old owner. For example, if you enter 3-31-06 as the end of liability date, the system will assign 4-1-06 as the start date of the new owner.
Update Master Total Employment and Total Wages
You can update the master total employment month 1, month 2, month 3 and total wages for the quarter displayed in the year/quarter fields. Any updates made from the multi screen to the master totals can be viewed by selecting the master account in the UI Account Information section and viewing the micro tab.
To update master total employment and total wage data:
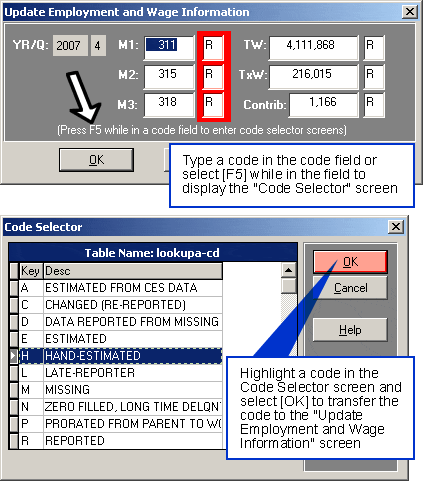
- Click the [Update Master] button located near the bottom of the Multi tab. The "Update Employment and Wage Information" window appears as shown below. If the quarter is locked you cannot make updates to master data.
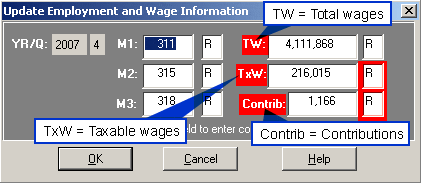
- Update/Change the desired data (i.e. M1, M2, M3 or TW). If the quarter has been locked, you must have EQUI (produce deliverable/truncate log file) and update permissions to update. If the quarter is closed and not locked you only need update permissions.
- Click [OK].

Note: If the quarter has been locked, you must have EQUI permissions (produce deliverable/truncate log file) to update.
Update Multi Establishment Employment and Wage Information
To update multi establishment employment and wage data:
- Double-click on the worksite you want to change in the browser. The "Update Employment and Wage Information" screen appears. The M1 (Month 1 employment) field will be highlighted.
- Input desired changes and press [Tab] twice to advance to M2 (Month 2 employment). If you [Tab] through Taxable Wages and Contributions the values remain unchanged. However, when Taxable Wages are modified its' associated indicator changes to "R". Contributions are recalculated and its' associated indicator changes to a "C". If the quarter has been locked, you must have EQUI (produce deliverable/truncate log file) and update permissions to update. If the quarter is closed and not locked you only need update permissions.
- Click [OK] when you are finished. If you click [Cancel], your changes will be lost.

Notes:
- Tabbing through the Month 1, Month 2, Month 3 and Total Wages results in 0 for the field and "M" for the indicator if no data is inputted.
- If the quarter has been locked, you must have EQUI (produce deliverable/truncate log file) and update permissions to update. If the quarter is closed you only need update permissions.
Print MWR Form Screen
Multiple Worksite Reports are printed using the [MWR/UCFE Forms] button located near the bottom of the Multi tab.
To Print MWR or UCFE Forms
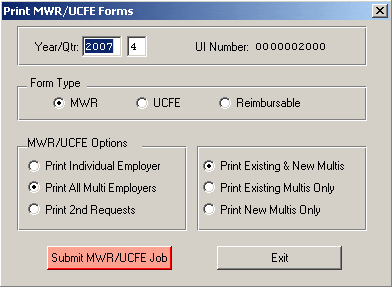
- Click [MWR/UCE Forms] button on the Multi tab. The "Print MWR/UCFE Forms" screen will appear as follows:
- Input a year and quarter in the ‘Year/Qtr’ field.
- Select one of the following ‘Form Type’ by clicking the radio button:
- MWR
- UCFE
- Reimbursable
- Select one of the following ‘MWR/UCFE Options’ by clicking the radio button:
- Print Individual Employer
- Print All Multi Employers
- Print 2nd Requests
- Select one of the following ‘MWR/UCFE Options’ by clicking the radio button UCFE or MWRs Only:
- Print Existing & New Multis
- Print Existing Multis Only
- Print New Multis Only
- Click [Submit MWR Job]. Once the job is submitted a file will be created. The file name is based on the criteria selected (see output names below). If the [Cancel] button is selected, the job does not run.

Output files by type are as follows:
MWR:
- Single Account: mwruinumber (ex. mwr0005)
- Single Page Form: mwrsp1-yyyq (ex. mwrsp1-20054)
- Multiple Page Form: mwrmp1-yyyq (ex. mwrmp1-20054)
UCFE:
- Single Account: ucfeuinumber (ex. ucfe0005)
- Single Page Form: ucfesp1-yyyq (ex. ucfe1-20054)
- Multiple Page Form: ucfemp1-yyyq (ex. ucfe1-20054)
Reimbursable:
- Single Account: reimbuinumber (ex. reimb0005)
- Single Page Form: reimbsp1-yyyq (ex. reimbsp1-20054 - only single page forms)
Note: A user can control whether or not to include subunits on future multi accounts. This is done on the Reports menu under the Report Parameters tab by changing the Parameter Value for Code 4 which pertains to records with an MEEI=4. The default, 0, means pending subunits only are included; a value of 1 yields pending subunits and those records with no subunits.
