Home → Contents → Chapter 3 → Page 1 / 2 / 3 / 4 / 5 / 6 / 7 / 8 / 9 / 10 / 11 / 12 / 13 / 14 / 15 / 16

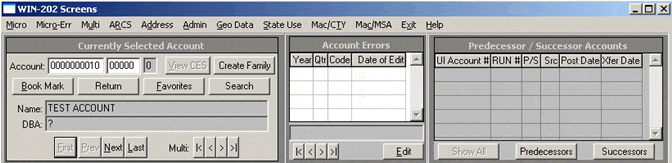
UI Account Information and Navigation Area
The Unemployment Insurance (UI) Account Information and Navigation Area, located at the top of the screen, is used to select an account for viewing and/or updating. The detailed data on the bottom half of the screen corresponds to the account shown in the UI account information and navigation area. The information and navigation area displays:
- UI Number
- Reporting Unit Number (RUN)
- Legal and Trade names (Doing Business As)
- View CES button
- Create Family button
- Predecessor and/or Successor Accounts (if applicable)
- Navigation buttons (Book Mark, Return, Favorites, UI Navigation Buttons, Error Navigation Buttons, and Predecessor/Successor Relationship Buttons)
- Search button
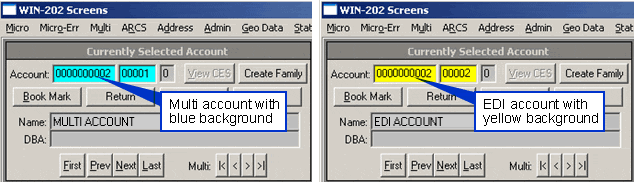
The UI account and run number of multi accounts display with a blue background. The UI account and run number of EDI accounts display with a yellow background.
Selecting a Specific Account
Account Number Search
To view a specific account using the account’s UI number and/or Run:
- Double-click the "ACCT" field to highlight it.
- Type a UI number and press the [Enter] key.
- Type a RUN number.
- Press [Enter]. If the account is not on the Admin table you receive an error message and the UI number will be reset to the closest account number.
Navigation Buttons
Use the Navigation buttons to scroll through or jump between accounts. The navigation buttons on the account information and navigation area are shown in the figure below.
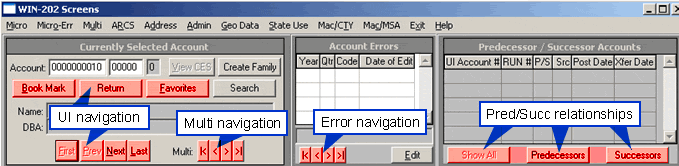
- UI Navigation Buttons: Used to search and jump through accounts at the micro level.
- Multi Navigation Buttons: Used to search through accounts at the multi level.
- Error Navigation Buttons: Used to search accounts with a specific error code.
- Predecessor/Successor Relationship Buttons: Used to view an account’s predecessor and/or successor UI Account/Run numbers (if applicable).
The navigation buttons operate as follows:
- Book Mark—Allows you to work with one account throughout the current screen session. To set a bookmark, navigate to the desired account and right-click on the bookmark button. To return to the bookmarked account, left-click on the bookmark button. Note: When you exit from "Screens", the bookmark is cleared from memory and must be reset the next time you open "Screens".
- Return—Returns to the last account you viewed. Allows you to flip back and forth between the last two accounts you displayed.
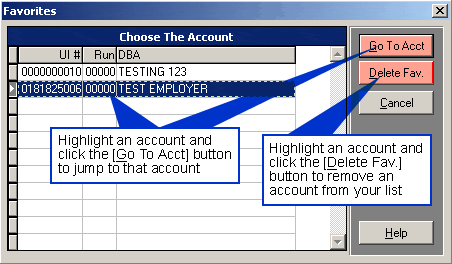
- Favorites—Allows you to build and permanently store a list of the accounts you use frequently. This list is available each time you open the "Screens" menu and is specific to each user. To store an account to favorites, navigate to the desired account and right-click the "Favorites" button. Left-click the favorites button to display the Favorites screen shown below. Highlight the desired account and select the [Go To Acct] button to activate and display the account in the browser. You may remove accounts from your favorites list by highlighting the account and clicking the [Delete Fav.] button.
- First [|<]—Brings you to the first record on your file (i.e., lowest UI and RUN)
- Prev [<]—Brings you to the previous record on your file (i.e., the UI and RUN just prior to the current one). If you right click on this button then the previous account with 00000 as the run number will appear.
- Next [>]—Brings you to the next record on your file (i.e., the UI and RUN just after the current one). If you right click on this button then the next account with 00000 as the run number will appear.
- Last [>|]—Brings you to the last record on your file (i.e., highest UI and RUN)
Note: If you are at the beginning or end of your file you will not be able to scroll further.
Search by Error Code
An additional feature of the Error Code scroll bar allows you to search accounts by a specific error code.
To Search by a Specific Error Code:
- Right double-click on the "Last Error" [>|] button. A data entry box will appear between the [>|] and the [Edit] button.
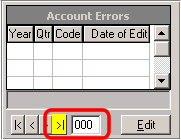
- Enter an error code in the box.
- Right click on the [>] "Next" button to scroll through only those accounts with the specified error. To remove the search, right double-click on "Last Error" and change the error number to all zeroes and press [Enter]
Predecessor/Successor Relationships
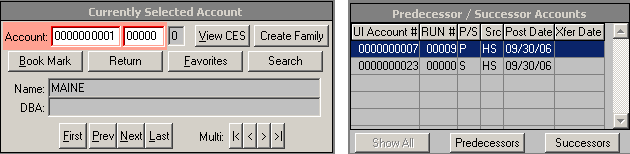
The Predecessor/Successor Accounts information area displays all predecessor and/or successor UI Account/RUN numbers for the active account. Predecessor accounts display a "P" in the P/S column and successor accounts display an "S". The information area also displays the account's source, post date, and transfer date. If an account has numerous predecessor and successor accounts, you can display only the desired type by clicking the [Predecessors] button or the [Successors] button. Display all the accounts again by clicking the [Show All] button. You can navigate/activate a predecessor or successor account by double-clicking on the account in the Predecessor/Successor Accounts area.
Example: In the figure below, the active account, highlighted in red, is 0000000001 RUN 00000. This account's predecessor is 0000000007 RUN 00009 and it's successor is 0000000023 RUN 00000. Double-clicking on either the predecessor or successor account will activate and display that account as the currently selected account.
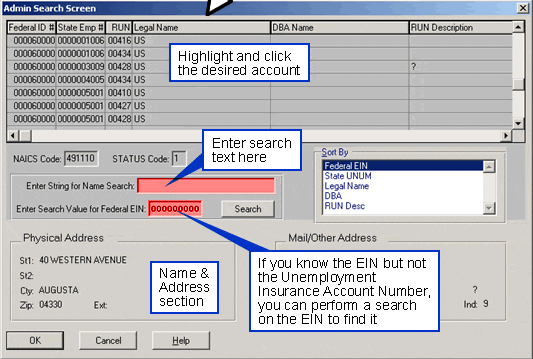
Admin Search Screen
The Admin Search Screen allows you to search for accounts by a word, phrase, or EIN.
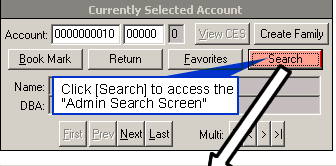
- Click the [Search] button on the "WIN-202 Screens" or place your cursor in the "Account unum " field and press the [F5] key to view the "Admin Search Screen" (see figure below).
- Type a word or phrase (e.g., an employer name) in the "Enter String for Name Search" field or double-click in the "Enter Search Value for Federal EIN" field and enter an EIN.
- Click the [Search] button. A list of accounts having the search string contained within their name or the specified EIN will appear on the screen.
- Scroll through the list until you find the account you want and click on it. Account information will appear in the Name & Address Section at the bottom of the screen.
- Click the [OK] button and the account will appear on the "WIN-202 Screens" as the active account. If you click the [Cancel] button, you will return to the "WIN202 Screens" and your account will be unchanged.
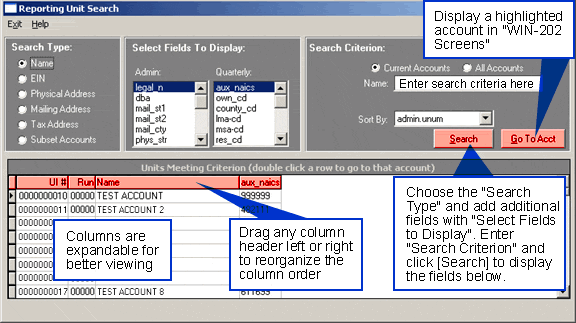
Reporting Unit Search
The Reporting Unit Search screen allows you to search accounts by name, EIN, address, or subset account. Unlike the Admin Search Screen, the Reporing Unit Search screen can be kept open throughout your Screens session. This allows you activate an account from the search screen, view it on WIN-202 Screens, and easily return to the search screen to activate another account from your list.
- Right-click the [Search] button on the "WIN-202 Screens" or place your cursor in the "Account unum " field and press the [F4] key to view the "Reporting Unit Search" screen.
- Select the "Search Type and choose additional Admin and/or Quarterly display fields from the "Select Fields To Display" section (Note: use [Ctrl]+click to add multiple fields). Enter the "Search Criterion" which will vary depending upon the Search Type chosen. Choose the "Sort By" field and click the [Search] button to display the results in the bottom of the screen.
- If desired, expand any columns to view more information or click on a column header name and drag the column left or right to reorganize the display.
- Double-click on an account or highlight an account and click the [Go To Acct] button to activate the account on WIN-202 Screens.