Home → Contents → Introduction → Data Entry Screens → Screens → Quarterly Processing → Lookup Tables → Administrative → Reports → Server Information → Appendices
Chapter 3: Screens
This chapter explains how to use the "Screens" within WIN-202. When you click the [Screens] button on the "Main Menu", the "WIN-202 Screens" window displays as illustrated bellow. The following functions can be performed on this screen:
- Data can be viewed on account information, coding, and quarterly data
- Data can be updated
- Multi accounts can be created or updated from a list of single and subunit accounts
- Edits & Estimates can be performed
UI Account Information and Navigation Area
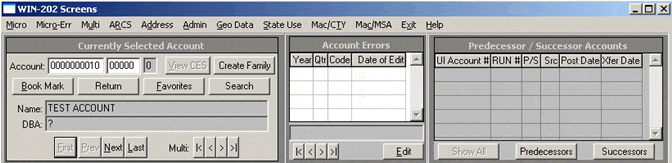
The Unemployment Insurance (UI) Account Information and Navigation Area, located at the top of the screen, is used to select an account for viewing and/or updating. The detailed data on the bottom half of the screen corresponds to the account shown in the UI account information and navigation area. The information and navigation area displays:
- UI Number
- Reporting Unit Number (RUN)
- Legal and Trade names (Doing Business As)
- View CES button
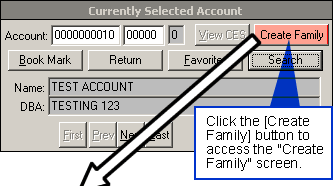
- Create Family button
- Predecessor and/or Successor Accounts (if applicable)
- Navigation buttons (Book Mark, Return, Favorites, UI Navigation Buttons, Error Navigation Buttons, and Predecessor/Successor Relationship Buttons)
- Search button
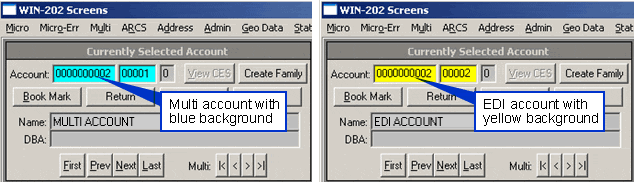
The UI account and run number of multi accounts display with a blue background. The UI account and run number of EDI accounts display with a yellow background.
Selecting a Specific Account
Account Number Search
To view a specific account using the account’s UI number and/or Run:
- Double-click the "ACCT" field to highlight it.
- Type a UI number and press the [Enter] key.
- Type a RUN number.
- Press [Enter]. If the account is not on the Admin table you receive an error message and the UI number will be reset to the closest account number.
Navigation Buttons
Use the Navigation buttons to scroll through or jump between accounts. The navigation buttons on the account information and navigation area are shown in the figure below.
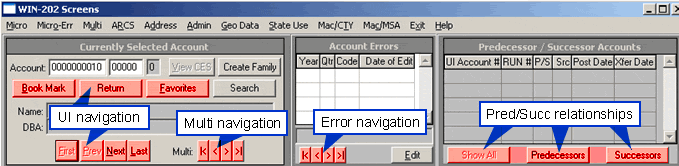
- UI Navigation Buttons: Used to search and jump through accounts at the micro level.
- Multi Navigation Buttons: Used to search through accounts at the multi level.
- Error Navigation Buttons: Used to search accounts with a specific error code.
- Predecessor/Successor Relationship Buttons: Used to view an account’s predecessor and/or successor UI Account/Run numbers (if applicable).
The navigation buttons operate as follows:
- Book Mark—Allows you to work with one account throughout the current screen session. To set a bookmark, navigate to the desired account and right-click on the bookmark button. To return to the bookmarked account, left-click on the bookmark button. Note: When you exit from "Screens", the bookmark is cleared from memory and must be reset the next time you open "Screens".
- Return—Returns to the last account you viewed. Allows you to flip back and forth between the last two accounts you displayed.
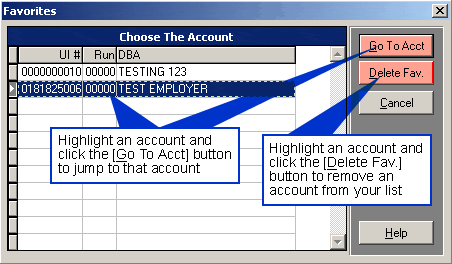
- Favorites—Allows you to build and permanently store a list of the accounts you use frequently. This list is available each time you open the "Screens" menu and is specific to each user. To store an account to favorites, navigate to the desired account and right-click the "Favorites" button. Left-click the favorites button to display the Favorites screen shown below. Highlight the desired account and select the [Go To Acct] button to activate and display the account in the browser. You may remove accounts from your favorites list by highlighting the account and clicking the [Delete Fav.] button.
- First [|<]—Brings you to the first record on your file (i.e., lowest UI and RUN)
- Prev [<]—Brings you to the previous record on your file (i.e., the UI and RUN just prior to the current one). If you right click on this button then the previous account with 00000 as the run number will appear.
- Next [>]—Brings you to the next record on your file (i.e., the UI and RUN just after the current one). If you right click on this button then the next account with 00000 as the run number will appear.
- Last [>|]—Brings you to the last record on your file (i.e., highest UI and RUN)
Note: If you are at the beginning or end of your file you will not be able to scroll further.
Search by Error Code
An additional feature of the Error Code scroll bar allows you to search accounts by a specific error code.
To Search by a Specific Error Code:
- Right double-click on the "Last Error" [>|] button. A data entry box will appear between the [>|] and the [Edit] button.
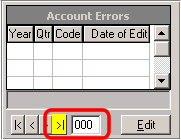
- Enter an error code in the box.
- Right click on the [>] "Next" button to scroll through only those accounts with the specified error. To remove the search, right double-click on "Last Error" and change the error number to all zeroes and press [Enter]
Predecessor/Successor Relationships
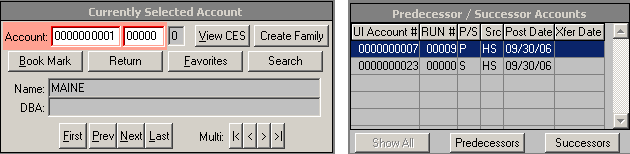
The Predecessor/Successor Accounts information area displays all predecessor and/or successor UI Account/RUN numbers for the active account. Predecessor accounts display a "P" in the P/S column and successor accounts display an "S". The information area also displays the account's source, post date, and transfer date. If an account has numerous predecessor and successor accounts, you can display only the desired type by clicking the [Predecessors] button or the [Successors] button. Display all the accounts again by clicking the [Show All] button. You can navigate/activate a predecessor or successor account by double-clicking on the account in the Predecessor/Successor Accounts area.
Example: In the figure below, the active account, highlighted in red, is 0000000001 RUN 00000. This account's predecessor is 0000000007 RUN 00009 and it's successor is 0000000023 RUN 00000. Double-clicking on either the predecessor or successor account will activate and display that account as the currently selected account.
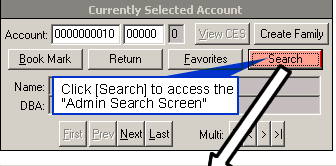
Admin Search Screen
The Admin Search Screen allows you to search for accounts by a word, phrase, or EIN.
- Click the [Search] button on the "WIN-202 Screens" or place your cursor in the "Account unum " field and press the [F5] key to view the "Admin Search Screen" (see figure below).
- Type a word or phrase (e.g., an employer name) in the "Enter String for Name Search" field or double-click in the "Enter Search Value for Federal EIN" field and enter an EIN.
- Click the [Search] button. A list of accounts having the search string contained within their name or the specified EIN will appear on the screen.
- Scroll through the list until you find the account you want and click on it. Account information will appear in the Name & Address Section at the bottom of the screen.
- Click the [OK] button and the account will appear on the "WIN-202 Screens" as the active account. If you click the [Cancel] button, you will return to the "WIN202 Screens" and your account will be unchanged.
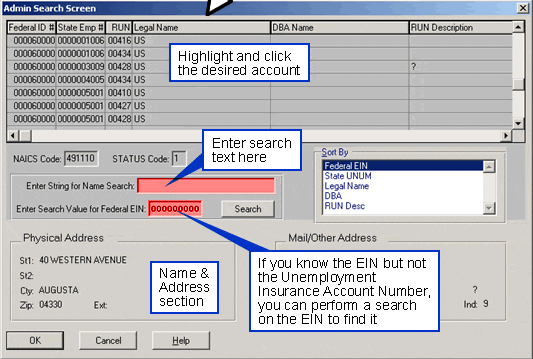
Reporting Unit Search
The Reporting Unit Search screen allows you to search accounts by name, EIN, address, or subset account. Unlike the Admin Search Screen, the Reporing Unit Search screen can be kept open throughout your Screens session. This allows you activate an account from the search screen, view it on WIN-202 Screens, and easily return to the search screen to activate another account from your list.
- Right-click the [Search] button on the "WIN-202 Screens" or place your cursor in the "Account unum " field and press the [F4] key to view the "Reporting Unit Search" screen.
- Select the "Search Type and choose additional Admin and/or Quarterly display fields from the "Select Fields To Display" section (Note: use [Ctrl]+click to add multiple fields). Enter the "Search Criterion" which will vary depending upon the Search Type chosen. Choose the "Sort By" field and click the [Search] button to display the results in the bottom of the screen.
- If desired, expand any columns to view more information or click on a column header name and drag the column left or right to reorganize the display.
- Double-click on an account or highlight an account and click the [Go To Acct] button to activate the account on WIN-202 Screens.
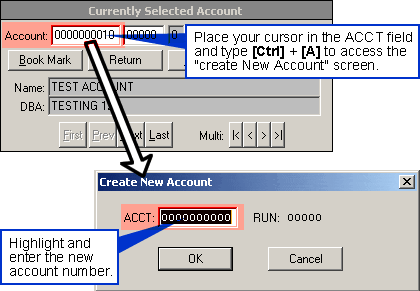
Create New Account
Users with update privileges can add a new account to the system from the "WIN-202 Screens". However, worksites are not added from this screen. Worksites are added from the Multi Tab located on the "WIN-202 Screens" (see the Multi Screen Tab, Mass Create/Change Screen in this chapter for more information).
To add a Single or Master Account
- Click on the UI Account Number (ACCT) field and press the [Ctrl] key and the [A] key at the same time. This will bring up the "Create New Account" dialog box as shown below.
- Enter the new UI Account Number and click on the [OK] button. If you try to add an account that already exists in the database, a warning will appear on the screen stating, "That Account already exists. Create cancelled." You must then click on the [OK] button to go back to the "Create New Account" screen.
If you click on the Codes radio button on the Micro tab, you can see new accounts that have been set up. They contain default codes (e.g., county = 999, NAICS = 999999, and MEEI = 1). Double-click on the highlighted item, and you may update codes.
Note: When an account is created, the account’s setup date is assigned the value of the current day’s date and a transaction record is added to the status log with the User ID, the current date as the posted date, and "CREATE" as the table name. See Section 6, Administrative, Transactions Tab for more information.
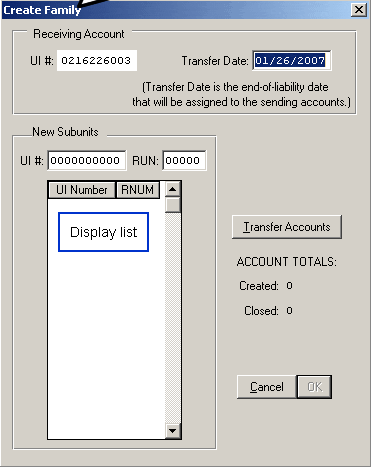
Create/Update a Family
Users with edit privileges can create or update multi accounts from a list of single and subunit accounts using the "Create Family" button as shown below. The transfer of employment, total wages, taxable wages, and contributions data is based on the "Transfer Start Date" and is moved as follows:
- If the transfer date falls in month 1 of the quarter, all 3 months of employment, wages, and contributions are transferred.
- If the transfer date falls in month 2 of the quarter, months 2 and 3 of employment are transferred along with two thirds of wages and contributions.
- If the transfer date falls in month 3 of the quarter, month 3 employment is transferred along with one third of wages and contributions.
To create a new multi account
- On WIN-202 Screens, navigate to the account that is the existing master or is to become the new master account.
- Select the [Create Family] button in the top left quadrant of the main window. This will activate the Create Family Screen. Note: Please use the [Tab] key to move in this screen as using [ENTER] will not work.
- The "Receiving Account" UI number will auto-fill on the screen.
- Using the "MM/DD/YYY" format, enter the "Transfer Start Date" with the date on which you want the transfer of the records to begin. This date determines the year/quarter at which to begin transferring information, as well as the months of employment and wages that will be moved.
- Fill in the UI/RUN of each account that will become a subunit of the receiving account. As you enter each account, tab from the UI# field to the RUN field and back to the UI# field to add the account number to the display list. The cursor will not move into the list, but will continually loop back to the UI number field until you complete this step. Note: The process will issue a message when certain conditions are encountered (e.g. when an account is inactive, not on file, etc.). Please respond to the message and processing will continue based on your response.
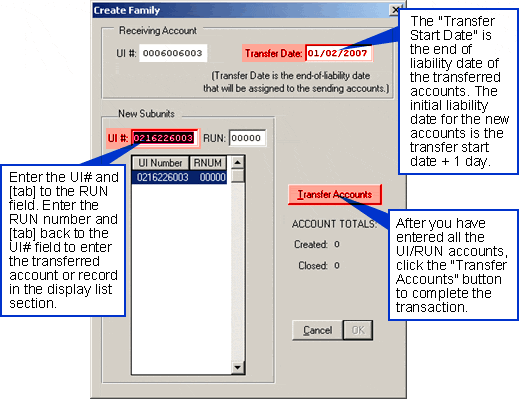
- When you are finished adding accounts, select the [Transfer Accounts] button. You will receive the following message:
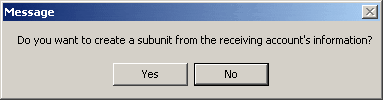
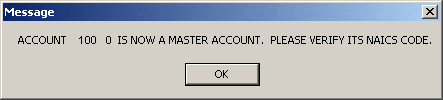
Selecting "Yes" creates a subunit of the "Receiving Account". Selecting "No" will not create a subunit of the receiving account. Once you have made your selection, you will be prompted to verify the NAICS code of the new master account (see below figure). Click "OK" to continue.
- Totals for the number of accounts created and the number of accounts closed will be displayed at the end of the process. The predecessor and successor information will be updated for each affected account. Note: The initial liability date for the new accounts is the "Transfer Start Date" + 1 day.
- Select the [OK] button to close the "Create Family" screen or select the [CANCEL] button to exit the screen without transferring the accounts.
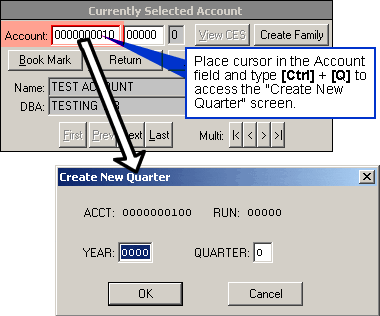
Create New Quarter
Users with update privileges can create a new quarter for an account.
To Create a New Quarter
- Click on the UI Account Number (ACCT) field and press the [Ctrl] key and the [Q] key at the same time. This brings up the "Create New Quarter" dialog box as follows:
- Input the year in the year field.
- Input the quarter in the quarter field.
- Click [OK] and the new quarter will be added. You may need to refresh the screen by clicking the next and previous buttons in order to see the new quarter. The new quarter employment and wage data will default to zero. The codes will be assigned the codes of the previous quarter (i.e. county, town, NAICS, etc.).
Closing an Account
Users with delete privileges can close an account for ALL quarters on the system from the "WIN-202 Screens". When an account is closed the Reactivation Date is blanked out, and the Ending Liability Date is assigned the value of the Beginning Liability Date. The Reactivation Date, Ending Liability Date, and Beginning Liability Date are displayed on the Admin tab of the "WIN-202 Screens". A closed account will be retained until the last six quarters and the current quarter each have a status code of "2". After this time has elapsed the record will roll off the system at the next quarter roll.
To Close an Account:
- Bring up the account by entering the UI Account Number and RUN numbers in the UI Account Information Area.
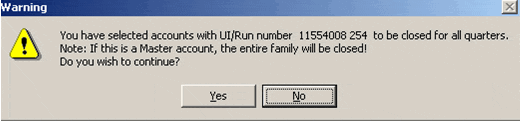
- Click on the UI Account Number and press the [Ctrl] key and the [D] key at the same time. The following warning appears:
- Click the [Yes] button to close the account from the database. Click [No] if you do not wish to close the account. Note: Only users with update privileges may delete accounts.
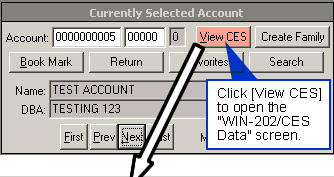
View CES
The CES Screen is accessed by clicking the "View CES" button (see figure below). The CES screen can only be viewed when the "View CES" button is highlighted. A grayed out button indicates CES data is not available for the account. The CES screen helps analysts make comparisons between CES (survey) estimates and ES-202 counts. From the CES screen a user can update employment on the WIN202 Data browser side.
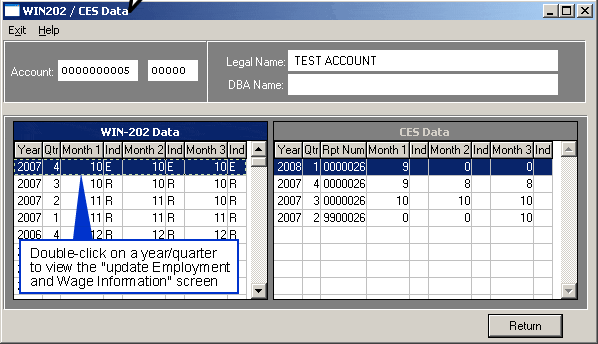
To Update Employment via the CES Screen:
- Click the [View CES] button to view the "WIN202 / CES Data" screen.
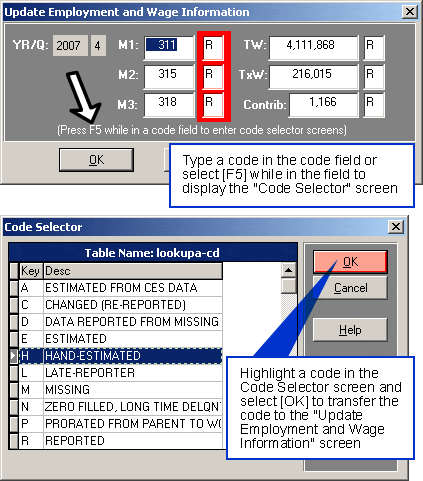
- Double click a Year/Quarter to access the "Update Employment and Wage Information" screen. Note: Total Wages (TW), Taxable Wages (TxW) and Contributions (Contrib) display but cannot be modified. Also, the employment indicator(s) are set to "A" on the fields you modify. To reset the indicator to missing, type a "?" in the employment field.
- Click the [Return] button when finished.
Note: If the quarter has been locked, you must have EQUI (produce deliverable/truncate log file) and update permissions to update.
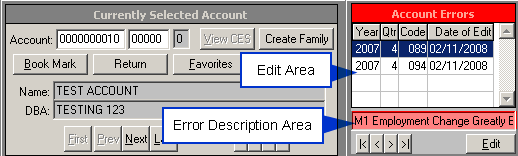
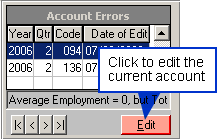
Edit Area
If an account has errors, they will be displayed by year, quarter, code, and edit date under Account Errors. A written description of the error(s) can be viewed in the Error Description Area by clicking on the error code in the Edit Area. See Appendix F - Edit Conditions and Formulas from the QCEW Operating Manual for detailed information.
Online Editing
By editing an account you can identify any errors within the account.
To Edit an Account:
- Click on the [Edit] button to edit the current account (i.e., the one displayed in the UI Account Information & Navigation Area). Note: See the Micro Error Tab for information on viewing, sorting, and filtering errors online.
- Make the necessary corrections to resolve the indicated error(s).
- Click the [Edit] button to see if your changes eliminated the error(s).
Note: You may do a batch edit of all accounts by clicking on the [Quarterly Proc] button on the "Main Menu" screen and then clicking on the Edit tab. See Chapter 4, Quarterly Processing, Edit Data Tab, for more information.
Tab Details
The ten tabs on the "WIN-202 Screens", illustrated below, contain tabs, radio button sets or sub-tabs. Information displayed, in each tab, is for the account shown in the UI Account Information and Navigation Area.
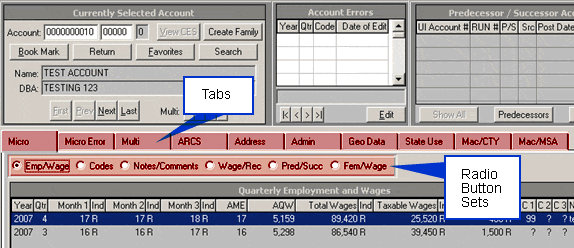
The following is a brief description of each tab:
- Micro—Contains employment, wage and code information, comments and notes for a specific account for previous and current quarters.
- Micro Error—Provides the ability to view, sort, and filter errors online.
- Multi—Contains information about multi establishments including county, ownership, NAICS, wages and employment, and SIC. It shows the difference between reported establishment data and master account information. Additionally, you can create or change an account, transfer an account and its establishments to another account due to a change of ownership, or print multiple worksite reports by choosing from various options.
- ARCS——To enter, view, or update information reported in the Annual Refiling Control Survey.
- Address—To view unemployment insurance addresses and to enter physical addresses, mailing addresses, contact names and telephone numbers. It works like the "Address Data Entry" screen.
- Admin—To view and update fields such as RUN description, predecessor and successor numbers, liability dates and fax number. To view the federal EIN, organization type and setup date. To determine whether a Multiple Worksite Report is supposed to be printed, if it has been received, and whether the data source is the EDI Center.
- Geo Data—To view the geographical information related to the account (i.e. longitude, latitude).
- State Use—Contains two additional alphanumeric, two additional numeric and two additional date fields of your choice for use in your state.
- Mac/CTY—Contains aggregated data for combinations of county, ownership and NAICS code for previous and current quarters. It also contains comments.
- Mac/MSA—Contains aggregated data by MSA, by Ownership, and by NAICS codes.
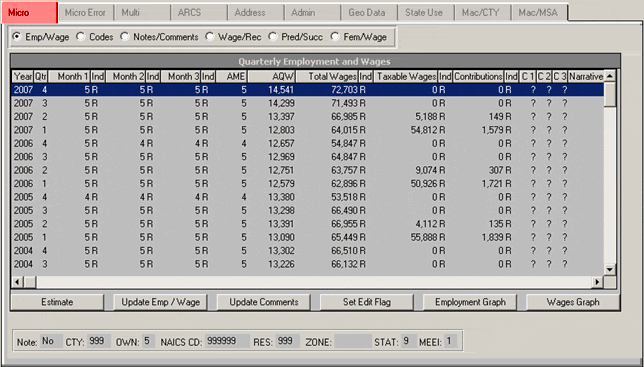
Micro Tab
The Micro tab, illustrated below, shows data for individual employers. The Micro tab has the following six radio buttons:
- Employment/Wage
- Codes
- Comments
- Notes
- Wage/Record
- WR Pred/Succ (Wage Record Predecessor/Successor)
- Fem/Wage (Female Wage)
The Micro Screens can be used to:
- View an account’s wage and employment data, female wage and employment data, wage record data, predecessor and successor relationships, codes, notes and comments
- Update and/or add an account’s wage and employment data, female wage and employment data, codes, notes and comments and establish predecessor/successor relationships
- Estimate an account’s employment and wage data
- Set an edit flag
- View employment and wage graphs
Employment and Wage Data (Emp/Wage) Radio Button
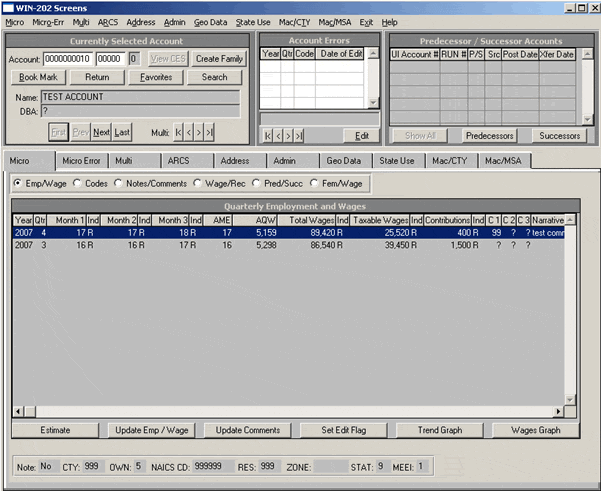
The Emp/Wage radio button displays employment, wages, taxable wages, contributions, comment code indicators, and employment and wage indicators for an account.
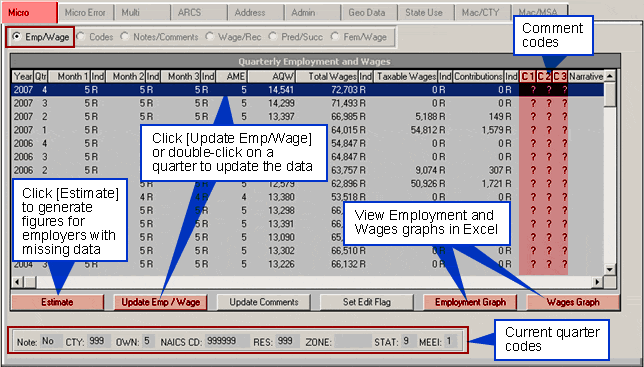
There can be up to three comment codes per account/quarter. The first comment code for an account is shown in the "C1" column. If more than one comment code exists the "C" field contains an asterisk. Employment and Wage indicators appear next to their respective fields. These indicators indicate how the data was collected (e.g. E=Estimated Date). A list of the meanings of the indicators can be found under "Emp/Wage Ind." under the "Misc" tab of the Lookup Tables. See Chapter 5, Lookup Tables, Miscellaneous Lookup Tab for further information.
The [Estimate] button generates figures for employers with missing data (indicator M=Missing). The [Update Comments] button allows you to add/modify comments without switching to the Notes/Comments screen. The [Set Edit Flag] button changes the edit status flag of quarterly records with a comment code only. See the Set Edit Flag section of the chapter for more detailed information. The [Employment Graph] and [Wages Graph] buttons are used to display the corresponding trend graph for all available data for the "Currently Selected Account".
If available, current quarter codes and a note indicator display at the bottom of the screen. When a note exists on any quarter for the account this indicator is set to "yes". On some accounts, future quarters may appear.
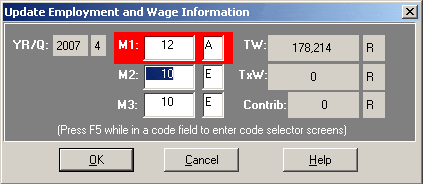
Changing Employment, Total Wages, Taxable Wages and Contributions
To Change Employment, Total Wages, Taxable Wages, and/or Contributions:
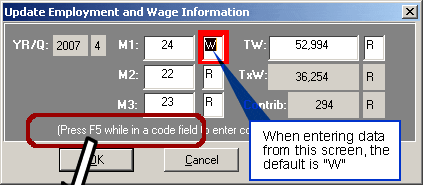
- Double-click the year and quarter you want to make changes to within the Emp/Wage browser. The "Update Employment and Wage Information screen displays.
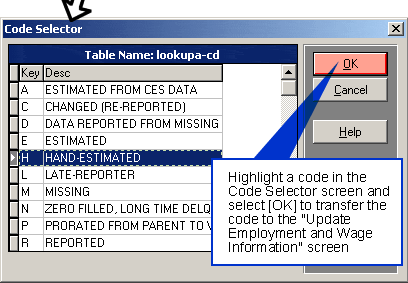
- Input changes to the monthly employment, total wages, taxable wages and/or contributions. Press [Tab] to navigate between fields. If the quarter has been locked, you must have EQUI (produce deliverable/truncate log file) and update permissions to update. If the quarter is closed and not locked you only need update permissions. Additionally, if the "Type of Coverage" code for the account is 1 (Employer Reimbursed) or 9 (UCFE Covered), you will not be able to enter any taxable wages or contributions. Note: Type [F5] while in the code field to display the "Code Selector" screen. This screen can be used as a reference lookup or to select and transfer an employment/wage indicator code to the "Update Employment and Wage Information" screen.
- Click [OK]. If you do not wish to save changes, click [Cancel].

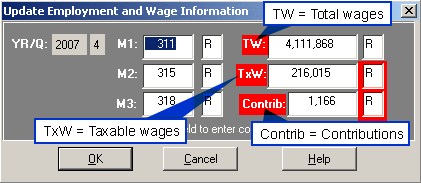
Note: If you press [Tab] from a field with missing (?) employment or wages the field is changed to 0 and the indicator remains "M". To make the field/indicator combination display 0/"C", simply enter 0 and press [Tab]. To reset the field/indicator combination back to 0/"M" place the cursor in the appropriate field, enter a "?" and press [Tab]. Click the [OK] button for the changes to take affect. If you click the [Cancel] button, any changes you made will be lost. M1, M2 and M3 are the three monthly employment figures, TW is total wages, TxW is taxable wages, and Contrib is contributions.
Codes Radio Button
The Codes tab displays quarterly code information. Use the vertical scroll bar to view more quarters and/or the horizontal scroll bar to view more codes.
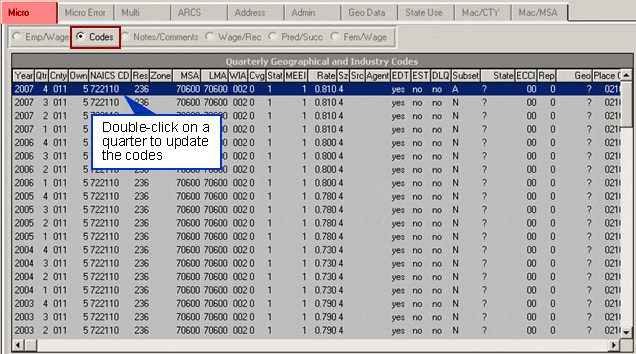
The following codes are listed on the codes tab. A more detailed description of each indicator code can be found on the Look-Up Tables. See Chapter 5 Lookup Tables for more information.
- Agent Code—A 4 digit alphanumeric field used to identify companies, such as payroll providing firms and tax filing firms, who file UI reports or MWR reports for other establishments.
- Auxiliary Code—Indicates the type of service the unit provides for other establishments of the same enterprise. If the unit does not provide an auxiliary service for another part of the company, a "5" (designating operating establishment) is coded in this field.
- Class Code (formerly City ID)—Identifier that explains the Place code field. If no place code is assigned, then no class code will be assigned either.
- Census ID—Census block based on the physical location address. BLS uses the automatic assignment of Census block found in the GeoStan software.
- Census Track—BLS-supplied from GeoStan software. Census tract based on the combination of latitude and longitude information mapped to Census-supplied boundary tables. A small, relatively permanent statistical subdivision of a county delineated by a local committee of census data users for the purpose of presenting data. Typically corresponds to the physical location of an establishment and is only included for units with physical location addresses.
- County—FIPs county code based on the unit’s location or place of business.
- Coverage—Each employer covered under the State’s Unemployment Insurance or Unemployment Compensation for Federal Employees is assigned a type of coverage using a State-specific coding scheme. These codes identify whether the employer is determined to be experience rated, covered under a standard contributions rate, or is an employer who is not required to pay contributions but must reimburse taxes when a claim is filed against the account. Three States have a provision for the possible use of employee contributions. Several States also collect data from non-UI/UCFE covered employers.
- ECCI (Economic Code Change Indicator)—Code assigned to a micro level data record to indicate an economic change in NAICS, county or township area, or Ownership codes.
- Geo (Geocode Source)—Indicates where the latitude and longitude were originally assigned. Potential sources include: State 202 unit, BLS-Washington, or outside vendors. A default of blank is used when no latitude and longitude are assigned.
- MEEI (Multi Employment Establishment Indicator)—This indicates if the account is a single, master or subunit.
- NAICS (North American Industry Classification System)—codes are uniform industrial codes used by the United States, Canada, and Mexico to identify the primary activity of an establishment. The NAICS code uses the NAICS Manual definitions for the handling of auxiliary establishments, in which each establishment is classified based on its own activities.
- Ownership—A one-position field showing the legal proprietorship of the enterprise and describing the economic ownership of the enterprise (e.g. private, state, federal, or locally owned entity).
- Place Code (formerly City Code)—Five digit code assigned on Census supplied boundary tables and latitude and longitude. Note: Not all records that are assigned latitude and longitude values will also be assigned place codes. Place codes will only be assigned for selected class codes, as defined in the NIST web site at http://www.itl.nist.gov/.
- Rate—Tax rate used during the reference quarter to tax contributory employer's taxable wages to meet the employer's obligation to the UI fund. Tax rates should be assigned, typically by the UI tax unit, to all active, tax-rated or experience-rated accounts.
- Reporting Change Indicator—Indicator to show whether an apparent change in reporting from multi-establishment employer to single establishment employer, or from single to multi, is a reporting change and not an actual economic event such as a birth, death, acquisition, or sale of a worksite. The field is an optional use field, manually assigned in the State, in the quarter when the change occurs.
- SIC (Standard Industrial Classifications)—Identifier of the primary economic activity of the reporting unit. The primary activity is the primary product or group of products produced or distributed (or services rendered) by the establishment (reporting unit). The primary activity of the enterprise is the primary activity of the establishments within a State.
- Source Code—A 1 digit alphanumeric field used to identify multi-unit UI accounts whose MWR data are provided by the EDI Center; are not provided directly to the State by employers (or their agents). Valid values include: E,C,Q,S,X and blank (default value all other sources). If the current quarter source code is "S" or "Q" the new quarter is assigned a blank. If the current quarter source code is "E" the new quarter is assigned an "E". If the current quarter source code is "C" the new quarter is assigned an "E".
- Specifying a Residence Code (New England states) automatically fills in associated County, MSA (Metropolitan Statistical Area), LMA (Labor Market Area) and WIA (Workforce Investment Act/Area) Codes. Specifying a county code (other states) automatically fills in associated MSA, LMA and WIA codes. To change a code double-click one and type a new one or use the drop down list to select one. Press [Enter] to fill in its' associated description or choose from a list on the drop down box.
- Status—Indicates whether or not the record is active for ES-202 purposes. This does not refer to the UI status of the record. If a record is active for any part of the quarter, it is active for the entire quarter.
- Subset EQUI—Indicator used to mark an account to be included for the Subset EQUI. Accounts can be set via the new Subset Data Entry Screen or through the Codes Update Screen.
- Zone—has been added to the screen to accommodate those states who use zones which are coded alphanumerically. This field is distinguished from the numeric residence code other states use. Also, the residence code continues to be included on the EQUI however, the "zone" code will not.
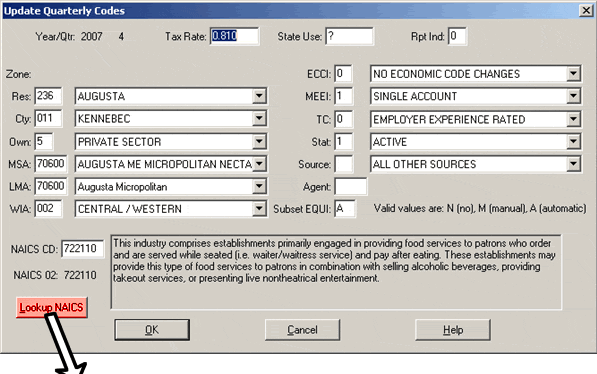
Changing Information on the Codes Screen
The following fields can be updated via the codes screen: Tax Rate, Geo Code, Report Indicator, Zone, Residency (res/town), County, Ownership, Auxiliary, Economic Code Change Indicator (ECCI), Multi Employment Establishment Indicator (MEEI), Subset EQUI Indicator, Experience Rating (TC), Status, Source Code, Agent Code, NAICS, and SIC codes
To Update Codes:
- Double-click on a year and quarter you wish to change in the browser. The "Update Quarterly Codes" screen will appear.
- Update the desired information. Note: If the quarter has been locked, you must have EQUI (produce deliverable/truncate log file) and update permissions to update. If the quarter is closed and not locked you only need update permissions.
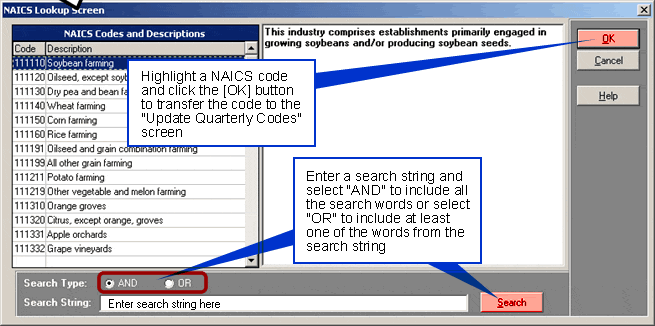
- Use the [Lookup NAICS] button to display the "NAICS Lookup Screen" to search for codes.
- Click [OK] to save changes. If you do not wish to save changes, click [Cancel].
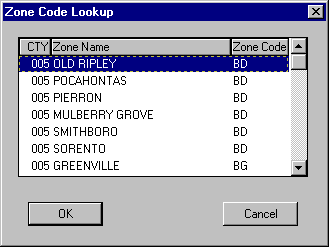
Zone Lookup
Also available to the user on the "Update Quarterly Codes" screen is the zone code lookup. Note: This function can be used provided the use of zone codes are enabled from the Administrative Functions/State Info tab.
To Lookup Zone Codes:
- Place your cursor in the zone field by clicking on it or tabbing to it and press the [Enter] key. The Zone code Lookup screen displays only zone codes for the selected county code.
- Highlight a zone.
- Click on [OK] to fill the zone field.
Notes/Comments Radio Button
The Notes/Comments Radio Button displays notes for each quarter. Notes are not transmitted to BLS on the quarterly deliverable. The screen also displays up to three comments and one narrative per quarter. Notes, comment codes and narratives may be added using this screen. Like the Emp/Wage screen, current quarter codes are displayed at the bottom of the screen.
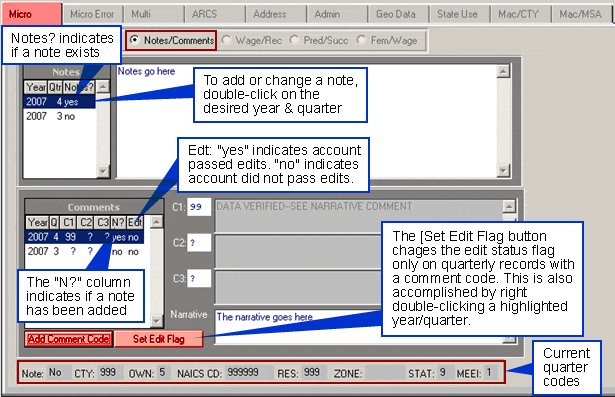
Set Edit Flag
All new quarters (after a quarter roll) have the edit flag defaulted to "No" because records have not been edited yet. Any time data is changed for an account during a quarter, the edit flag for that quarter and all subsequent quarters is reset to "No". Edit flags will be set to "Yes" after performing a full Integrated Edit only. A partial edit will not reset flags.
It is possible to bypass accounts that have been investigated but still fail edits. Do this by entering a comment code then double right-click on the quarter you wish to bypass. The system will run edits for the selected quarter and will set the edit flag to "Yes" if it has no error codes greater than 75. You can't bypass crucial errors (i.e., those with error codes of 75 or less).
Adding Notes
To Add a Note:
- Double-click on a year/quarter in the "Notes" section to access the "Update Quarterly Notes" screen.
- Type your note.
- Click [OK]. If you click [Cancel] all changes are lost.
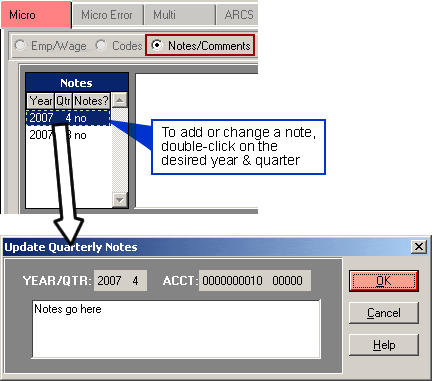
The "Update Quarterly Notes" screen can also be accessed by pressing [Enter] on a selected entry. To modify a note, double-click the quarter you wish to change, edit existing text and click [OK].
Note: You need update permissions to add/update notes. With update permissions, notes can be added to active or inactive records and can be added to locked or unlocked quarters.
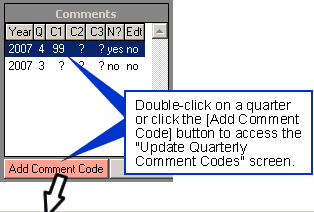
Adding Comments
To Add Comment Codes:
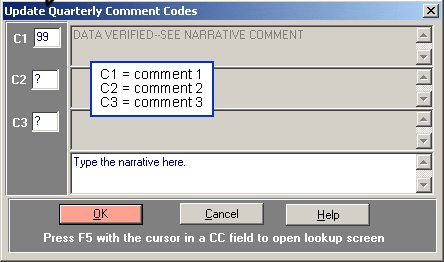
- Either double-click on a year/quarter in the "Comments" section or click the [Add Comment Code] button to display the "Update Quarterly Comments Codes" screen.
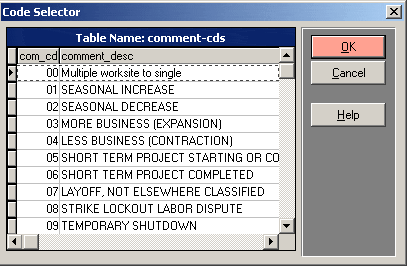
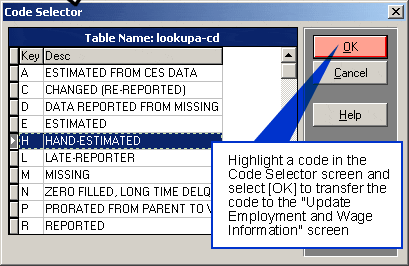
- Input a comment code and press [Tab] to display the comment in the screen or press the [F5] button to display the "Code Selector" lookup screen shown below. Highlight a code and click the [OK] button to transfer the code to the "Update Quarterly Comment Codes" screen. The Code Selector screen closes automatically. If you click [Cancel] the screen closes and no code is transfered.
- Enter more comments as needed in the "Update Quarterly Comment Codes" screen.
- Input a narrative if desired by clicking in the large box below the three comment code fields.
- Click [OK] to exit the screen. If you click [Cancel] all changes are lost.
Note: You need update permissions to add/update comments. With update permissions comments can be added to active or inactive records and can be added to locked or unlocked quarters.
Wage Record Radio Button
The "Wage/Rec" radio button displays wage/record data. This data includes the unique social security number (SSN) count and the total wages reported on the wage record. The screen allows you to compare the unique-ssn count and the total wages reported on the wage record to the data on the "Micro Employment/Wage" screen. This screen also displays a breakdown of the unique-ssn count by continuous, entrants, hires, exits, and separations. The micro employment data can be updated from this screen, but the wage/record data cannot be updated.
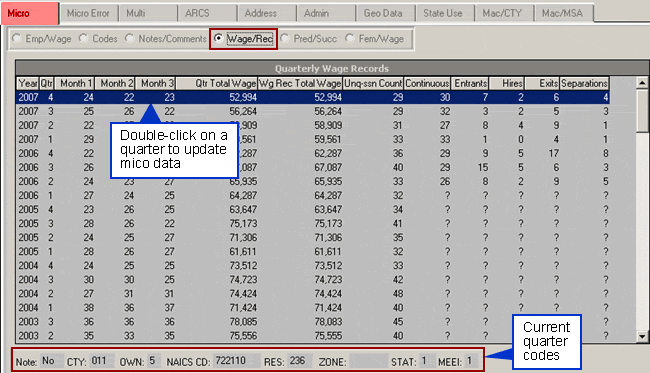
To Change Employment or Total Wages via the Wage/Record Screen:
- Double-click the year and quarter you want to make changes to within the Wage/Rec browser. The "Update Employment and Wage Information" screen displays.
- Input changes to the monthly employment and/or total wages fields. Press [Tab] to navigate between fields. If the quarter has been locked, you must have EQUI (produce deliverable/truncate log file) and update permissions to update. If the quarter is closed you only need update permissions. Additionally, if the "Type of Coverage" code for the account is 1 (Employer Reimbursed) or 9 (UCFE Covered), you will not be able to enter any taxable wages or contributions.
- Click [OK]. If you do not wish to save changes, click [Cancel].
Predecessor/Successor Relationship Radio Button
The "Pred/Succ" radio button displays ‘possible’ predecessor/successor relationships by identifying shared social security numbers between UI accounts. In the figure below, POSSIBLE pred/succ relationships are displayed on the left-side of the browser (area A, outlined in yellow). The related SSN's are listed by year, quarter, pred/succ type, score (not currently available), and the number of shared SSN's. On the right-side of the browser, ACTUAL pred/succ relationships (area B, outlined in green) are listed by related UI account number, related run number, pred/succ type, transfer date, source, posted date, and narrative.
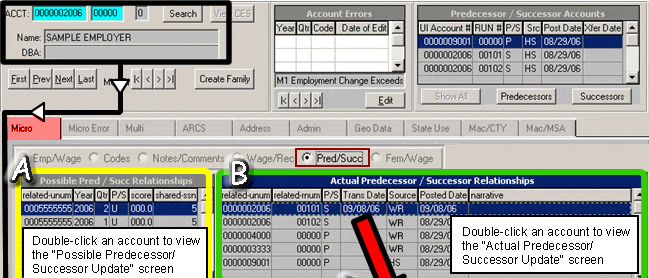
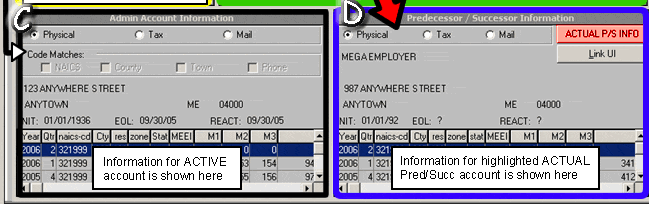
In the illustration above, detailed information for the ACTIVE Admin Account is listed at the bottom left-side of the browser (area C, outlined in black). The Physical, Tax, and Mail radio buttons allow you the view the information for the account easily. The Code Matches area is for reference only. Code Matches by NAICS, County, Town, and Phone will be checked when matches occur between the ACTIVE Admin Account and the highlighted actual or possible P/S, otherwise the boxes will be grayed out.
Detailed information for the highlighted ACTUAL pred/succ account is listed on the bottom right-side of the browser (area D, outlined in blue). The [ACTUAL P/S INFO] button displays in the Predecessor/Successor Information area. Physical, Tax, and Mail radio buttons allow you quickly view information. You may also view detailed account information of POSSIBLE pred/succ accounts by clicking/highlighting an account in the Possible Pred/Succ Relationships area. The [POSSIBLE P/S INFO] button displays in the Predecessor/Successor Information area to clarify between the possible and actual account information. Click the [Link UI] button or double-click a Year/Qtr account to activate/jump to that account.
Possible and Actual account fields may be updated. In the Possible Pred/Succ Relationships area (area A, outlined in yellow in the above figure), double-click on a related UI account for a specified Year/Qtr to view the "Possible Predecessor/Successor Update" screen as shown below. This screen allows you to create/verify a predecessor or successor relationship.
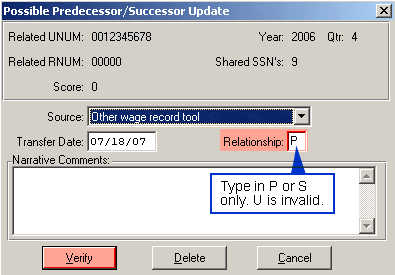
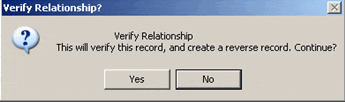
Choose a Source from the drop-down menu (a complete list is provided below), enter the Transfer Date, Relationship (P or S only, U is invalid), and any Narrative Comments. Click the [Verify] button to create the relationship. The message below appears. Select [Yes] to continue or [No] to cancel.
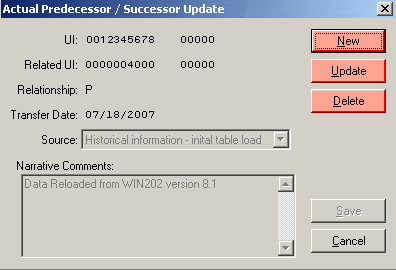
Double-click on a related-unum in the Actual Pred/Succ Relationships area (area B, outlined in green in the above figure) to view the "Actual Predecessor/Successor Update" screen shown below. Click the [New] button to enter a new relationship or the [Update] button to make changes to the selected account. Use the [Save] button to carry out your changes or click [Cancel] to return to the Pred/Succ screen. The [Delete] button removes a pred/succ relationship. When deleting a relationship, a message box appears confirming the deletion process along with a note stating "This record will be a D record on your next EQUI".
Note: Although having shared social security numbers could indicate a predecessor/successor relationship, a predecessor/successor relationship may not exist. A possible scenario is that a retail store closes and sells the building to a competitor. Many of the job applicants at the new store could be the same people that were laid off at the previous company. With the experience of these workers they could easily be hired. A second example is a staffing agency that hires employees that work at another company.
Predecessor/Successor Data Source Codes
| Source Code | Definition |
|---|---|
| (Blank) | Unknown |
| X | UI extract load |
| U | UI, not loaded through extract |
| R | Information from the employer |
| D | Wage record SUTA dumping detection system |
| E | EDI data load |
| W | Other wage record tool |
| L | State record linkage/scoring |
| A | ARS |
| M | MWR |
| S | Other federal/state programs |
| B | BLS weighted match system |
| N | News Media |
| H | Historical information - initialization of P/S table/files |
| O | Other/Unidentified source |
Female Employment and Wage (Fem/Wage) Radio Button
The Fem/Wage radio button displays at least seven quarters of female employment, wages, taxable wages and contributions for an account. If your state does not track this data, a state information table message is generated. To view earlier quarters, simply use your vertical scroll bar. For some accounts, future quarters may show up on the screen. Employment and Wage indicators appear next to their respective fields. If available, current quarter codes and a note indicator display at the bottom of the screen. When a note exists on any quarter for the account this indicator is set to "yes".

Changing Female Employment and Employment Indicators
To Change Female Employment and Employment Indicators:
- Double-click on the year and quarter that you want to make changes to in the browser within the Fem/Wage sub-tab. If the quarter has been locked, you must have EQUI (produce deliverable/truncate log file) and update permissions to update. If the quarter is closed and not locked you only need update permissions.
- Double-click on the field(s) you want to change (e.g., F3 is month 3 female employment) and enter data.
- Click [OK]. If you do not wish to save changes, click [Cancel].

Note: If you press [Tab] from a field with missing (?) employment or wages the field is changed to 0 and the indicator remains "M". To make the field/indicator combination display 0/"C", simply enter 0 and press [Tab]. To reset the field/indicator combination back to 0/"M" place the cursor in the appropriate field, enter a "?" and press [Tab]. Click the [OK] button for the changes to take affect. If you click the [Cancel] button, any changes you made will be lost.
Micro Error Tab
The Micro Error tab provides the ability to view, sort, and filter errors online. The screen is intended to streamline the process of cleaning micro data. Note: The sort order of the main window’s error browser is year/quarter within each error code. Errors of the same number display together and the year/quarter to which each relates is a sub-level.
The Micro Error Screen can be used to:
- Select the Error type
- Select the Ownership type
- Select the Source code
- Select the Multiple Establishment Employer Indicator (MEEI)
- Select the NAICS Sector
- Sort errors by County, LMA, or MSA
- Export the current contents of the browser to an Excel Spreadsheet
Note: The [Accept] button must be clicked to re-build the list once you have selected the types of errors you would like to view.
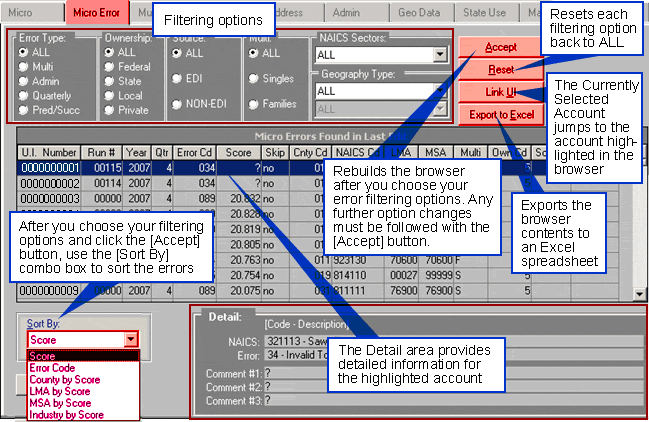
Note: You must have Excel on your workstation to use the [Export to Excel] function. Closing the Excel spreadsheet prior to exporting all of the records to that spreadsheet will result in an error, but no data loss.
Filtering Options
Error Type
This radio set is used to select the error type.
- All—Does not filter records based on error type, all errors will be displayed.
- Multi—Displays only error codes from the Multi Edit
- Admin—Displays only error codes from the Admin Edit
- Quarterly—Displays only error codes from the Quarterly Edit
- Pred/Succ—Displays only error codes from the Predecessor/Successor Edit
Ownership
This radio set is used to select the ownership type.
- All—Does not filter records based on ownership, all ownerships will be displayed.
- Federal—Displays only error codes for accounts with an ownership code = 1. Federal Government
- State—Displays only error codes for accounts with an ownership code = 2. State Government
- Local—Displays only error codes for accounts with an ownership code = 3. Local Government
- Private—Displays only error codes for accounts with an ownership code = 5. Private Ownership
Source
This radio set is used to select the source code.
- All—Does not filter records based on the Source code.
- EDI—Displays only error codes for accounts where the Source code is "E" or "C". Only EDI errors will be shown.
- NON-EDI—Displays only error codes for accounts where the Source code is an "S", "Q", "R", "W" or "X". Only NON-EDI errors will be shown.
Multi
This radio set is used to select the Multiple Establishment Employer Indicator (MEEI).
- All—Does not filter records based on the MEEI code.
- Singles—Displays only error codes for accounts where the MEEI code is 1, 4 or 6.
- Families—Displays only error codes for accounts where the MEEI code is 2, 3 or 5.
NAICS Sectors
This combo-box is used to select the NAICS Sector. Due to the changing nature of NAICS codes, the list of Sectors is dynamically built based on the NAICS-Sector table in the WIN-202 database. When you select a Sector, the only error codes displayed in the browser will be for accounts that have that NAICS Sector. Select "ALL" to see all errors regardless of NAICS Code.
Geography Type
These two combo-boxes are similar to the NAICS Sectors combo-box in that they are dynamically driven and State independent. When you select LMA in the first combo-box, the second combo box will become enabled and populated with the LMA’s your state has entered into the WIN-202 system. You may sort errors based on County, LMA, or MSA. If "ALL" is selected, the errors will not be filtered based on the geography type.
Sort By Drop Down List
Once you have chosen your filtering options and have pressed the [Accept] button (after the result list has been rebuilt), you may sort the errors using this combo-box. The options are:
- Score
- Error Code
- County by Score
- LMA by Score
- MSA by Score
- Industry by Score
Using the Micro Error Screen
Here are the suggested steps to use the Micro Error screen.
- Select Filtering options (Error Type, Ownership, Source, Multi, NAICS Sectors, and Geography Type) that are appropriate to your work.
- Click the [Accept] button to build the result list.
- After the result list is built, choose an appropriate "Sort by" option (Score, Error Code, County by Score, LMA by Score, MSA by Score, or Industry by Score).
- Select the first error in the "Micro Error" browser and right-click or choose the [Link UI] button to display the ACCT in the "Account Information and Navigation Area" at the top of the screen.
- Select the "Micro" tab and correct any data on the account that is causing the error. This may include changing codes or estimating data, etc.
- Click the [Edit] button to re-edit the account.
- Choose the "Micro Error" tab again to return to your error list and work on the next error.
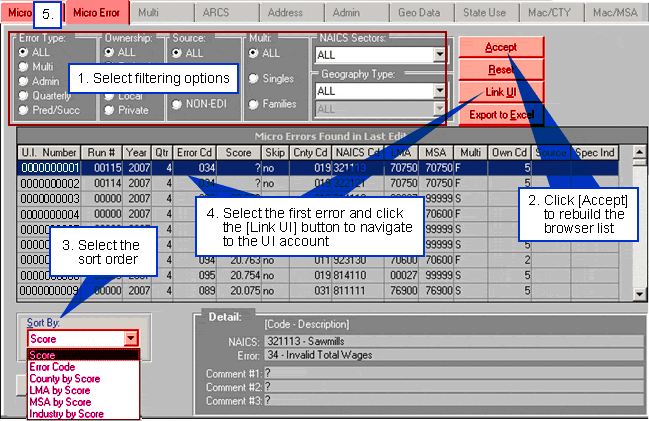
Note: All errors that are corrected when you edit an account will be gone from the error list when you return to the Micro Error Screen. New errors created when you edit the account will not show up in the error-list unless you choose the [Accept] button and rebuild the error-list.
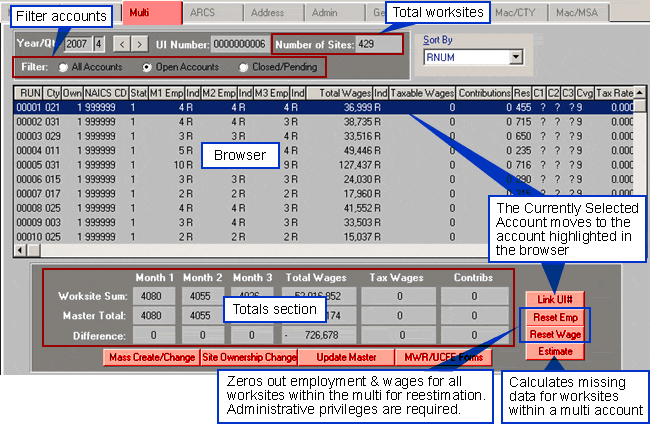
Multi Tab
The Multi tab shows the employment, wages, contributions and other information by worksite for a multiple worksite employer.
The Multi Screen can be used to:
- View Differences in Worksite Sum & Master Total
- Update Multi Worksite Wage & Employment Data
- Update Master Total
- Add New Establishment Worksites
- Change/Update Static Data (e.g. address, NAICS, County) for Multiple or All Worksites at One Time
- Move/Transfer Multi Establishment Worksite Data to New Owners
- Print Multiple Worksite or UCFE Forms

Viewing Information on the Multi Screen
The Multi tab shows the employment, wages, contributions and other information for each worksite in the browser of the multi screen. The data for each worksite only displays data for one quarter. The [<] [>] buttons by the "Year/Qtr" field will move to the next or previous quarter.
The master account and the total number of work sites within the master are displayed in the top middle portion of multi screen.
The screen has a filter to view All Accounts, Open Accounts only, or Closed/Pending accounts only. The filter is used by clicking the radio button next to the desired option. The default is Open Accounts.
The screen has a sort, which functions as a drop down on the top right corner of the multi screen. The worksites can be sorted by NAICS, county, or RNUM.
The Totals Section, located below the browser, displays three sets of figures:
- The sum of the individual worksites' employment and wage data
- The reported employment and wage data for the master account
- The difference between those two figures
Multi Estimation
Click the [Estimate] button on the Multi tab to estimate missing data for worksites within a multi account. Only multi accounts with an "E" (estimated), "M" (missing), or "P" (prorated) indicator will be estimated. If data with any other indicator {i.e., "C" (changed), "H" (hand estimated), "R" (reported), etc.} exists in the family you are attempting to estimate, you will receive the following warning message:
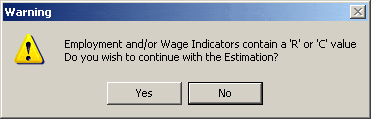
Clicking "Yes" on the warning message changes all data with an "E", "M", or "P" indicator to 0 with an "M" indicator and then attempts to complete the estimation. Note: Data with "E", "M", and "P" indicators will be zeroed out by clicking "Yes" and data will not be estimated again until the analyst manually changes the reported data (i.e., "C", "H", "R", etc) to 0 and "M". The purpose of this warning message is to reduce the number of manual changes to data and also provide feedback to the analyst to help eliminate mistakes.
Mass Create/Change Screen
The [Mass Create/Change] button located at the bottom left of the Multi tab is used to update several worksites or to add a new worksite within a Master. In order to add or change information about several worksites, you must first have a multi establishment account active on your screen. Note: If the quarter has been locked, you must have EQUI permissions (produce deliverable/truncate log file) to update
Mass Create
To Create a New Worksite:
- Click [Mass Create/Change] button on the Multi tab.
- The [Mass Create] radio button on the Mass Create/Change Screen is selected by default (see figure below).
- Select the account you want to ‘pattern’ in the ‘Pattern Account’ field. This is used to easily copy the information you want into the fields.
- Select one of the following two radio buttons (the "All" selection is unavailable for mass create):
- Range of RUNs: If you chose a range the system automatically fills in the ‘From" section with the next unused RUN number. You must input the "To" field based on how many worksites you wish to add.
- One at a Time: The system automatically fills in the next unused Run Number.
- Ensure the Account Information is correct (e.g., DBA, EIN, NAICS, etc.). Note: Any information in fields with check marks beside them will be transferred to the new worksites (e.g., DBA, EIN, NAICS, etc.).
- Click [Process Change/Create], if you are satisfied with the data.

-
Note: If the quarter has been locked, you must have EQUI permissions (produce deliverable/truncate log file) to update
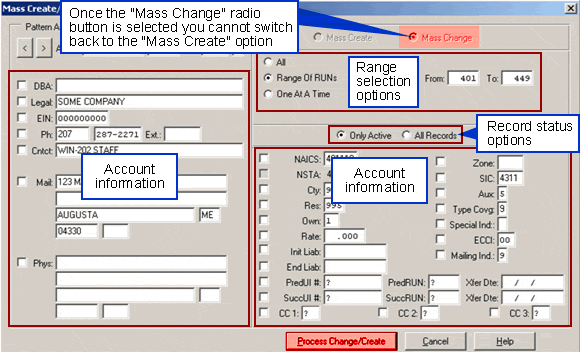
Mass Change
- Click [Mass Create/Change] button on the Multi tab.
- Click the [Mass Change] radio button on the Mass Create/Change Screen (see figure below). Note: Once selected, the Mass Create radio button is unavailable. You must close the Mass Create/Change screen and re-open it to access the Mass Create options.
- Select one of the following three radio buttons:
- All: To change information for all existing RUN numbers within the master.
- Range of RUNs: If you chose a range the system automatically fills in the ‘From" section with the next unused RUN number. You must input the "To" field based on how many worksites you wish to add.
- One at a Time: The system automatically fills in the next unused Run Number.
- Select one of the following two radio buttons:
- Only Active: To change only active records.
- All Records: To change all records regardless of status (e.g., inactive).
- Make the desired changes to account information (e.g., DBA, EIN, NAICS, etc.) by placing a check mark in the box next to the desired field and double click on the field to input the new information. Note: Any information in fields with check marks beside them will be updated and will overwrite any data (e.g., DBA, EIN, NAICS, etc.).
- Ensure all information is correct, including the year and quarter.
- Click [Process Change/Create], if you are satisfied with the data
-
Note: If the quarter has been locked, you must have EQUI permissions (produce deliverable/truncate log file) to update
Site Ownership Change Screen
The Site Ownership Change screen, accessed via the [Site Ownership Change] button located near the bottom of the Multi tab, is used to close out (terminate) multi establishment worksites and transfer multi worksites from one account to another.
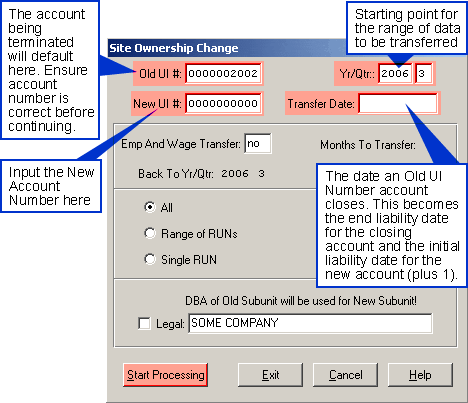
To Transfer an Account
- Ensure the account you want to work on appears in the UI Account Information Section on the Multi Screen.
- Click the [Site Ownership Change] button on the Multi tab. The "Site Ownership Change" screen will appear.
- Enter the account number the worksites will transfer to, in the ‘New UI#’ field.
- Select a Yr/Qtr (e.g., Yr=2000,Qtr=1) that is the start point. To select a different start point, double click the displayed values and enter new ones.
- Enter a transfer date for the old account (both digits for month and day are required for entry (see the figure below).
- Input ‘yes’ or ‘no’ in the ‘Emp and Wage Transfer’ field to transfer employment and wage data. If you want employment and wages transferred then double-click on the word "no" and press the [y] key.
- Input the ‘Back to Yr/Qtr’. This is only if you selected ‘yes’ in ‘Emp and Wage Transfer’.
- Input the ‘Months to Transfer’. Place the cursor in the "Months to Transfer" field and enter a number from one to three. [1] Transfers only the 3rd month [2] transfers the 2nd and 3rd months and [3] transfers all months. All options relate to a specified "Back to Yr/Qtr". If you transfer less than three months, the wages are prorated. Enter a particular "Yr/Qtr" value for the end point. This is only if you selected ‘yes’ in ‘Emp and Wage Transfer’.
- Select one of the following:
- All - moves all multi establishment worksites from the old UI account to the new account.
- Range of RUNs - moves a range of sites from the old UI account to the new account. When the "Range of RUNS" option is selected the "From" and "To" fields appear. Enter the range of reporting unit numbers you want transferred to the new account.
- Single RUN - moves only one site from the old UI account to the new account.
- Determine whether or not the new account will carry over the legal name. To do this click on the check box next to the "Legal" field. If you want to enter a different name then double-click on the box to the right of the "Legal" field and enter it in. If everything is correct, click on the Start Processing button.
- Click on the Exit button, if you are finished making site ownership changes. If you click on the Cancel button before starting processing, no changes are made.
Items to keep in mind when using the Site Ownership Change screen:
- Only active records within an unlocked quarter are transferred.
- The DBA field is no longer an option—the DBA of the old Subunit is now used for the New Subunit DBA.
- For transfers, the start date of the new owner is one day after the end of liability date of the old owner. For example, if you enter 3-31-06 as the end of liability date, the system will assign 4-1-06 as the start date of the new owner.
Update Master Total Employment and Total Wages
You can update the master total employment month 1, month 2, month 3 and total wages for the quarter displayed in the year/quarter fields. Any updates made from the multi screen to the master totals can be viewed by selecting the master account in the UI Account Information section and viewing the micro tab.
To update master total employment and total wage data:
- Click the [Update Master] button located near the bottom of the Multi tab. The "Update Employment and Wage Information" window appears as shown below. If the quarter is locked you cannot make updates to master data.
- Update/Change the desired data (i.e. M1, M2, M3 or TW). If the quarter has been locked, you must have EQUI (produce deliverable/truncate log file) and update permissions to update. If the quarter is closed and not locked you only need update permissions.
- Click [OK].
Note: If the quarter has been locked, you must have EQUI permissions (produce deliverable/truncate log file) to update.
Update Multi Establishment Employment and Wage Information
To update multi establishment employment and wage data:
- Double-click on the worksite you want to change in the browser. The "Update Employment and Wage Information" screen appears. The M1 (Month 1 employment) field will be highlighted.
- Input desired changes and press [Tab] twice to advance to M2 (Month 2 employment). If you [Tab] through Taxable Wages and Contributions the values remain unchanged. However, when Taxable Wages are modified its' associated indicator changes to "R". Contributions are recalculated and its' associated indicator changes to a "C". If the quarter has been locked, you must have EQUI (produce deliverable/truncate log file) and update permissions to update. If the quarter is closed and not locked you only need update permissions.
- Click [OK] when you are finished. If you click [Cancel], your changes will be lost.
Notes:
- Tabbing through the Month 1, Month 2, Month 3 and Total Wages results in 0 for the field and "M" for the indicator if no data is inputted.
- If the quarter has been locked, you must have EQUI (produce deliverable/truncate log file) and update permissions to update. If the quarter is closed you only need update permissions.
Print MWR Form Screen
Multiple Worksite Reports are printed using the [MWR/UCFE Forms] button located near the bottom of the Multi tab.
To Print MWR or UCFE Forms
- Click [MWR/UCE Forms] button on the Multi tab. The "Print MWR/UCFE Forms" screen will appear as follows:
- Input a year and quarter in the ‘Year/Qtr’ field.
- Select one of the following ‘Form Type’ by clicking the radio button:
- MWR
- UCFE
- Reimbursable
- Select one of the following ‘MWR/UCFE Options’ by clicking the radio button:
- Print Individual Employer
- Print All Multi Employers
- Print 2nd Requests
- Select one of the following ‘MWR/UCFE Options’ by clicking the radio button UCFE or MWRs Only:
- Print Existing & New Multis
- Print Existing Multis Only
- Print New Multis Only
- Click [Submit MWR Job]. Once the job is submitted a file will be created. The file name is based on the criteria selected (see output names below). If the [Cancel] button is selected, the job does not run.

Output files by type are as follows:
MWR:
- Single Account: mwruinumber (ex. mwr0005)
- Single Page Form: mwrsp1-yyyq (ex. mwrsp1-20054)
- Multiple Page Form: mwrmp1-yyyq (ex. mwrmp1-20054)
UCFE:
- Single Account: ucfeuinumber (ex. ucfe0005)
- Single Page Form: ucfesp1-yyyq (ex. ucfe1-20054)
- Multiple Page Form: ucfemp1-yyyq (ex. ucfe1-20054)
Reimbursable:
- Single Account: reimbuinumber (ex. reimb0005)
- Single Page Form: reimbsp1-yyyq (ex. reimbsp1-20054 - only single page forms)
Note: A user can control whether or not to include subunits on future multi accounts. This is done on the Reports menu under the Report Parameters tab by changing the Parameter Value for Code 4 which pertains to records with an MEEI=4. The default, 0, means pending subunits only are included; a value of 1 yields pending subunits and those records with no subunits.
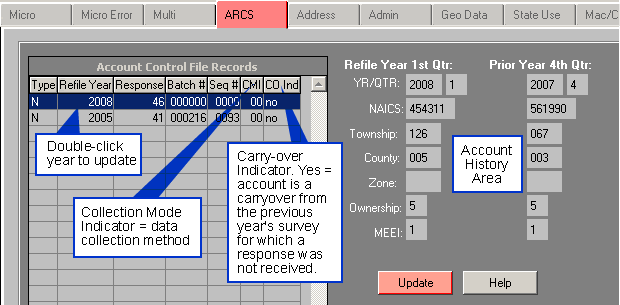
ARCS Tab
The ARCS tab is similar to the look and function of the "ARCS Data Entry" screen. The two quarters shown in the Account History Area depend on the refiling year highlighted in the browser. The refiling year shown on the screen below is 2008, therefore the quarters displayed are 2008-1 and 2007-4.
Update ARCS Data
Information entered for the Annual Refiling Survey is updatable via the "Update ARCS Control File" screen.
- On the ARCS Screen shown above, double-click on the refile year entry in the browser to display the "Update ARCS Control Files" screen shown below. This screen updates first quarter data with the last available previous quarter data.
- Ensure the correct year and account number are displayed.
- Input a batch number (optional) and change the source if necessary. The default source is "ARS". Use "Other" if the code change is from a non-refiling source.
- If applicable, choose a special circumstance from the drop-down menu, otherwise leave the default of "None". The special circumstance selections include: (31) Not Reviewed, (42) Employer Misunderstood, (63) P.O. Returned, and (64) Out of Business.
- Update the desired data. Note: The response code is automatically assigned based on the values entered on the screen. The code is displayed at the bottom of the screen as the "Resulting Response Code". This response code will only be assigned to the control file record if the "Accept and Save" button is chosen.
- Click the [Accept and Save] button. The quarterly codes are saved to the first quarter record. Note: If you click the [Cancel] button first, the screen will close and any changes made will not take effect.
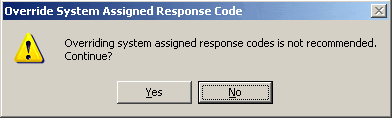
- To override the automated response code selection click the [Manual Coding] button. The following warning message is displayed:
- Click the [Cancel] button on the Update ARCS Control File screen to return to the ARCS screen or navigate to a new account by entering a new UI/Run number. The code you manually entered is not viewable on the Update ARCS Control File screen, it displays on the ARCS screen only. Note: Selecting the [Accept and Save] button will overwrite your manual code with the system determined code.
- Click the [Help] button to view the online documentation for the ARCS tab.
- When finished with the Update ARCS Control File screen, click the [Cancel] button to return to the ARCS screen.

Click [Yes] to view the Manually Override Response Code Screen shown below.
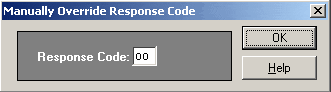
Enter the response code and select the [OK] button to make your change and return to the Update ARCS Control File screen.
Address Tab
The Address tab is used to update the Mail/Other Address, Physical Address, and Telephone Number/ Contact/Title information for an account. The UI Tax Addresses are, by design, not changed here but may be overwritten by information on the Admin Tax Extract. The address tab allows you to set locks on specific fields, so information will not be replaced by data from UI Tax extracts (see Locking Fields for the Current Record). Click the [Email] button to send an email to the address listed. Use the [Website] button to view the company's website. The [Map It!] button opens a web browser to display the company's physical location using Google map.
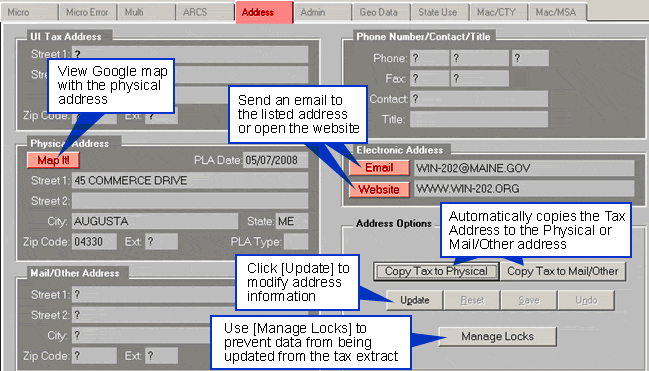
To Update Address Data:
- Click the [Update] button.
- Click the field you wish to change and type the new information. Note: You can copy the UI Tax address to the Physical Address and the Mail/Other Address by clicking the appropriate button (i.e., [Copy Tax to Physical] or [Copy Tax to Mail/Other]).
- Click the [Save] button. If you do not wish to save your changes, click the [Reset] button and your changes will be undone.
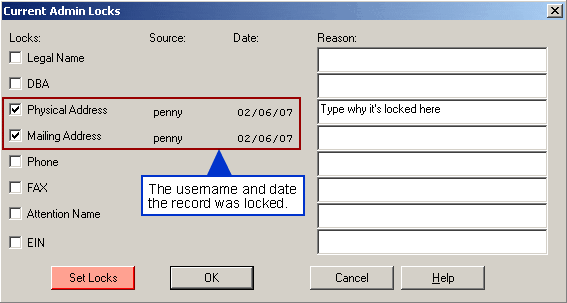
Locking Fields for the Current Record
The locking feature prevents overwriting current information with information brought over from the UI Tax database. If you have a good address or phone number for an account and you do not want it replaced by information in the UI Tax database when an extract is done, you should lock those fields.
To Lock a Record:
- Click the [Manage Locks] button on the "Address" tab to view the "Current Admin Locks" screen.
- Click on the [Set Locks] button to access the list of fields that you can lock for the current record (e.g., Legal Name, Physical Address, Phone, etc.).
- Set a lock by clicking the empty box to the left of the field label. A check mark appears in the box. If you click on a box that has a check mark, the check mark is removed and the lock is removed.
- Type in a reason why you locked the record. This is optional.
- Click on the [OK] button to set the locks. Click the [Cancel] button to return to the "Address" screen without saving your changes.
Admin Tab
The Admin tab displays administrative data for an account. This is non-quarterly information.
To Change/Update Admin Data:
- Click the [Update] button to access the data fields.
- Click the field you wish to change and type the new information. Press [Tab] to move among fields or double-click on the field to make changes. All data entered is capitalized automatically when saved.
- If you make errors and wish to start over, click the [Reset] button. This will return you to information before the changes. Click the [Save] button when your changes are complete. If you decide that you do not want to make any changes to the account, click [Undo] to leave the "update" mode.
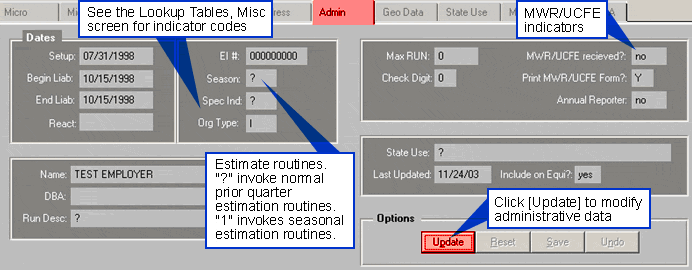
MWR/UCFE Received Indicator
A first run of MWR/UCFE forms for printing sets the MWR/UCFE Received Indicator to N (No, a form has not been received). The MWR/UCFE Received Indicator cannot be changed using the Admin Screen. The MWR/UCFE Received Indicator is set/changed to Y (Yes) by subunit data being entered to the system either via the MWR data entry screen or the quarterly data load.
When the second requests of the MWR/UCFE forms is run, records that have the MWR/UCFE Received Indicator set to Y (Yes) will not have a form printed and records that have the MWR/UCFE Received Indicator set to N (No) will have a form printed.
Print MWR/UCFE Form Indicator
A record create automatically sets the "Print MWR/UCFE Form" indicator to Y (Yes). The "Print MWR/UCFE Form" indicator will change to N (No) by either loading an EDI record via the EDI load program or by an analyst manually updating the indicator through the Admin Screen. Analysts can also update the indicator to 1 (first quarter), 2 (second quarter), 3 (third quarter) or 4 (fourth quarter). If 1, 2, 3, or 4 is set then forms will only be printed when the quarter set is printed (i.e. if the indicator is 1 the forms will only be printed when the system prints the forms for first quarter). This feature is useful for businesses that do not report MWR/UCFE forms every quarter.
When the MWR/UCFE forms program is run, records that have the Print MWR/UCFE Form Indicator set to N (No) will not have a form printed and records that have the Print MWR/UCFE Form Indicator set to Y (Yes) will have a form printed.
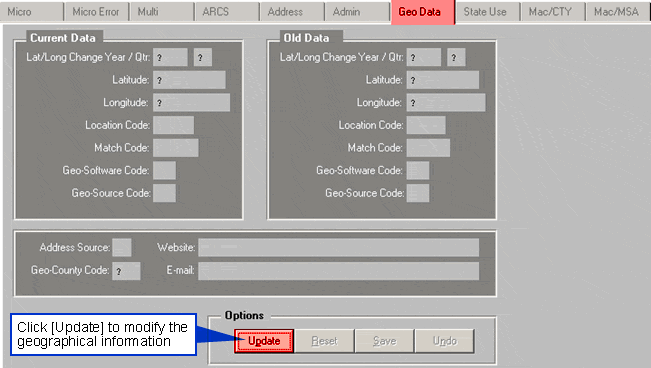
Geo Data Tab
The Geo Data tab displays the geographical information related to the account. From this screen the below geo data fields can be updated. If a state does update the latitude and/or longitude then the following changes will automatically occur: geocode software will be U, geocode source will be S, match code will be M999 and location code will be A99.
- Latitude
- Longitude
- Address Source
- Website
To Update Geo Data:
- Click on the [Update] button on the Geo Data tab.
- Update the desired fields.
- Click [Save]. If you want to change your updates, click [Undo]. If you make changes and do not wish to save the changes click [Reset].
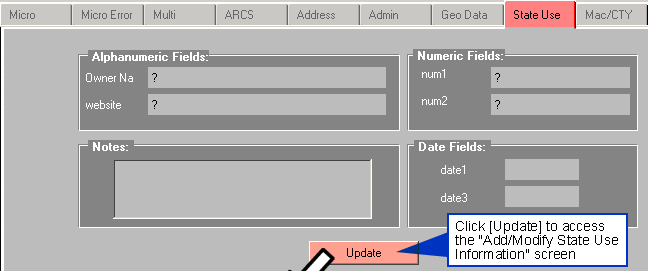
State Use Tab
States may add two alphanumeric fields, two numeric fields, and two date fields in the WIN-202 system to help meet their specific information needs. Data may be added to or updated in these fields.
To Update State Use Data
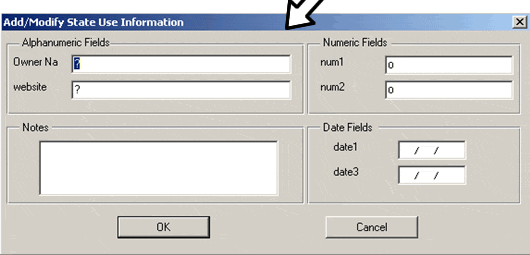
- Click the [Update] button on the ‘State Use’ Screen. The "Add/Modify State Use Information" screen appears.
- Enter data into the state use (Fields should have previously been defined. For more information on defining state use fields, see Chapter 6 Administrative.
- Click on the [OK] button to store the additions or updates. If you click the [Cancel] button, you will exit and the entries will be lost.
Mac/CTY Tab
The Mac/CTY (Macro County) tab shows data aggregated by year, quarter, county, ownership code, and NAICS code. The Mac/CTY tab has three sub-screens:
- Inquiry
- Detail
- Comments
The Mac/CTY screens can be used to:
- Get on-line information by macro cell (county/ownership/NAICS) for a specific year/quarter combination
- View all accounts that are part of a macro cell
- Enter comments for macro records
- View macro level errors and see accounts that may be the cause of the errors
- View yearly and trend graphs
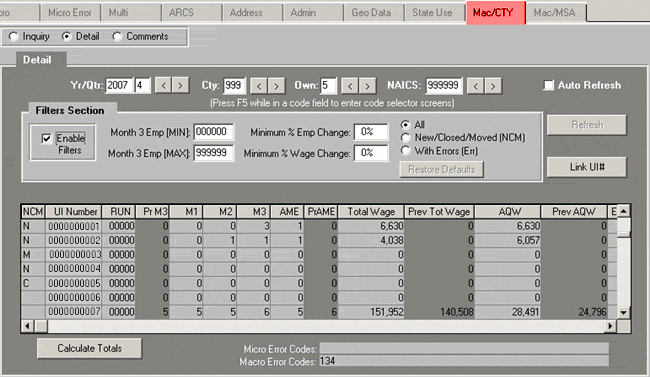
Note: Someone with Quarterly Processing privileges must "roll the data" to display the most recent updates on the database. This is done on the [Quarterly Proc], "Macro" tab accessed through the "Main Menu" screen.
Mac/CTY Inquiry Screen
The inquiry sub-screen displays the totals for a macro cell (a combination of county, ownership and NAICS). For each macro cell, the browser will display:
- Change (an asterisk displays if quarterly data has been modified since the last macro roll)
- Year
- Quarter
- Number of different cells contained within the macro cell selection
- Total units (i.e., employer accounts in the aggregation)
- Total employment for the macro cell for each month of the quarter
- Total wages
- AME (Average Monthly Employment)
- AQW (Average Quarterly Wage)
- AAE (Average Annual Employment)
- AATW (Average Annual Total Wages)
- Confidential indicators
This screen also has accumulate and standard sector options and a trend and yearly graph function.

Note: When first selecting an account and run the system will display the macro cell associated with that account. Other macro cell data may be viewed without changing accounts in the Account Information & Navigation Area by using any of the arrows [<] [>]. Alternately, type [F5] while in the code field to display the "Code Selector" screen. This screen can be used as a reference lookup or to select and transfer a code to the "Mac/CTY" screen.
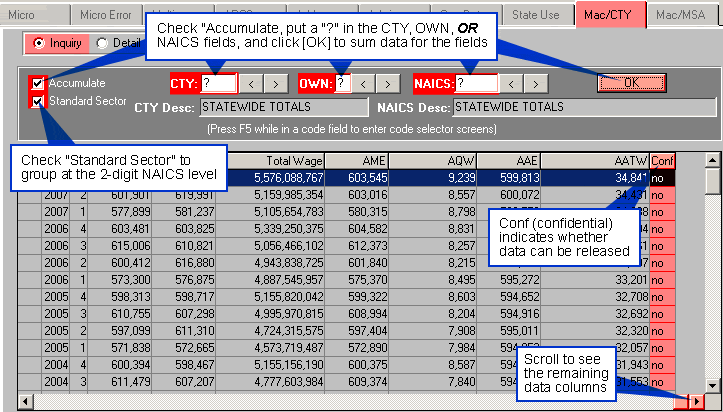
Accumulate
The Accumulate check box is used to search for a specific county, ownership or NAICS without using the arrow buttons.
To use the accumulate option:
- Click the Accumulate box.
- Double-click on the county, ownership, and/or NAICS field and input the desired code. Alternatively, click [F5] while in the code field to display the "Code Selector" screen to search for and/or enter a code.
- Click on OK to update the browser.
Two, three, four, five or six digit NAICS codes may be entered. For example, if NAICS 42 is entered then all data with a combination of county code, ownership code, and NAICS codes that start with 42 will be rolled up and displayed.
You may also accumulate data for all counties, ownership codes, and NAICS codes by placing a "?" in the field(s). The accumulate box must be checked. Click OK to update the browser. Note: This accumulation will take some time to complete. Click on the accumulate box again and the check mark disappears and the accumulation is off.
Standard Sector
If you select "Accumulate", the Standard Sector option is automatically checked. At the 2-digit NAICS level, the browser will display the standard sector groupings with the following standard sector codes aggregated together: Manufacturing 31-33, Retail Trade 44-45, Transportation and Warehousing 48-49. Uncheck the "Standard Sector" option to view your results by Non-Standard ungrouped 2-digit NAICS.
Confidential
If the word "Yes" appears under Conf (confidential) in the browser, data may not be released. A question mark appears here if any of the smaller macro cells are confidential. An analyst will need to determine if the data can be released. Confidentiality is determined when the macro cell is rolled. A "No" in confidentiality will happen only if all of the cells making up the aggregate are not confidential. The Chg (Change) field to the left of year and quarter will show an asterisk (*) if any of the quarterly data in that cell has been modified since the last macro roll. Re-rolling the macro resets this to a blank field.
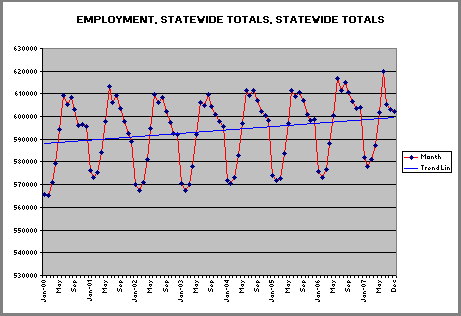
Trend Graph
Clicking the [Trend graph] button is similar in that it graphs employment by month for all available data with a trend line passing through the data.
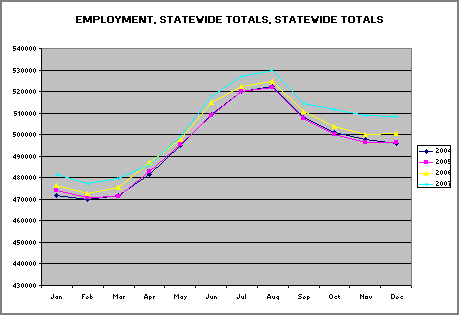
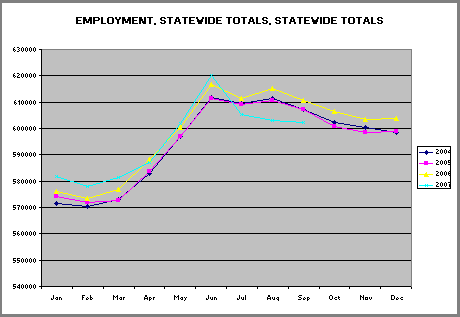
Yearly Graph
The [Trend Graph] and the [Yearly Graph] buttons are used for analysis purposes. Clicking the [Yearly Graph] button produces a line graph in Excel of employment by month for each year. The following graph displays employment in a Maine coastal county for NAICS code 722213, which primarily consists of carry out services such as ice cream. As expected, peak employment occurs in July and August.
Mac/CTY Detail Screen
The Detail sub-tab shows all quarterly accounts that make up a macro cell. Note: Pending accounts are not displayed on this screen.
Check the "Enable Filters" box to further limit the accounts that appear in the browser. You may select:
- Accounts having a specified range of employment
- Accounts with a minimum percentage change in wages and/or employment
- Accounts with Errors
- New or closed accounts
- A combination of the parameters listed above
- Click the [Restore Defaults] button to return the filter settings to their default values
The [Refresh] button must be used to complete a search. The screen displays a message to alert you when the browser does not match parameter or filter settings. As an alternative, select the "Auto Refresh" option to automatically update the browser when screen settings are changed.
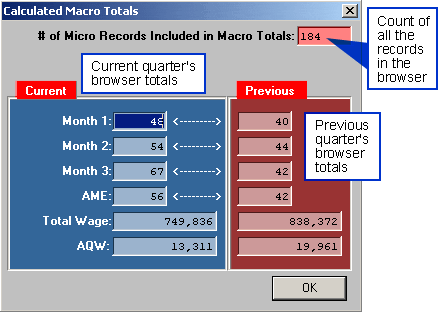
Click the [Calculate Totals] button, located at the bottom-left of the screen, to produce a dialog box displaying the macro totals for all records currently displayed in the browser (see below). If filters are enabled, the following warning will appear: Filtering is ON! This data may be a subset of Macro Data.
Mac/CTY Comments Screen
The Comments sub-tab shows all comments for a macro cell. Macro Comment Codes can be added or updated via this screen. A complete listing of comment codes is available via the [Lookup Tables] screen, "Edit" tab, "Comment Codes" radio button.
To Update Comments:
- Double-click on a year and quarter and the "Update Macro Comment Codes" screen appears. Three comment codes are available for each macro.
- Input or update a comment code in C1, C2, and/or C3 and press [Tab]. The corresponding description appears in the comment description area and the cursor moves to the C2 field.
- Press [Enter].
- Click [OK]. If you click the [Cancel] button, comments will not be accepted.
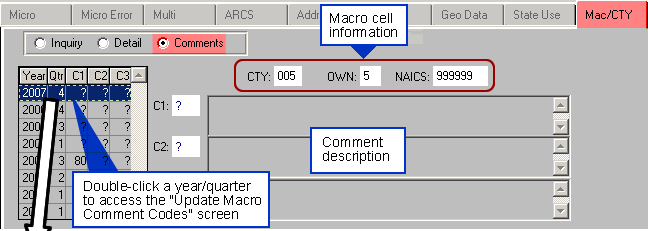

Note: If the quarter has been locked, you must have EQUI (produce deliverable/truncate log file) and update permissions to update.
Mac/MSA Tab
The Mac/MSA (Macro Metropolitan Statistical Area) can be viewed by the MSA Detail screen, which is the default, or by the MSA Inquiry screen. These two screens look and function the same as the detail and inquiry screens on the Mac/CTY tab except data is aggregated by MSA, Ownership, and NAICS codes.
The MSA Detail screen shows all quarterly accounts that make up a macro cell. The following Standard Sector Level Codes are aggregated together:
- Manufacturing: Sector Levels (31-33)
- Retail Trade: Sector Levels (44-45)
- Transportation and Warehousing: Sector Levels (48-49)
Check the "Enter Parms" box to further limit the accounts that appear in the browser. You may select:
- Accounts having a specified range of employment
- Accounts with a minimum percentage change in wages and/or employment
- Accounts with Errors
- New or closed accounts
- A combination of the parameters listed above
- Click the [Restore Defaults] button to return the filter settings to their default values
Type in a code in the MSA, OWN, or NAICS code fields or type [F5] while in the field to display the "Code Selector" screen. The code selector screen can be used as a reference lookup or to select and transfer a code to the "Mac/MSA" screen. The [Refresh] button must be used to complete a search. The screen displays a message to alert you when the browser does not match parameter or filter settings. As an alternative, select the "Auto Refresh" option to automatically update the browser when screen settings are changed.
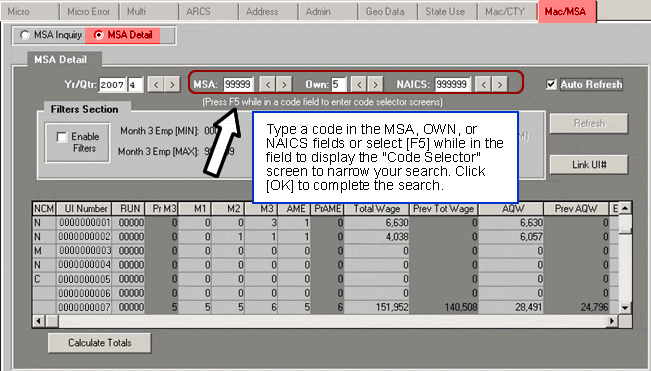
Click the [Calculate Totals] button, located at the bottom-left of the screen, to produce a dialog box displaying the macro totals for all records currently displayed in the browser (see previous page). If filters are enabled, the following warning will appear: Filtering is ON! This data may be a subset of Macro Data.
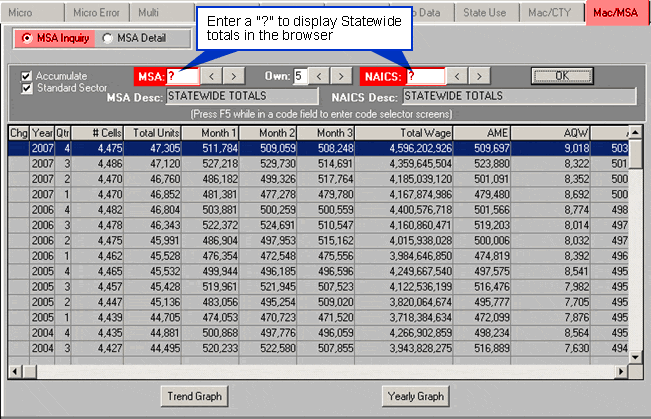
Mac/MSA Inquiry Screen
The Mac/MSA Inquiry screen, shown below, displays the totals for a macro cell (a combination of MSA, ownership and NAICS ). For each macro cell, the browser will display:
- Change (an asterisk displays if quarterly data has been modified since the last macro roll)
- Year
- Quarter
- Number of different cells contained within the macro cell selection
- Total units (i.e., employer accounts in the aggregation)
- Total employment for the macro cell for each month of the quarter
- Total wages
- AME (Average Monthly Employment)
- AQW (Average Quarterly Wage)
- AAE (Average Annual Employment)
- AATW (Average Annual Total Wages)
- Confidential Indicators (see the "Confidential" sub-section in the Mac/CTY section for further details)
If you check the box to the left of "Accumulate", the "Standard Sector" option is automatically checked also. The browser will display standard sector groupings of selected 2-digit NAICS codes. Click in the box to uncheck the "Standard Sector" option to view your results by Non-Standard ungrouped 2-digit NAICS. You may also accumulate data for all MSA codes, ownership codes, and NAICS codes by placing a [?] in the field(s). The accumulate box must be checked. Click OK to update the browser
Trend Graph
Clicking the [Trend graph] button is similar in that it graphs employment by month for all available data with a trend line passing through the data.
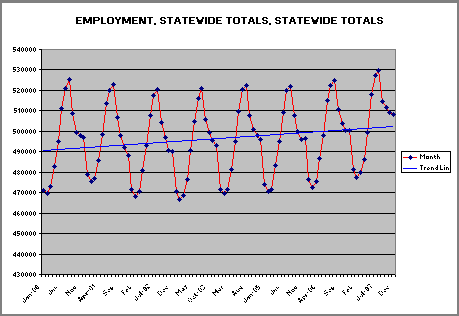
Yearly Graph
Clicking the "Yearly Graph" button produces a line graph in Excel of employment by month for each year. The following graph displays employment for NAICS code 711211, which is the professional or semi-professional sports industry. As expected, peak employment occurs April through August.