Home → Contents → Introduction → Data Entry Screens → Screens → Quarterly Processing → Lookup Tables → Administrative → Reports → Server Information → Appendices
Chapter 4: Quarterly Processing
The "Quarterly Processing" screens of the WIN-202 system contain processes that affect the system’s data. Although processing is done on a quarterly basis, these processes may be done more than once each quarter. Click the [Quarterly Proc] button on the "Main Menu" screen to bring up the "WIN-202 Quarterly Processing Screen" as shown below.
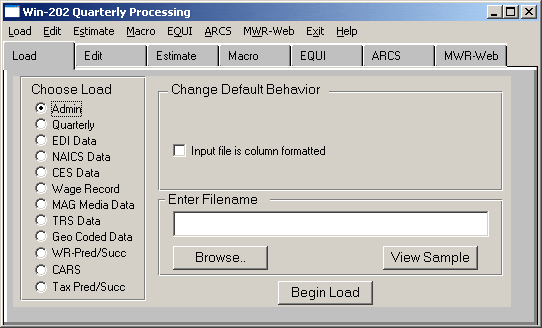
The seven tabs on the "WIN-202 Quarterly Processing Screen" perform the following functions:
- Load: To load data files into the WIN-202 system.
- Edit: To perform edits on the data in the WIN-202 system.
- Estimate: To perform estimates for missing data.
- Macro: To roll a specific quarter or to roll all unlocked quarters. This updates the macro data, so changes made since the last macro roll are incorporated when viewing data.
- EQUI: To produce the Enhanced Quarterly Unemployment Insurance (EQUI) deliverable file or a subset EQUI.
- ARCS: To submit jobs that generate a Summary of Differences file and Code Change Supplement (CCS) for NAICS
- MWR-Web: To load and create data files for the web-based multiple worksite reports.
Load Data Tab
The Load tab allows you to load data files into the WIN-202 system. Data can be loaded for 12 different load types, which are listed under "Choose Load" in the figure below. View the data load file formats in Appendix C.
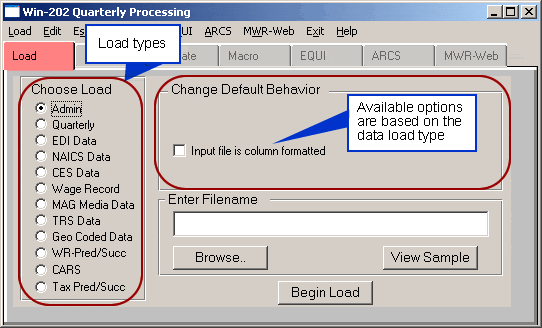
Several changes can be made to the load default (see table below). The choice(s) available change based on the load selected. Please refer to the WIN-202 V4 Extract Development Guide for more information about Progress defaults and loading information into the WIN-202 system.
| Change Default Behavior | Description | Associated Loads |
|---|---|---|
| Prevent overwriting emp + wage data w/"C" indicators? | Prevents overwriting existing data when "C" (changed) indicator is present | Quarterly |
| Prevent overwriting emp + wage data w/"R" indicators? | Prevents overwriting existing data when "R" (reported) indicator is present | Quarterly |
| Prevent overwriting emp + wage data w/"C" + "R" indicators? | Prevents overwriting existing data when both "C" and "R" indicators are present | Quarterly |
| Input file is column formatted | To specify incoming data as an ASCII file | Admin Quarterly NAICS Data |
| Create new EDI/MAG units | Allows the creation of new accounts to the database (a checked toggle box) or dumping new accounts to a file prior to being added to the system (an unchecked toggle box). | EDI Data MAG Media Data |
| Overwrite Existing Fax Numbers? | TRS Data | |
| BLS Supplied Input File? | Geo Coded Data | |
| Overwrite Physical Address Data? | Geo Coded Data | |
| Overwrite City Code and ID? | Geo Coded Data | |
| Overwrite Match and Location Codes? | Geo Coded Data | |
| Overwrite Latitude and Longitude? | Geo Coded Data | |
| Response File Load | Load CARS data received from BLS Washington to update the control file records including the response code. | CARS |
| NCOA Load | Load National Change of Address (NCOA) file. | CARS |
Loading Data
To Load Data (refer to Appendix C for file formats):
- Click the "Load" tab.
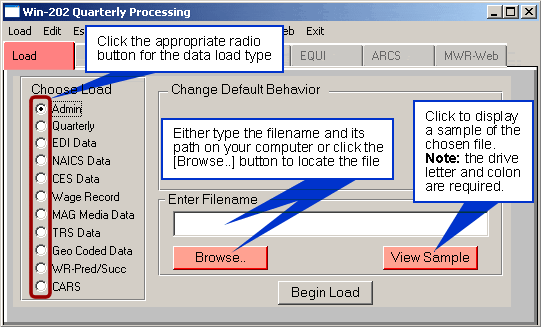
- Click the radio button of the data you want to load (e.g., Admin, Quarterly) in the "Choose Load" section.
- Click the box(es) in the "Change Default Behavior" section if the data is not in the Progress standard format (i.e., data in the admin and quarterly split formats, and transaction based processing). Note: The options in this section change based on the Load.
- Enter the filename and path in the "Enter Filename" field. If you are unsure of the filename, use the [Browse] button to search for the file. The data file for the extract is typically located on the server under the WIN202\data subdirectory. When you find it, highlight it and click the [Open] button. The filename and path display in the box. Delete the drive letter and colon so all that remains is the following: \WIN202\data\filename.
- Click the [View Sample] button to verify the correct format of the data.
- Click [Begin Load] to start the loading process. A message will appear stating that the load has been initiated. Analysts can check the job status using the Batch Monitor (Manager). An error file is produced for each load (batch) run. Any errors will be reported on this file. See Chapter 6, Administrative, Monitor (Batch Monitor) Tab for more information on checking job status and Error Files.
Output Files
Listed below are files that are automatically generated in the reports folder when running the load indicated.
| Load Name | Output File | Output File Example | Output File Description |
|---|---|---|---|
| Admin | admMMDD | Adm0218 | Lists the Total Records Processed |
| Quarterly | oldyearMMDD | oldyear0219 | Lists records not loaded due to year < prior year |
| qtrMMDD | qtr0219 | Lists:
|
|
| qtrload-estimate-overwritesMMDD | qtrload-estimate-overwrites0219 | Lists any data with a ‘W’ or ‘H’ that was over-written by reported data | |
| qtrload-invalid-codesMMDD | qtrload-invalid-codes0219 | Lists any invalid codes on quarterly load file not loaded (note the record will load, only the invalid codes will not) | |
| reloadMMDD | reload0219 | Lists records not loaded due to locked quarter | |
| EDI Data | edi-newMMDDTTTTT | edi-new021856014 | Lists all new units not added to system due to the ‘Create New Units’ not being checked |
| edi-lockMMDD | edi-lock0218 | Lists all EDI records not loaded due to locked quarters | |
| ediMMDDTTTTT | edi021856014 | Lists:
|
|
| analystMMDD.txt | analyst0916.txt | Report listing type 3 records with the value to be reviewed on specified fields. Report can be imported into an Excel spreadsheet for viewing. | |
| NAICS Data | arcsMMDD | arcs0223 | Lists any exceptions that did not load to the system |
| arcs-noadminMMDD | Lists records that did not load to the system due to no admin account on system | ||
| CES Data | ceslderrMMDD | ceslderr0218 | Lists any duplicate records and errors such as invalid NAICS |
| Wage Record | No output file. | ||
| MAG Media Data | Same as EDI | ||
| TRS Data | trs-err | trs-err | Lists any errors |
| trs-fax-numbers | trs-fax-numbers | List fax numbers & UI, which were not written to the database because of a previously entered fax number. Lists total fax number in input file and total fax numbers written to database. | |
| Geo Coded Data | geo-err | geo-err | Lists any errors |
| WR-Pred/Succ | No output file. | ||
| CARS | solicit-load-rpt.txt | solicit-load-rpt.txt | Lists total number of records loaded |
Edit Data Tab
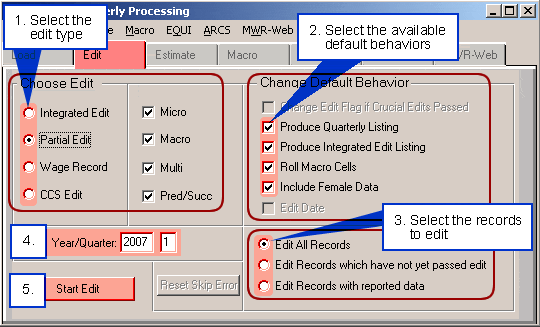
Click on the Edit tab and you will discover there are several ways to edit your data in the WIN-202 system. After you roll forward to a new quarter and extract and load data, you should run an Integrated Edit for all records (the default in the Edit Selection Area on your screen).
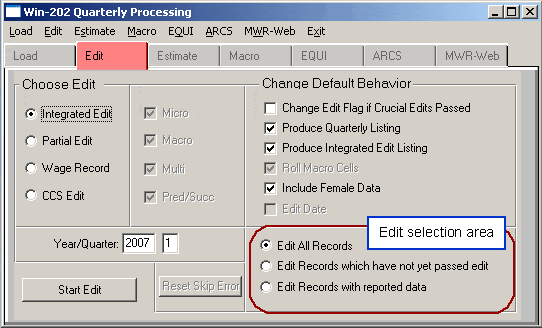
The different kinds of edits that you may run are as follows:
- Integrated Edit—Edits all Micro, Macro, Multi and Predecessor/Successor data simultaneously. Processing will be done for all unlocked quarters up to and including the current quarter.
- Partial Edit—Allows for selection of some or all of the integrated edits (Micro, Macro, Multi, and Pred/Succ). By default, all edit types have check marks beside them, indicating that those edits will be run. Click on a check mark to remove it and not run a particular edit.
- Wage Record—Checks wage record data against employment and wage data already in the system.
- CCS Edit—Checks 1st and 4th quarter records for a code change supplement.
Descriptions of the Change Default Behavior selections are as follows:
- Change Edit Flag if Crucial Edits Passed—The edit flag is changed to yes if the edits pass without crucial errors.
- Produce Quarterly Listing—Produces a listing of quarterly data errors.
- Produce Integrated Edit Listing—Produces a listing of records with macro and micro errors. It will display macro cells with errors and within it all related micro records with errors.
- Roll Macro Cells—Re-rolls (aggregates) the macro data by county, ownership and industry.
- Include female data—Used if your state tracks female employment and wages.
- Edit Date—Used to edit only those records that changed since the last date an edit was run.
The edit selections are:
- Edit all records (default)
- Edit records that have not yet passed edit (edit flag = yes)
- Edit records with reported data (all indicator = C)
Performing Edits
Each record in your file contains an edit flag. Initially the edit flag is set to "no" because no records have been edited. If you edit a record and the record passes all edits, the edit flag is changed to "yes". If you edit a record and the record does not pass all edits, the edit flag is changed to "no".
If you make changes to a record, the edit flag is changed to "no" to indicate that the record must be edited again. Re-editing again changes the edit flag to "yes". Analysts may bypass re-editing accounts by manually setting the edit flag. You can manually change the edit flag to "yes" only if you have added a comment to a record. See Chapter 3 Screens, Micro Tab section, Comments Radio Button subsection. Note: Running partial edits will not change the edit flags.
To Perform an Edit:
- Click the radio button of the desired edit from the "Choose Edit" area.
- Check or uncheck the box(es) of the desired default behaviors from the "Change Default Behavior" area. Clicking on a check mark removes the default behavior. Some default behaviors are unavailable with certain edits. If the integrated edit is selected, you must roll macro cells. The choice is grayed out and unavailable for de-selection.
- Select the records to edit (i.e., All Records, Records which have not yet passed edit, or Records with reported data) by clicking on the appropriate radio button.
- Enter a year/quarter to edit and press [Tab] after each selection.
- Click [Start Edit] button. A message displays stating the job has begun. The edit batch job can be tracked using the Batch Monitor. See Chapter 6 Administrative for more information on the Batch Monitor.
Note: Running an edit will automatically run the Data Counts Listing (dcountsyymm.userid), which can be found in the Reports folder after the job is complete. See Chapter 7 Reports for more information.
Estimate Data Tab
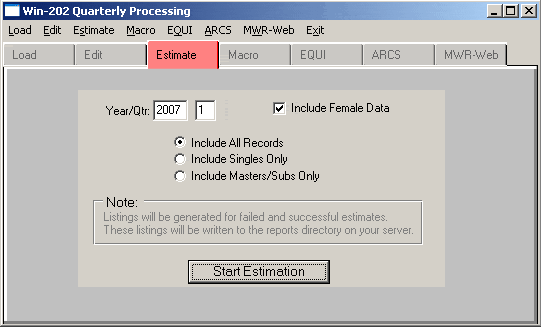
The Estimate tab is used to estimate data for records with missing data. When running batch estimations, you have the option of including "All Records", "Singles Only" or "Masters & Subunits Only".
To Estimate Data for All Records:
- Input the Year and Quarter desired in the "Year/Qtr" field.
- Click the "Include Female Data" box if you wish to include female data.
- Select the type of records to include: "All Records", "Singles Only", or "Masters/Subs Only".
- Click [Start Estimation] to begin processing. A message will display stating the job has started. You can monitor the job via the Batch Manager. Estimation output will go to the \win202\reports\directory.
Five output files are generated when female data is not included and seven output files when female data is included. These output files are generated regardless of the "Selection Type of Records" chosen. The output files are as follows:
- Multis that passed estimation: ESTMLTPASSYYMDD.ot
- Multis that failed estimation: ESTMLTFAILYYMDD.ot
- Singles that passed estimation: ESTSGLPASSYYMDD.ot
- Singles that failed estimation: ESTSGLFAILYYMDD.ot
- Estimate summary: ESTSUMMARYYYMDD.ot
- Female data that failed estimation: FEMALE-EST-FAIL-YYYY-Q.txt
- Female data that passed estimation: FEMALE-EST-PASS-YYYY-Q.txt
Macro Roll Tab
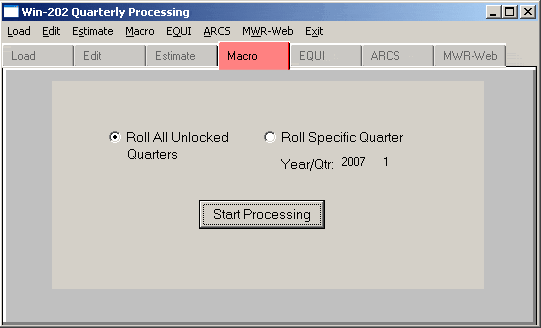
The Macro tab is used to roll macro data. Rolling macro data aggregates information by NAICS/Ownership/County, including any recent changes made to the data. You have the option of rolling all unlocked quarters or rolling a specific quarter. The default is set to "Roll All Unlocked Quarters".
To Roll Macro Data:
- Choose one of the two radio buttons on the screen:
- "Roll Specific Quarter"
- "Roll All Unlocked Quarters"
- Input the year and quarter if you selected "Roll Specific Quarter"
- Click [Start Processing]. A message displays stating the job has started. You can monitor the job via the Batch Manager.
EQUI Tab
The "EQUI" tab is used to produce your full quarterly ES-202 EQUI deliverable and/or a subset EQUI.
To run a Full EQUI:
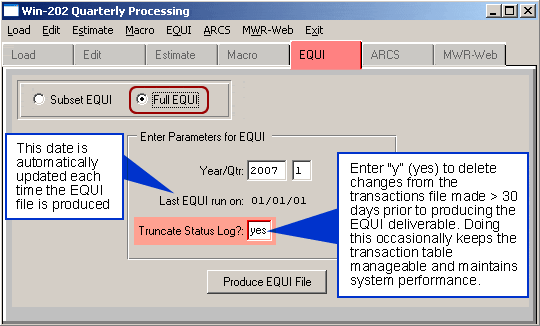
- Click the "Full EQUI" radio button. Note: If a full EQUI has already been run for the quarter, you will receive a message instructing you to run the Subset EQUI.
- Enter a year and quarter for the deliverable.
- Type "y" (yes) or leave the default value "no" in the "Truncate Status Log" field. Note: The WIN-202 system maintains a transaction file of all additions, changes and deletions to the system. Entering "y" (yes) in this field, allows the system to delete, from the transactions file, any changes made more than 30 days prior to producing the EQUI deliverable. This option should be done occasionally to keep the size of the transaction table manageable. If allowed to grow unabated, database size and performance may be affected. All transactions deleted from the system will first be output to \win202\reports\trxyymmdd.ot, where yymmdd is one month prior to producing the EQUI deliverable file.
- Click [Produce EQUI File]. Output for the EQUI file is written to the server directory \win202\reports\equiyymmdd.ot, where yymmdd equals the date the file was generated. A secondary output file is titled totsyymmdd.ot, and contains information that needs to be submitted on your EQUI transmittal form. The Data Counts Listing (dcountsyymm.userid) is also automatically generated. See Chapter 7 Reports for more information on the Data Counts Listing.
Example:
If an EQUI file was produced on 3/9/07 with the truncate status log field set to "yes", the output files would be as follows:
- Equi070309.ot → EQUI Deliverable
- Tots070309.ot → EQUI Transmittal Form Data
- Trx070309.ot → Data that was truncated from the Transaction Log
- Equierrsyymmdd.ot → Errors in EQUI processing (Quarterly records with no Admin records)
Both the Full & Subset EQUI programs prevent any data in the Residence Code field from being sent to the output file unless the "Use Town Codes" option has been selected on the "State Info" screen. If the Use Town Codes is not selected, the Residence code field in the EQUI is zero filled. See Section 6 Administrative, State Information Tab for more information.
Subset EQUI
A Subset EQUI is used to report to BLS a limited number of micro record corrections instead of sending a full EQUI Update File. The Subset EQUI screen shown below is used to pull micro records to create a Subset EQUI file of all records listed on an input, all previously marked records, or to both records listed on an input and all other previously marked records.
The "Select Run Type" radio set allows you to include only manually marked records or all manually marked and automatically marked records. The "Include Auto-marked Accounts" selection processes all manually identified records, as well as records that are automatically marked via behind-the-scenes processing in the WIN-202 system. The "Manually Selected Accounts Only" selection will process all records that a state submits via an input file and any records that have been identified via the "Codes" screen in the system.
The include subset flag has the following 3 values:
- N = Not marked for inclusion on the next subset EQUI
- M = Manually marked for inclusion on the next subset EQUI
- A = Automatically marked for inclusion on the next subset EQUI. Note: Automatically marked records will only be processed for current and prior quarters, with current quarter being identified by the subset parameters "Year/Qtr". The automatically marked for subset records include the following:
- Records that have changed their status code
- New deletes
- New quarterly records
- Records that have updates to their Predecessor or Successor fields
- Records that have changed from unclassified NAICS, County or Township codes to classified NAICS, County or Township Codes
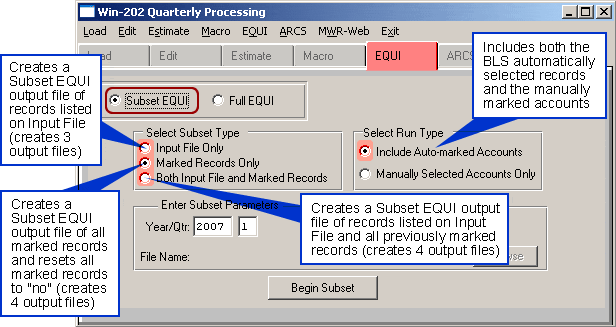
To run a Subset EQUI File:
- Click on the "Subset" EQUI radio button.
- Select a Subset Type.
- Enter the Subset Parameters. For an input file, type the filename in the "File Name" field or use the browse button to locate your filename. For marked records, enter a year and quarter.
- Select the Run Type.
- Click [Begin Subset]. The Subset EQUI file will begin and can be viewed via the batch manager. For more information on viewing the job see Batch Monitor in Chapter 6.
The following output files are created in the Reports folder when the Subset EQUI is run:
| Output File | Description |
|---|---|
| subloaderrmmdd | Error File. This file is not created when ‘Marked Records Only’ is selected. |
| dcountsyyyyq | Data Counts File. See Chapter 7 Reports for more information on Data Counts Listing. |
| totssubdlyymmdd | Lists Totals: Number of Units, Employment Month 1, Employment Month 2, Employment Month 3, Total Wages, Taxable Wages, Contributions |
| equisub-incl-indyymmdd | Lists UNUM, RNUM, Year, Qtr, Subset for accounts included in Subset file. This file can easily be formatted and used as the input file. See Appendix C for Subset Input File Format. |
| equisuberrsyymmdd | Error File |
| equisubyymmdd | Subset EQUI |
ARCS Tab
The ARCS tab is used to submit jobs to generate the Summary of Differences file and Code Change Supplement (CCS) for NAICS. The CCS Summary of Differences file shows the economic data that enter or leave due to noneconomic code changes. The CCS file is a compilation of all records with noneconomic code changes in one or more of the essential classification codes. For most States, these are the county, ownership, and industry codes. For New England States and New Jersey, township is also included.
Note: The ARCS tab is not used to select accounts for the Annual Refiling Survey. This is done through a create process job. See Chapter 6, Administrative, ARCS Selection Criteria (Control File Build).
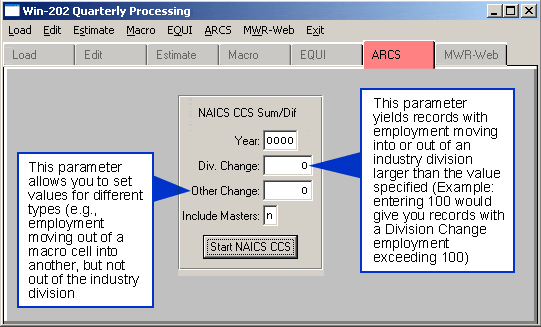
To Create a NAICS CCS Summary/Difference:
- Enter the appropriate year.
- Input the "Division Change" parameter (not required). See output ccs2-1a-rpt.txt file.
- Input the "Other Change" parameter (not required). See output ccs2-1b-rpt.txt file.
- In the "Include Masters" field, enter a "y" to include master records or an "n" to leave them out.
- Click [Start NAICS CCS] to run job.
The following 10 files are generated in the \win202\reports directory:
- ccs2-counts-file.ot (data counts file)
- ccs2-1a-rpt.txt (ccs listing BLS 1A selected records with division level code changes)
- ccs2-1b-rpt.txt (ccs listing BLS 1B selected records with code change within the division and/or locality change and/or ownership change)
- ccsfile2.txt (detailed ccs file)
- count2-rpt-file.txt (number of records on the micro file and number of micro file records excluded from the ccs file)
- error2-rpt.txt (ccs creation report for records with response code of 31, 30 or non-numeric employment)
- miss2-wg-rpt.txt (ccs creation report for records excluded due to missing employment and/or wages)
- nocode2-rpt.txt (ccs creation report for records excluded due to missing code change)
- sum2-dif-rpt.txt (code change summary of differences for 4th quarter of prior year and 1st quarter of selected year)
- zero2-rpt.txt (ccs creation report for ccs zero employment and wage reported)
MWR Web
The MWR Web screen is used for creating and loading MWRweb files. These BLS files are transferred (uploaded/downloaded) via EUSWeb. Click here to view the "State Reference Documentation" pdf file.
MWRWeb data is loaded by selecting the appropriate load type, entering the filename or using the [Browse] button to find the file, and selecting the [Begin Process] button. To create a state historical date file choose the radio button, enter a Year/Quarter, and select the [Begin Process] button. You can check the job status using the Batch Monitor (Manager) See Chapter 6, Administrative, Monitor (Batch Monitor) Tab for more information.
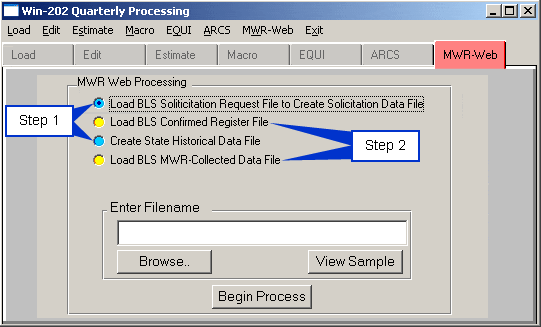
A quarterly cycle is as follows:
Step 1: Begin the process by loading the "BLS Solicitation Request File" downloaded via EUSWeb. When the load is finished, the "solicit-load-rpt.txt" file is generated in the WIN202\reports folder. This file displays the total number of records loaded. Next, create the "State Historical Data File" to generate the "hist-dta-##yyyyq.txt file in the WIN202\reports folder (## = state FIPS). This file is transmitted to BLS via EUSWeb.
Step 2: At weekly intervals during the quarter, BLS will provide a "Confirmed Register File" (mwrconfirmmmddyy.txt) and a "MWR-Collected Data File" (mwrdatammddyy.txt) via EUSWeb. The file names include the month, date, and year (example: mwrconfirm041907.txt and mwrdata041907.txt). Note: When loading these files, load the Confirmed Register file first and the MWR-Collected Data file second. Loading the Confirmed Register file generates the MWRweb-load-ddmm.txt file (displays record load counts) and loading the MWR-Collected Data file generates the confirmed-ld-errors.txt file (displays error count) in the WIN202\reports folder.