Home → Contents → Introduction → Data Entry Screens → Screens → Quarterly Processing → Lookup Tables → Administrative → Reports → Server Information → Appendices
Chapter 2: Data Entry Screens
Selecting the [Data Entry] button on the "Main Menu" screen, displays the "Data Entry" screen illustrated below. You can click one of eight buttons to manually enter data into the WIN-202 system. The Data Entry Screens are used for large-scale manual data entry or via a scan gun. Analysts may also enter data via the [Screens] button on the "Main Menu" screen (see Chapter 3, Screens for detailed information).
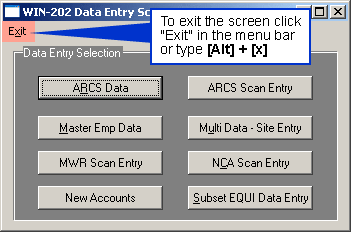
The Data Entry Screens are used for the following:
- ARCS Data
- Inputting or updating Annual Refiling data (e.g. NAICS, Ownership, Response Code, etc.)
- ARCS Scan Entry
- Scanning or manually inputting Annual Refiling to track receipt and response code
- Master Emp Data
- Entering or Updating Employment dat a for non reporting master or single accounts
- Multi Data – Site Entry
- Entering data from the MWR
- Entering/Updating employment & wage data for subunits of multis
- Comparing subunit employment & wage data to master employment & wage data
- MWR Scan Entry
- Scanning or manually inputting MWRs to track receipt
- NCA Scan Entry
- Scanning or manually inputting NCAs to track receipt
- New Accounts
- Updating or Creating Accounts for current quarter
- Subset EQUI Data Entry
- Creating Subset EQUI Records
ARCS Data
- To manually input response codes from the Annual Refiling Survey (ARS) and/or any changes reported on the ARS.
To Update ARCS Data:
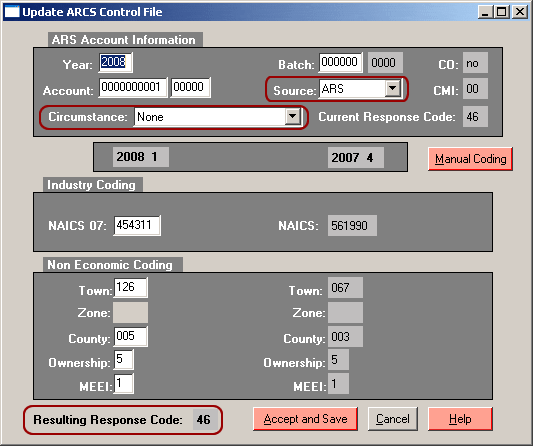
- Click on the [ARCS Data] button from the "Data Entry" screen. The "Update ARCS Control File" screen displays as shown below. This screen updates first quarter data with the last available previous quarter data.
- Input the year, UI Account Number and RUN.
- The Batch Number field is optional. To start a new batch, input a number greater than zero.
- Change the source if necessary. The default source is "ARS". Use "Other" if the code change is from a non-refiling source.
- Input any code changes. Note: The response code is automatically assigned based on the values entered on the screen. The code is displayed at the bottom of the screen as the "Resulting Response Code".
- Click the [Accept and Save] button. The quarterly codes are saved to the first quarter record. Note: If you click the [Cancel] button first, the screen will close and any changes made will not take effect.
- To override the automated response code selection click the [Manual Coding] button. The following warning message is displayed:
- Click the [Cancel] button on the Update ARCS Control File screen to close the screen or work on a different account by entering a new UI/RUN number. The code you manually entered is not viewable on the Update ARCS Control File screen, it displays on the ARCS screen only. Note: Selecting the [Accept and Save] button will overwrite your manual code with the system determined code.
- Click the [Help] button to view the online documentation for the Update ARCS Control File screen.
- When finished with the Update ARCS Control File screen, click the [Cancel] button to return to the Data Entry Screens menu.

Click [Yes] to view the Manually Override Response Code Screen shown below.

Enter the response code and select the [OK] button to make your change and return to the Update ARCS Control File screen.
ARCS Scan Entry
The purpose of this screen is to enter Annual Refile Control Survey information quickly into the WIN-202 system using a scan gun. When account refile data is entered this way, the system knows not to produce additional forms for subsequent mailings. Scanning a form that is part of the NAICS revision generates a message and does not update the control file. It is recommended that you have your computer's sound turned on in order to hear this notification. Note: If there are revisions on the ARS form, then updates will need to be made via the ARCS Data Entry screen.
To enter ARCS data via scanning:
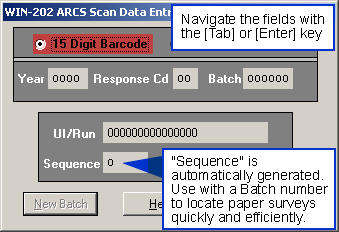
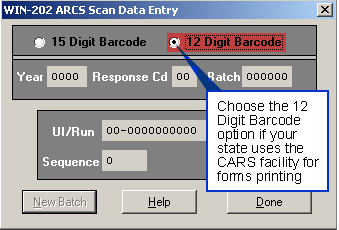
- Click the [ARCS Scan Entry] button on the "Data Entry" screen. The "WIN-202 ARCS Scan Data Entry" screen will appear (see below figures).
- Choose either the 15-digit or 12-digit barcode radio button. The 12-digit barcode option is for forms printed at the CARS print facility where the first 2-digits are the state’s FIPS code and the remaining 10-digits are the UI account number. If your state does not use the CARS facility, then choose the 15-digit barcode option.
- Use the [Tab] or [Enter] key to enter a year, response code and batch code.
- Press [Tab] or [Enter] to move into the UI/Run field.
- Assuming that a scan gun has been setup, data entry can begin.
- Position the form's bar code under the scan gun for the account number and associated information to be read and saved in the system. Repeat this step for all accounts with the same response code.
- If you want to start a new batch of response codes then click the [New Batch] button and follow steps 2-6.
- Use the [Help] button to view the online documentation for detailed information on the ARCS Scan Data Entry screen.
- Click [Done] when finished entering batches.
Master Employment Data
Uses:
- Entering employment data for non-reporting master or single accounts
- Changing employment data for master or single accounts
To Enter Employment Data:
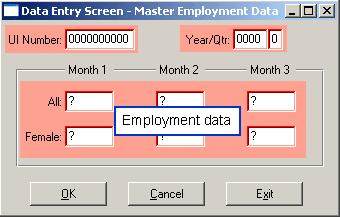
- Click on the [Master Emp Data] button on the "Data Entry" screen. The "Data Entry Screen-Master Employment Data" screen displays.
- Double-click on the UI Number field. Enter the Unemployment Insurance Account Number and press [Enter].
- Input the year and press [Enter].
- Input the quarter and press [Enter]. Any existing employment for the account and quarter will appear.
- Input the correct employment information for each month and press [Enter].
- Click [OK]. Use [Cancel] if you decide that you do not want to add or update the information.
- Follow steps 2-6 if you wish to input data for another account.
- Click on the [Exit] button when you are done entering data and you will be brought back to the "Main Menu" screen.
Multi Data – Site Entry
Uses:
- To enter data from the Multiple Worksite Report
- To enter employment and wage data for subunits of multis
- To compare reported data for master accounts with reported data of all subunits of the master account.
To Enter Multi Establishment Wage and Employment Data:
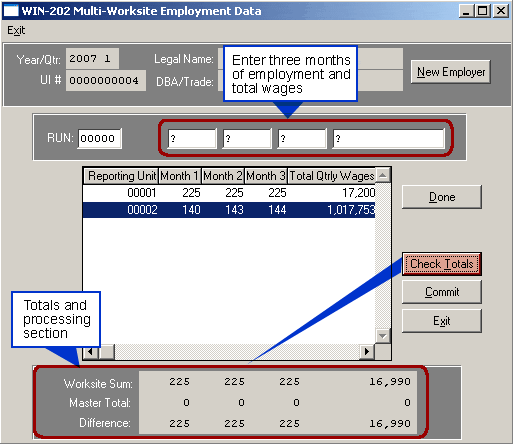
- Click the [Multi Data – Site Entry] button on the "Data Entry" screen. The "WIN-202 Multi-Worksite Employment Data" screen will appear.
- Double-click the ‘Year/Qtr’ field and enter a year/quarter.
- Enter the Unemployment Insurance Account Number (UI #) and press [Enter]. The Legal name and DBA for the account displays on the screen.
- Enter the RUN number and press [Enter]. Note: If the Master is closed, access is denied to the subunits or if the Master is active but a subunit is closed then access is denied to the subunit only.
- Enter the three monthly employment figures and the quarterly wages, pressing [Enter] after each. The information entered for the worksite will appear in the browser area.
- To work on another worksite, press [Enter]. Type another RUN number and press [Enter] to proceed.
- Click [Done] when you are finished entering worksite data for the account.
- Click [Check Totals] to compare differences between worksite and master totals. If a discrepancy exists then verify if data from the Multiple Worksite Report (MWR) was entered correctly.
- Click [Commit] if the data is accurate and you want to save it.
- Click the [New Employer] button to enter data for another employer or click [Exit]. Clicking [Exit] before [Commit] results in loosing the data just entered coupled with a return to the "Main Menu" screen.
Modifying Employment and Wage Data
An analyst can modify data for any worksite previously entered as follows:
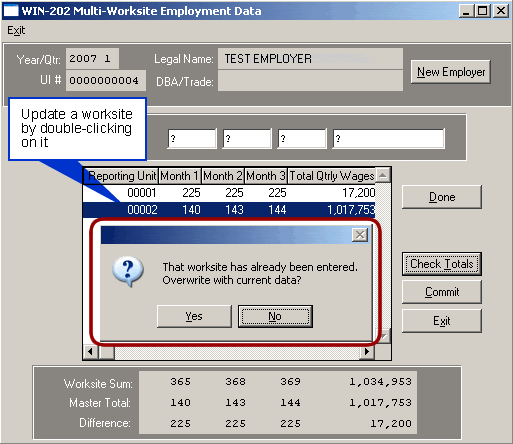
- Double-click on the worksite in the browser of the "Multi-Worksite Employment Data Entry Screen" (see figure below). This brings you to the RUN for that establishment.
- Input any changes to the employment and wage data. Press [Enter] after each change. When pressing the [Enter] key after the wages entry, a dialog box displays asking if you want to overwrite the existing data (see figure below). The default is "No".
- Click [Yes] if your changes are correct. Click [No] if your changes are not correct. If you click [No] your changes will be lost.
- When you are finished modifying data, click [Done].
MWR Scan Entry
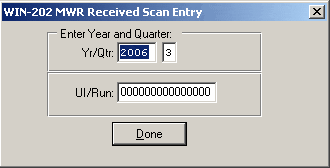
This screen functions much like the ARCS Scan Entry screen. Using a scanner the bar code containing the UI/RUN number can be read which sets the MWR received indicator to "Yes". Employment data is not entered. This screen only allows the updating of records to exclude them from the second mailing of MWR forms. If a scanner is not available, the UI/RUN numbers can be entered using the keyboard.
To Input MWRs:
- Click the [MWR Scan Entry] button on the "Data Entry" screen. The "WIN-202 MWR Received Scan Entry" screen displays. The year of the "Yr/Qtr" field is highlighted on this screen indicating a readiness to receive input.
- Input a year and quarter using the [Tab] key to navigate. Press [Tab] moving to the UI/Run field. Assuming that a scan gun has been setup, data entry can begin.
- Position the form's bar code under the scan gun for the account number and run to be read. If a scan gun is not available, type in the account number and run.
- Click [Done] when finished entering MWR's.
NCA Scan Entry
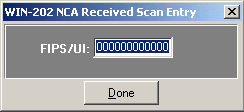
The NCA Scan Entry screen is used to quickly enter unemployment numbers from CA forms using a scan gun. Using a scanner, the bar code containing the state FIPS and UI number can be read which sets the received indicator in the NCA-control table to "Yes". However, employment data is not entered. This screen only allows the updating of records to exclude them from future mailings of NCA forms. If a scanner is not available, the UI/RUN numbers can be entered using the keyboard.
To Input CA Forms:
- Click the [NCA Scan Entry] button on the "Data Entry" screen. The "WIN-202 NCA Received Scan Entry" screen displays.
- Position the form's bar code under the scan gun for the account number and run to be read. If a scan gun is not available, type the account number and run.
- Click [Done] when finished.
New Accounts
This screen allows users to 1) create new accounts or 2) update existing ones for the current quarter only.
To create a New Account:
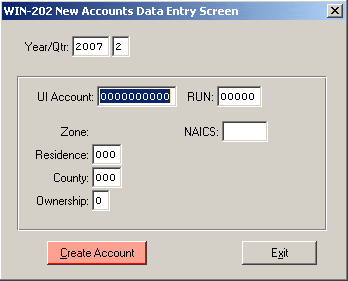
- Click the [New Accounts] button on the "Data Entry" screen. The "WIN-202 New Accounts Data Entry Screen" displays:
- Input the UI, run, zone (if applicable), residence, ownership, and NAICS information. Navigate among fields using the [Tab] key. The county code fills in automatically when a valid residence or zone code is entered. The LMA, WIA and MSA codes are derived from the residence or county codes.
- Use the [Tab] or [Enter] key to move to the [Create Account] button to activate it. Use the [Enter] key to update the system.
- Click [Exit] when finished.
Note: When an account is created, the account’s setup date is assigned the value of the current day’s date and a transaction record is added to the status log with the User ID, the current date as the posted date, and "CREATE" as the table name. See Section 6, Administrative, Transactions Tab for more information.
To Modify/Update Values for an Existing Account:
- Click the [New Accounts] button on the "Data Entry" screen. The "WIN-202 New Accounts Data Entry Screen" appears.
- Enter the UI/Run number and press [Tab]. All of the account's information displays on the screen.
- Make changes to the fields of your choice.
- Use the [Tab] or [Enter] key to move to the [Create Account] button to activate it. Use the [Enter] key to update the system with your changes.
- Click [Exit] when finished
Subset EQUI Data Entry
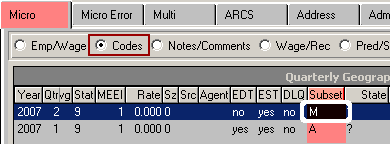
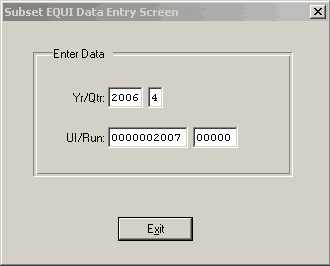
A Subset EQUI is used to report to BLS a limited number of micro record corrections. This is used instead of sending a full EQUI Update File. The Subset EQUI Data Entry Screen is used to mark micro records to be included in the Subset EQUI. Individual records can also be manually marked using the Subset EQUI field on the Micro Codes Screen (see Chapter 3, Screens, Codes Radio Button for more information). Records are selected for the BLS report via the EQUI Tab on the Quarterly Processing screen (see Chapter 4, Quarterly Processing on running a Subset EQUI).
To Create a Subset of Records:
- Click the [Subset EQUI Data Entry] button on the "Data Entry" screen.
- Enter the Year, Quarter, UI, and RUN Number for the record to be "marked"’ for inclusion. Use the [Tab] key to navigate between fields and to submit the record to be marked (i.e., tab the cursor to the Yr/Qtr field to complete the process).
- Click [Exit] on the Subset EQUI Data Entry Screen when you are finished marking accounts.
- If you open the Micro Codes screen, you can view the account you marked. Notice the "Subset" column for 2006/4 displays an M for manually marked. To view all the manually marked accounts on the subset file, run the Subset EQUI Listing from the Reports menu or the subset.p Progress query (click here to view information on running queries).
-
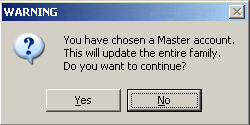
Note: When you enter a Master account UI/Run, a message box warns you that all sub-units for the family will be marked. Click Yes to mark all subunits or click No to mark only the master account.
