Home → Contents → Introduction → Data Entry Screens → Screens → Quarterly Processing → Lookup Tables → Administrative → Reports → Server Information → Appendices
Chapter 6: Administrative
This section of the WIN-202 System is geared primarily toward supervisors. Increased security exists to prevent casual users from accessing these screens. Supervisors must grant users Admin Function privileges in order to access these screens. Click the [Administrative] button on the "Main Menu" screen to display the "Administrative Functions" screen.

The five tabs function as follows:
- Batch Monitor—Tracks the status of jobs you run on the WIN-202 system
- State Information—Contains information about your state such as:
- Headers that display on forms and reports
- FIPS code for your state
- If your state includes female data
- If your state uses town codes
- If your state uses zone codes
- If your state automatically assigns comment codes
- If your state uses Touchtone Response codes
- Labels used for fields you have set up for state use (information you want collected that is not part of the ES-202 system)
- Transactions—Logs transactions on the WIN-202 system, what they were and when they occurred
- Maintenance—Locks or unlocks quarters, rolls quarters and creates a new current quarter; archives the oldest quarter to file, dumps the database and manages ID privileges
- Edit Stats—Provides statistics for each year/quarter including:
- Whether or not the quarter is locked
- Date the last micro, macro, multi, wage and predecessor/successor edits were run
- Date the last EQUI file was created
- The number of times a job has been run
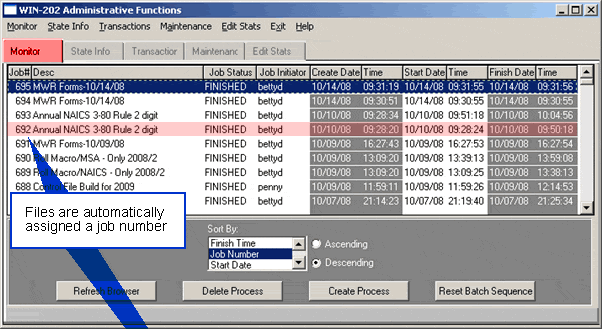
Monitor (Batch Monitor) Tab
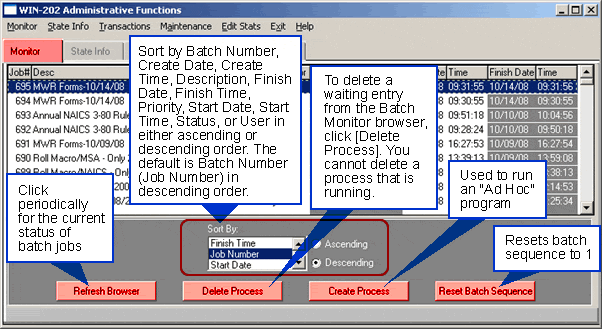
The Batch Monitor, sometimes referred to as the Batch Manager, displays a list of batch jobs (e.g., data loads, listings, reports, macro rolls, etc.) that are waiting to run or have already ran on the server. The browser contains the following information about each job in the list:
- The system assigned job number and description
- System priority, run status, the user who initiated the job
- Whether the job must be run alone or not
- The date and time the job was created and the date and time the job was started
- The date and time the job finished (To see the finish date, use the horizontal scrollbar)
The priority of a job determines when it will run. If all jobs have the same priority, they are processed in job number order. A job with a high priority will be run before a job with a lower priority. To change priority, click on a job title to highlight it and then right-click on the job title. Each right-click changes the priority of the job among low, medium, and high. Changing the priority of a job already running has no effect.
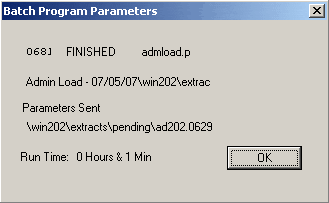
Double-click on an entry in the Batch Monitor browser to display the "Batch Program Parameters" screen (see below). This screen displays either the included job parameters or the path to the file that was loaded along with the total run time for the job. This information may be helpful if you want to compare past run times.
Create Process: Ad Hoc Programs
The system contains ad hoc procedures you can run to get answers for a specific question. These programs are stored on the server under the \win202\progbtch directory.
To Run a Program:
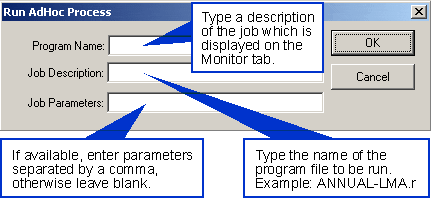
- Click the [Create Process] button from the Monitor tab to bring up the "Run Adhoc Process" screen.
- Enter a program name including the file extension in the Program Name field.
- Enter a description of the job you want to run in the Job Description field.
- Enter a set of parameters in the Job Parameters field. If there are no parameters leave this blank.
- Click [OK] to run the job. If you click the [Cancel] button the job does not run.
Note: You must know what the parameters are and the order they are in. Separate each parameter with a comma. Parameters are specific to the job you are running.
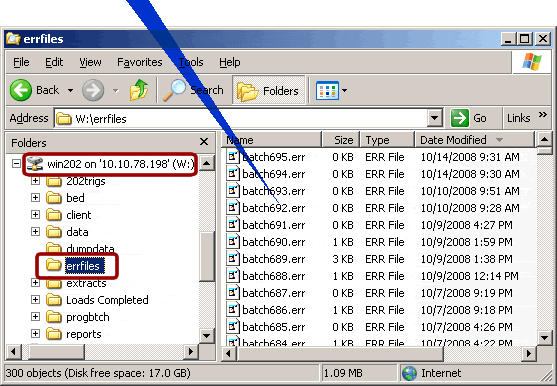
The output from an ad hoc program is stored in the \Win202\reports directory on the server. An error file is created for each job and the job number is part of the filename. Error files are written to the \win202\errfiles directory on your server. If a job fails, you can look at error files for possible causes. Certain error files may contain information such as the number of records processed.
ARCS Selection Criteria (Control File Build)
The selection of accounts for the Annual Refiling Survey (ARS) is done via an ad hoc procedure to create the "Control File". Note: the ARCS Lookup Tab on the Quarterly Processing screen allows you to view the contents of the Control file (see Chapter 5, Lookup Tables, ARCS Lookup Tab for more information).
Control File Build:
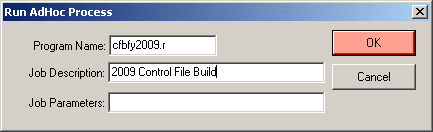
- Click the [Create Process] button from the Monitor tab to bring up the "Run Adhoc Process" screen shown below.
- Enter the program name: cfbfyYYYY.r
- Enter the job description: CFB YYYY
- Leave parameters blank
- Click [OK] to run the job
- View the progress via the Batch Monitor
The following 5 output files are placed in the \win202\reports directory:
- cfb2009-trs.txt: A file containing single accounts that are TRS eligible. This file is sent to BLS to create a TRS Respondent file to be used with the TRS Load.
- cfb2009-invalidcty.txt: A list of accounts with invalid County codes for the current quarter.
- cfb2009-ein.txt: A report containing a list of accounts that were automatically assigned a Response Code of 41 based on the list of EINs supplied by BLS National Office.
- cfb2009-ars-total.txt: A summary information report for review by the State and Regional office. This report helps States understand the contents of the control file so they can avoid any problems when building it. It contains information on counts of masters, singles, and subunits for each EIN pair (e.g., 33,34,…66) and totals; counts of masters, singles and subunits with zero or invalid EINs (this count also shows which position of the UI account number field was used to select the records); counts of masters, singles and subunits by size with totals; counts of TRS eligible records; and counts of carryover records.
- trs-listing-2009.txt: A count of individual Collection Mode Indicators (CMI) for non-respondents. This listing can also be run from the Reports Screen (Control File Listing for Non-Respondents).
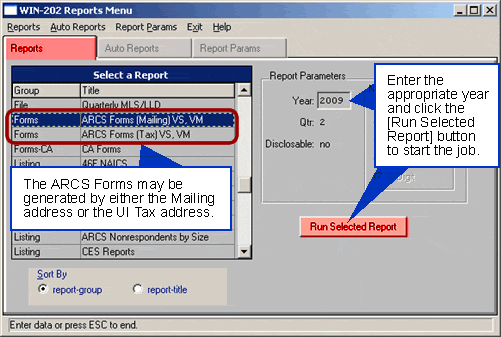
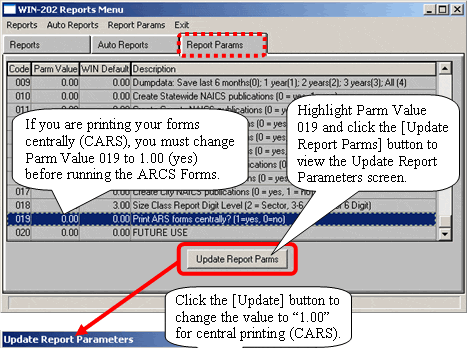
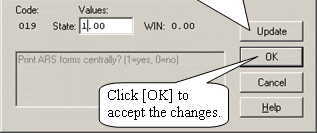
After you have completed the control file build, go to the "Reports Screen" and run the "ARCS Forms ... VS, VM" report from the "Reports Tab" (see Chapter 7 for more information on running reports). The files (vmtp, vstp, and vs-trs-tp) are generated in the \win202\reports directory. Note: If you are centrally printing your forms (CARS), you must change Parm Value 019 to 1 (yes) on the "Report Params Tab" to turn on the CARS option and change the print output for the forms (see figures below ).
Error File
For each load/batch that is run, an error file is produced in the /win202/errfiles folder. Each file name is automatically assigned a batch job number that can be viewed on the "Monitor" screen. In the example shown below, job numbers 688 through 695 on the "Monitor" screen correspond to the error files produced in the Error Files folder (errfiles). Note: File sizes of 0 KB indicate that there are no errors. These files are blank and cannot be opened.
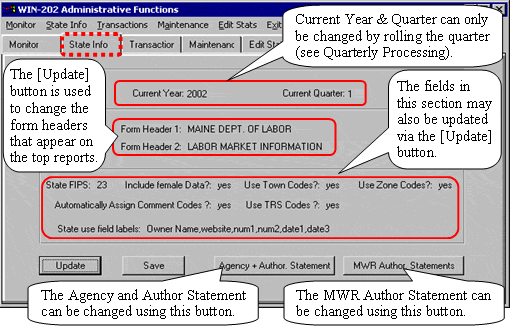
State Information Tab
The State Information Tab displays the State’s data. With certain privileges one can click on the "State Info" tab to modify options.
To Update Data:
- Click [Update]
- Click on the field desired and enter changes
- Click [Save]
Note: A user can specify labels to go along with state use fields (i.e., fields created especially for the state to enter information not captured in the WIN-202 system). State Use data is displayed via the State Use tab (see Chapter 3 Screens). State use field labels initially display as "Owner Name", "char2", "num1", "num2", "date1" and "date3". For example, to modify "Owner Name" highlight the text and type your choice leaving the commas intact.
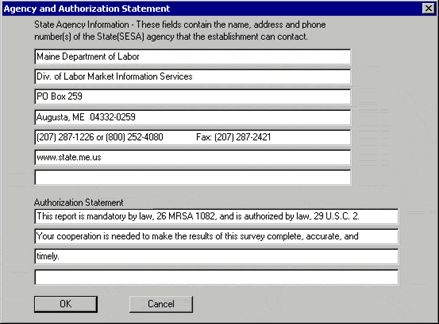
Agency & Authorization Statement & MWR Statement
Click the [Agency + Author Statement] button from the "State Info" tab to enter state-specific information that will print on ARCS forms. You can edit the address, phone number, fax number and web site address along with the authorization statement for the Annual Refiling Survey. Click [OK] to save changes otherwise, click [Cancel].
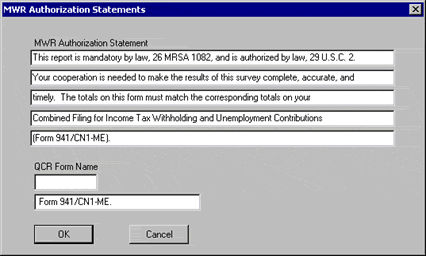
Click the [MWR Author Statements] button from the "State Info" tab to enter state-specific information that will print on MWR forms. To save changes click the [OK] button otherwise, click the [Cancel] button.
Transactions Tab
The WIN-202 system is transaction based. This means that all changes (additions, updates and deletions) are captured and stored until their removal. Click on the "Transactions" tab to view changes made to individual accounts by user(s). You may select accounts to view by entering an Account Number and RUN or by using the First, Prev, Next, and Last buttons.
In the below figure, the transaction highlighted occurred in the 2nd quarter of 2004 by user "Betty" on 8/23/2004 at 11:58.27. The Total Wages Indicator in the quarterly table on the database was changed from M to R.
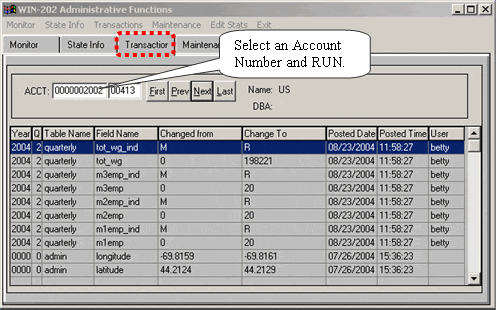
Note: Additions, updates or deletions to an account cannot be made using this screen. These transactions are discussed in the "Data Entry" and "Screens" portions of this manual. Removal of transactions stored in the database are not permitted using this screen.
Maintenance Tab
Clicking the "Maintenance" tab displays three sub-tabs:
- Quarters
- Database
- Security
Quarters Sub-Tab
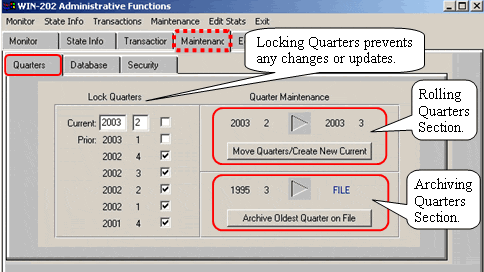
Click the "Quarters" sub-tab to perform quarterly maintenance. This screen allows users to lock or unlock quarters, archive the oldest quarter, and roll forward making a new quarter current.
Locking Quarters
When a quarter is locked, changes cannot be made to it. If a year/quarter combination is grayed out then it is unavailable to lock.
Changing the year and quarter on the "Lock Quarters" section does not change the current year and quarter in the system; it is used only to view and set locks.
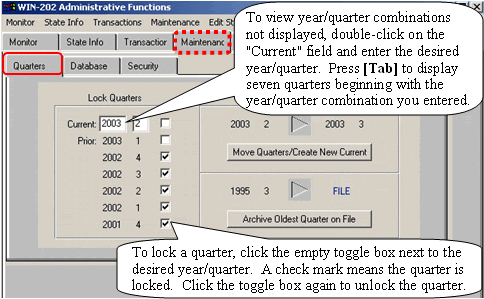
Rolling Quarters (Quarter Maintenance)
In the top part of the Quarter Maintenance section of the screen, you will see two year/quarter combinations:
- The current year and quarter for processing
- The year and quarter it rolls forward to
To roll quarters forward (aka quarter move or bump), click the [Move Quarters/Create New Current] button. You cannot roll forward until edits are complete and deliverables have been created for the current quarter. The button is disabled (grayed out) until those conditions are met. Once the button is enabled click it to create a new system current quarter. Appropriate data for each account will be loaded to the new quarter.
Archiving Quarters
This screen allows you to archive the oldest quarter to a file. The year/quarter combination displayed in the bottom portion of the "Quarter Maintenance" section is the quarter available for archiving. If the [Archive Oldest Quarter on File] button is disabled (grayed out) then archiving is not possible. The most likely reason for this is that the system always requires six quarters of old data. Each state can choose the number of quarters it would like on the WIN-202 system before archiving. Note: The total number of quarters is limited by disk space.
Click the [Archive Oldest Quarter on File] button to start a batch job that can be monitored using the Batch Manager. A job description will look like the following: "Archive Qtr yyyy/q") where "yyyy" and "q" are year and quarter, respectively. The oldest quarter is archived to the \win202\reports directory and then deleted from the WIN-202 System. When completed you can copy the file to tape or CD.
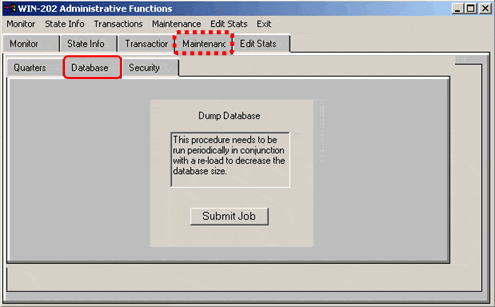
Database Sub-Tab
The database dump should be done in conjunction with a database reload. This helps defragment data which becomes scattered on your hard disk over time. It may also be used to increase the size of your database if necessary. Typically, the system developer would initiate this option and you would rarely dump the database yourself.
When dumping the contents of the database, the following directory must exist on your server: \win202\dumpdata. Delete all old data files from this directory before dumping the database. Click the "Database" tab and click the [Submit Job] button to dump the database. Monitor the process using the Batch Monitor. Periodically, the system developer will issue instructions on reloading data.
Security Sub-Tab
Only users with administrative privileges have access to this screen. This screen is used to add new users, reset user passwords, modify user permissions, and delete users from the system.
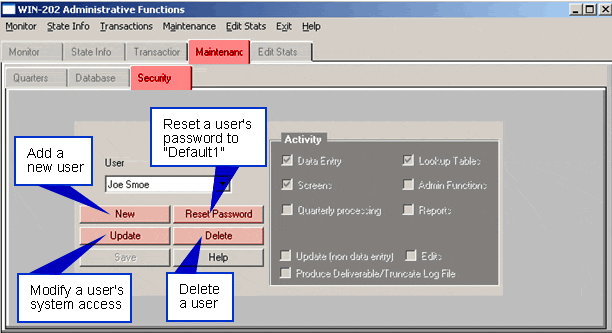
Add New Users
- Click the [New] button to open the "Add New User" screen.
- Type in the new user name and click [OK].
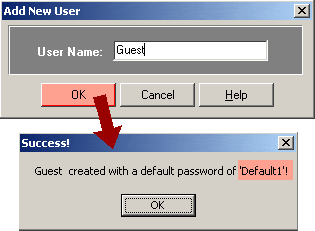
- The new user name is created with a password of "Default1".
- The user may change their password using the "Change Password" option on the Main Menu screen.
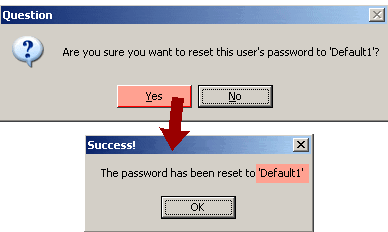
Reset User Passwords
- Select the user name from the dropdown selection box.
- Click the [Reset Password] button and affirm the process when prompted.
- The user's password is reset to "Default1".
- The user now has the option of using the "Change Password" option on the Main Menu screen.
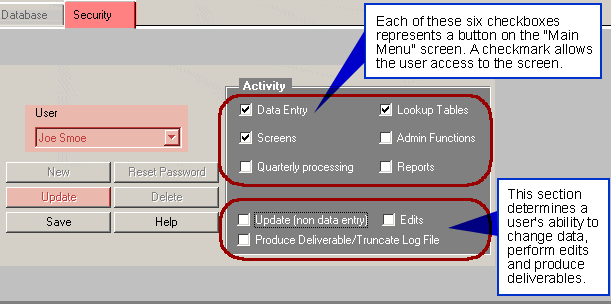
Update User Privileges
- Select the user name from the dropdown selection box.
- Click the [Update] button.
- Click on the Activities the user needs access under the ‘Activity’ Section.
- Click the [Save] button to apply privileges.
In the figure below the user "Joe Smoe " can perform data entry, and view screens and lookup tables. This user cannot perform administrative functions, quarterly processing or run reports. To remove a privilege, click on its corresponding check mark.
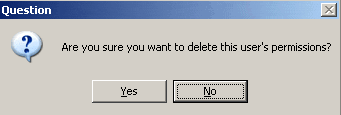
Delete Users from the System
- Select the user name from the dropdown selection box.
- Click the [Delete] button and affirm the process when prompted.
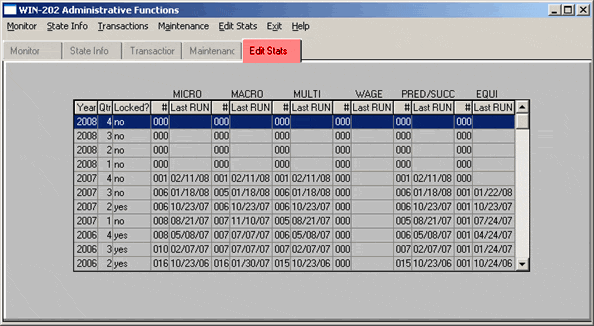
Edit Statistics Tab
Click the "Edit Stats" tab to view the dates when the edits and deliverables were last run and their frequency. The screen also displays year/quarter combinations and their locking status. Dates of last run accompany the following edit types: Micro, Macro, Multi, Wage, and Predecessor/Successor. The date of an EQUI deliverable last run is also displayed.