Home → Contents → Introduction → Data Entry Screens → Screens → Quarterly Processing → Lookup Tables → Administrative → Reports → Server Information → Appendices
Chapter 5: Lookup Tables
Lookup tables store descriptions associated with codes used in the system. For example, the description for NAICS 113310 is logging. If you click the [Lookup Tables] button on the "Main Menu" screen, you will see the "Lookup Tables" screen, which has the following six tabs:
- Res/Ind—Contains descriptions for county and town codes, LMA codes, WIA codes, MSA codes, NAICS codes, ZIP codes, Zone codes and SIC codes.
- Edit—Contains descriptions for parameters, error codes, estimate codes, comment codes and response codes.
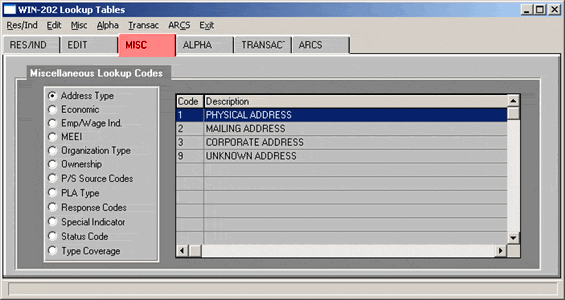
- Misc—Contains descriptions for address types, auxiliary codes, economic code change indicators, coverage types, organization types, multi establishment employer indicators (MEEI), ownership codes, status codes, special indicators, and Employment and Wage indicators.
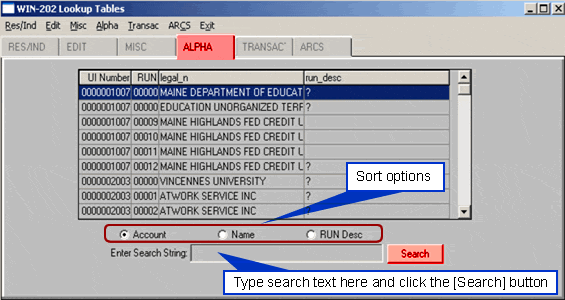
- Alpha—To find UI and RUN numbers, names and RUN descriptions by searching for an employer alphabetically.
- Transac—Displays a transaction history for an account. It displays fields that were changed, their previous and current values, a date-time stamp and the user who made the changes.
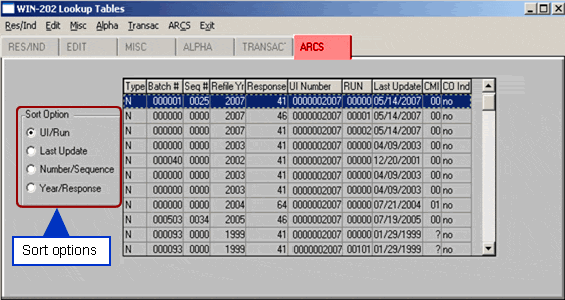
- ARCS—Displays the Type, Batch #, Sequence #, refile year, response code, UI, RUN, when accounts were last updated, Collection Mode Indicator, and Carryover indicator. Four sort options are available.
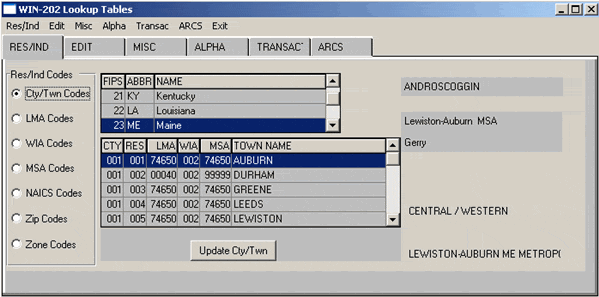
Note: These screens can be accessed either by clicking on the tabs or using the pull down menus. You may also access the menus by pressing and holding the [Alt] key and typing the underlined letter of the menu item (e.g. press [Alt] and [E] for Edit).
Residence/Industry Lookup Tab
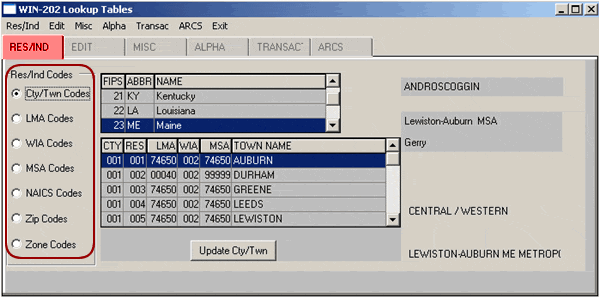
The "Res/Ind" tab contains definitions of Residency and Industry codes. There are seven radio buttons on this tab as illustrated below. Additions, edits, and deletions can be performed to the LMA, WIA, and MSA codes via this screen.
County/Town Codes
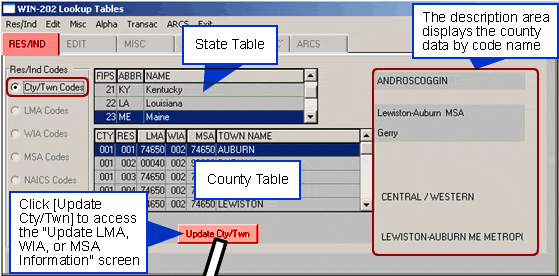
This screen defaults to "Cty/Town Codes" table. Your state name is highlighted in the upper browser. The County/Town Codes lookup table displays the following:
- State Table
- County Table
- Description Area
To update LMA, WIA and MSA codes:
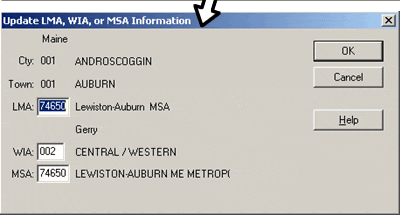
- Double click on the desired entry in the country table or highlight an entry in the county table and click the [Update Cty/Twn] button to access the "Update LMA, WIA, or MSA Information" screen shown below.
- Input changes.
- To finish click [OK] to save the changes. If you click the [Cancel] button, changes will not be saved. When a code is changed in the cty/twn table, the user is reminded to update the quarterly table by running the msa-updte.r procedure with "Create a Process".
LMA Codes
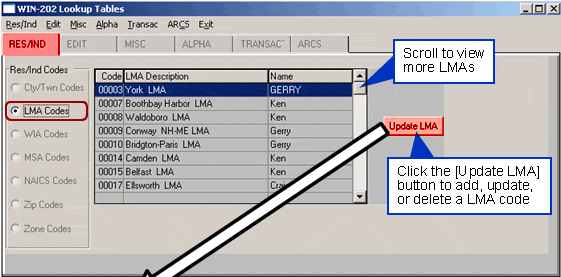
The Labor Market Area (LMA) Codes table displays the LMA code and description. Unlike other lookup tables, LMA values are not installed when the system is set up in your state. Analysts enter these manually.
To Update an LMA:
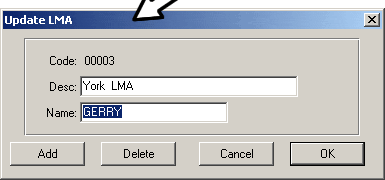
- Double click on the desired LMA or highlight the LMA and click the [Update LMA] button to access the "Update LMA" screen shown below.
- Make changes.
- Click [OK]. If you do not want to save your changes click [Cancel].
To Create a new LMA:
- Click on the [Update LMA] button to access the "Update LMA" screen.
- Click on the [Add] button.
- Input the code, description, and analyst name (LMA's only).
- Click [OK]. If you do not want to save your changes click [Cancel].
To Delete an LMA:
- Double click on the LMA you wish to delete or highlight the LMA and click on the [Update LMA] button to access the "Update LMA".
- Click the [Delete] button.
WIA Codes
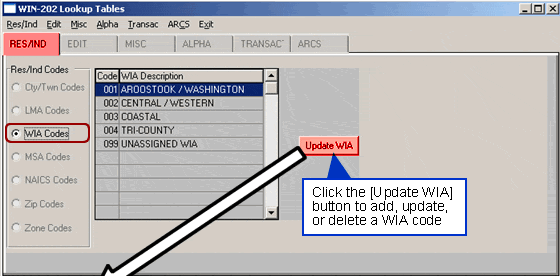
As with the LMA lookup table, Workforce Investment Act (WIA) geographic values are not installed with a system set-up in your state. Analysts need to enter these manually.
To Update a WIA:
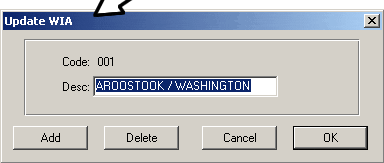
- Double click on the desired WIA or highlight the WIA and click the [Update WIA] button to access the "Update WIA" screen shown below.
- Make changes to the description.
- Click [OK]. If you do not want to save your changes click [Cancel].
To Create a new WIA:
- Click on the [Update WIA] button.
- Click on the [Add] button.
- Input the code and description.
- Click [OK]. If you do not want to save your changes click [Cancel].
To Delete a WIA:
- Double click on the WIA you wish to delete or highlight the WIA and click the [Update WIA] button to access the "Update WIA" screen.
- Click the [Delete] button.
MSA Codes
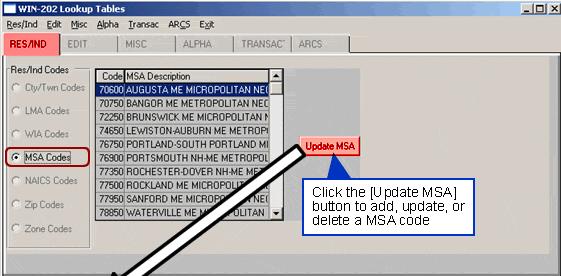
The "MSA Codes" lookup table contains descriptions of Metropolitan Statistical Areas (MSA) within your state.
To Update an MSA:
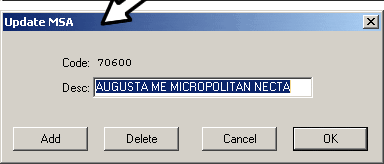
- Double click on the desired MSA or highlight the MSA and click the [Update MSA] button to access the "Update MSA" screen shown below.
- Make changes to the description.
- Click [OK]. If you do not want to save your changes click [Cancel].
To Create a new MSA:
- Click on the [Update MSA] button.
- Click on the [Add] button.
- Input the code and description.
- Click [OK]. If you do not want to save your changes click [Cancel].
To Delete an MSA:
- Double click on the desired MSA or highlight the MSA and click the [Update MSA] button to access the "Update MSA".
- Click the [Delete] button.
NAICS Codes
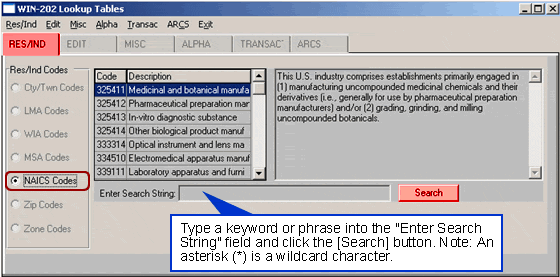
The "NAICS Codes" lookup table contains complete descriptions of 2002 North American Industry Classification System (NAICS) codes. The system will look for and use these first. If not found, then 1997 NAICS codes will be used.
Zip Codes
The Zip Code Lookup screen contains two browsers:
- State Browser contains state names and FIPS codes and can be sorted by State Name or by FIPS Code. This browser defaults to your state when the screen is accessed.
- Town Browser contains town names, zip codes and counties for the state selected in the first browser. This browser can be sorted by town names, zip codes or counties.
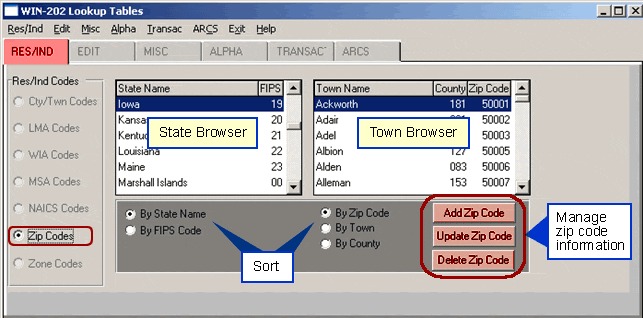
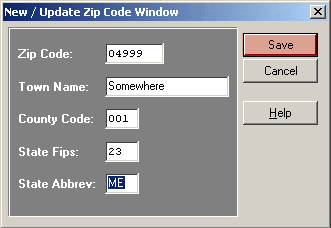
The zip code screen allows you to add, update and delete zip codes. To add a new zip code, click the [Add Zip Code] button to display the "New/Update Zip Code Window" shown below. Enter the appropriate information in the fields. The State Abbreviation field is automatically filled when you enter the State FIPS code. Click [Save] and then [Yes] to complete the process.
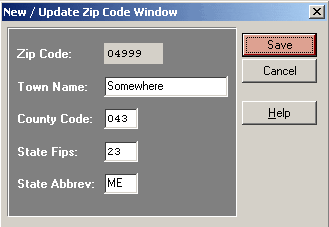
To modify zip code information, highlight the zip code in the Town browser and click the [Update Zip Code] button to display the "New/Update Zip Code Window" shown below. Update the desired data fields and click [Save] and then [Yes] to complete the process.
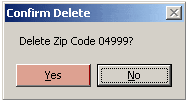
To delete a zip code, highlight the zip code in the Town browser and click the [Delete Zip Code] button. A confirmation message is displayed as shown below. Click [Yes] to complete the process.
Zone Codes
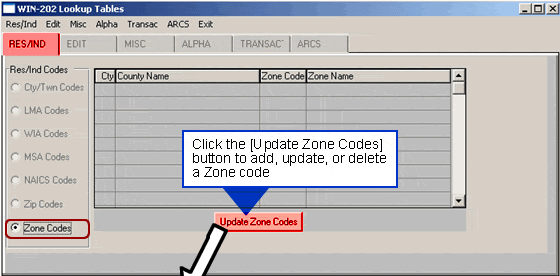
The zone code lookup table displays four fields: county code, county name, zone code and zone name. This screen provides information for states whose counties subdivide into zones utilizing alphanumeric codes rather than numeric residence codes.
To Update a Zone:
- Select the desired Zone.
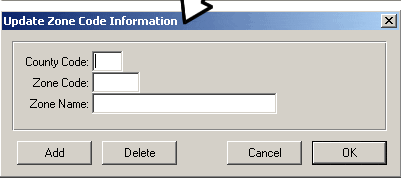
- Click on the [Update Zone Codes] button to access the "Update Zone Code Information" screen shown below.
- Make the desired changes.
- Click [OK]. If you do not want to save your changes click [Cancel].
To Create a new Zone:
- Click on the [Update Zone Codes] button.
- Click on the [Add] button.
- Input the County Code, Zone Code and Zone Name.
- Click [OK]. If you do not want to save your changes click [Cancel].
To Delete a Zone:
- Select the desired Zone.
- Click on the [Update Zone Codes] button to access the "Update Zone Code Information" screen.
- Click the [Delete] button.
Edit Lookup Tab
Click the "Edit" tab to access the Edit Code Lookup Screen. Within this screen is a set of radio buttons for five edit code lookups:
- Parameters codes
- Error codes
- Estimate codes
- Comment codes
- Response codes
Each radio button displays a distinct set of codes that are used in estimating and editing data.
Parameters
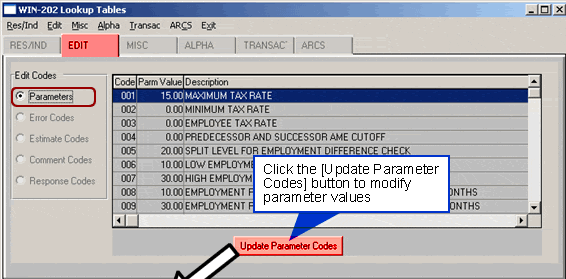
The "Parameters" radio button displays a list of all the current parameter settings used in the system. Use the horizontal scroll bar to view parm values, a description, the edit(s) which use it and the BLS default value. You can also get a printout of parameter information by using the "Output Parm Listing" Report (see Chapter 7, Reports).
To Change a Parameter:
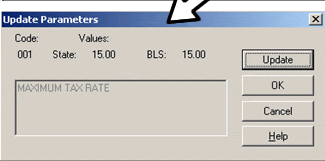
- Click the [Update Parameter Codes] button to view the "Update Parameters" screen shown below.
- Click the [Update] button to enable the state value parameter.
- Highlight the current value and enter one of your choosing.
- Click [OK] to save the change. If you click the [Cancel] button, the change will not be saved.
Note: The system does not allow new parameters to be added, only new values.
Error Codes
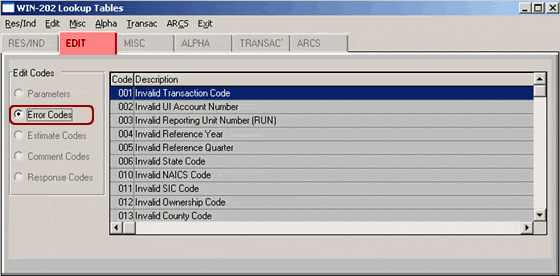
The "Error Codes" radio button displays all error codes produced by the system. These codes originate from the QCEW Operating Manual and cannot be changed. The codes are used in edit listings and display on-line in the "Edit" section of the "Screens" module. See Appendix F - Edit Conditions and Formulas from the QCEW Operating Manual for detailed information.
Estimate Codes
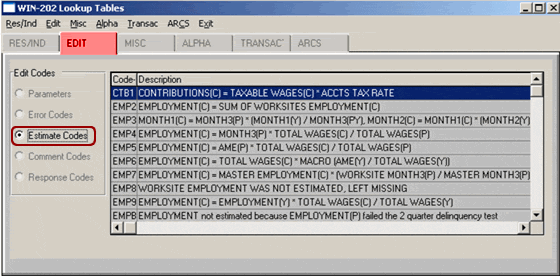
The "Estimate Codes" radio button displays a list of codes, descriptions and formulas used for estimation. These codes and descriptions cannot be modified.
Comment Codes
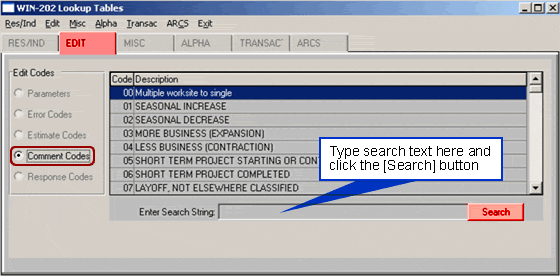
The "Comment Codes" radio button displays all Comment Codes and the associated descriptions. These codes represent the more common reasons for fluctuations in employment. These codes and descriptions cannot be modified.
You can search for specific words within comments. This can be useful if you have a description in mind but don't know the comment code to use. Click the "Enter Search String" field. Enter a word or group of words and click the [Search] button. Use the character "*" as a wildcard if you don't know the complete description. All codes containing the specified word(s) display in the browser. For example, if you enter "bonus*", code 31 (bonuses-executive pay-profit distribution-lump sum pay) displays in the browser.
Response Codes
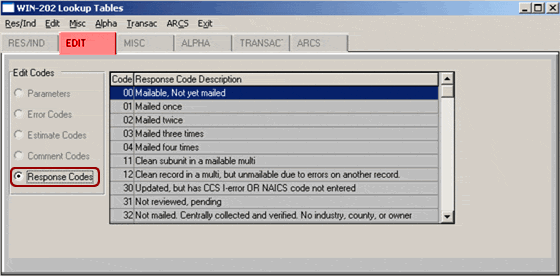
The "Response Codes" radio button is used to view a list of Annual Refile Control Survey response codes and their associated descriptions.
Miscellaneous Lookup Tab
The "Misc" tab provides a listing of the following code types and code descriptions (click on the name to view the complete listing):
- Address Type
- Economic
- Emp/Wage Indicator
- MEEI
- Organization Type
- Ownership
- Predecessor/Successor Source Codes
- PLA Type
- Response Codes
- Special Indicator
- Status Code
- Type Coverage
Alpha Lookup Tab
Use this screen to find an account when the UI and RUN number are unknown. Click on the "Alpha" tab. Search by words you believe are part of the employer name. To do this, click in the box beside the "Enter Search String" label. Enter the word or group of words and click the [Search] button. You can use the asterisk symbol "*" as a wildcard if you don't know the complete name, e.g., "Bangor*". All employer names containing the word or words you specify appear in the browser. Use the vertical scroll bar to view more of a list if the browser is full.
Transaction Lookup Tab
The transaction log feature of the WIN-202 system provides a way to track changes users have made to data. These changes are displayed beginning with the most recent and moving back through time. This may be helpful if you want to research a problem introduced into the system. This screen can also be helpful in dealing with errors made to accounts. This is done by looking up the transaction for the "Changed From" value before the error was made and simply editing the account with that value. To view which user made the transaction, use the Administrative, Transaction screen (see Chapter 6 Administrative, Transactions Tab for more information).
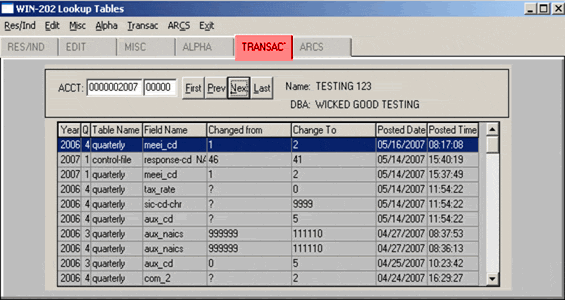
Note: When this screen is first displayed, a transaction history for the first account of the file is displayed and the Unemployment Insurance Account Number field "ACCT" is highlighted. If you want to view a different account, enter the number and press [Enter]. Now, enter the RUN and press [Enter] again. You can also view a different account using the account navigation buttons. An alpha search can be done by clicking the Unemployment Insurance Account Number field and pressing the [F5] key.
ARCS Lookup Tab
The ARCS Lookup allows you to view the contents of the Control file. If you would like to view the data other ways there are four sort options available:
- Account Number (UI/Run)
- Date of Last Update (Last Update)
- Batch/Sequence Numbers (Number/Sequence)
- Refile Year/Response Code (Year/Response)
To obtain a different view click one of the radio buttons in the "Sort Options" box to make a selection—the button will fill with a black dot. The browser displays Type, Batch number, Sequence number, Refile year, Response code, UI number, RUN, Last Update (date the account was last modified in the Annual Refiling Survey), Collection Mode Indicator, and Carryover indicator. "Type" identifies the record coming from a particular survey. Primarily these records will have an "N" (NAICS) associated with them. The Carryover Indicator signifies whether a record is new or was part of last year's survey.
