Home → Contents → Chapter 3 → Page 1 / 2 / 3 / 4 / 5 / 6 / 7 / 8 / 9 / 10 / 11 / 12 / 13 / 14 / 15 / 16

ARCS Tab
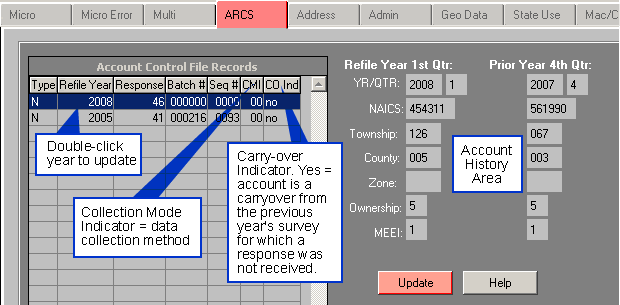
The ARCS tab is similar to the look and function of the "ARCS Data Entry" screen. The two quarters shown in the Account History Area depend on the refiling year highlighted in the browser. The refiling year shown on the screen below is 2008, therefore the quarters displayed are 2008-1 and 2007-4.
Update ARCS Data
Information entered for the Annual Refiling Survey is updatable via the "Update ARCS Control File" screen.
- On the ARCS Screen shown above, double-click on the refile year entry in the browser to display the "Update ARCS Control Files" screen shown below. This screen updates first quarter data with the last available previous quarter data.
- Ensure the correct year and account number are displayed.
- Input a batch number (optional) and change the source if necessary. The default source is "ARS". Use "Other" if the code change is from a non-refiling source.
- If applicable, choose a special circumstance from the drop-down menu, otherwise leave the default of "None". The special circumstance selections include: (31) Not Reviewed, (42) Employer Misunderstood, (63) P.O. Returned, and (64) Out of Business.
- Update the desired data. Note: The response code is automatically assigned based on the values entered on the screen. The code is displayed at the bottom of the screen as the "Resulting Response Code". This response code will only be assigned to the control file record if the "Accept and Save" button is chosen.
- Click the [Accept and Save] button. The quarterly codes are saved to the first quarter record. Note: If you click the [Cancel] button first, the screen will close and any changes made will not take effect.
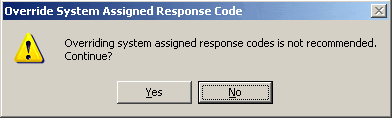
- To override the automated response code selection click the [Manual Coding] button. The following warning message is displayed:
- Click the [Cancel] button on the Update ARCS Control File screen to return to the ARCS screen or navigate to a new account by entering a new UI/Run number. The code you manually entered is not viewable on the Update ARCS Control File screen, it displays on the ARCS screen only. Note: Selecting the [Accept and Save] button will overwrite your manual code with the system determined code.
- Click the [Help] button to view the online documentation for the ARCS tab.
- When finished with the Update ARCS Control File screen, click the [Cancel] button to return to the ARCS screen.

Click [Yes] to view the Manually Override Response Code Screen shown below.
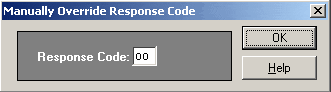
Enter the response code and select the [OK] button to make your change and return to the Update ARCS Control File screen.
Address Tab
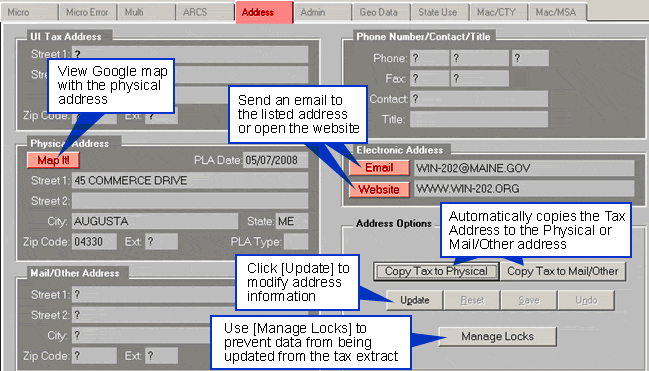
The Address tab is used to update the Mail/Other Address, Physical Address, and Telephone Number/ Contact/Title information for an account. The UI Tax Addresses are, by design, not changed here but may be overwritten by information on the Admin Tax Extract. The address tab allows you to set locks on specific fields, so information will not be replaced by data from UI Tax extracts (see Locking Fields for the Current Record). Click the [Email] button to send an email to the address listed. Use the [Website] button to view the company's website. The [Map It!] button opens a web browser to display the company's physical location using Google map.
To Update Address Data:
- Click the [Update] button.
- Click the field you wish to change and type the new information. Note: You can copy the UI Tax address to the Physical Address and the Mail/Other Address by clicking the appropriate button (i.e., [Copy Tax to Physical] or [Copy Tax to Mail/Other]).
- Click the [Save] button. If you do not wish to save your changes, click the [Reset] button and your changes will be undone.
Locking Fields for the Current Record
The locking feature prevents overwriting current information with information brought over from the UI Tax database. If you have a good address or phone number for an account and you do not want it replaced by information in the UI Tax database when an extract is done, you should lock those fields.
To Lock a Record:
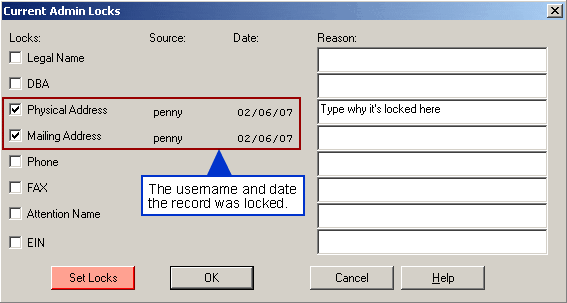
- Click the [Manage Locks] button on the "Address" tab to view the "Current Admin Locks" screen.
- Click on the [Set Locks] button to access the list of fields that you can lock for the current record (e.g., Legal Name, Physical Address, Phone, etc.).
- Set a lock by clicking the empty box to the left of the field label. A check mark appears in the box. If you click on a box that has a check mark, the check mark is removed and the lock is removed.
- Type in a reason why you locked the record. This is optional.
- Click on the [OK] button to set the locks. Click the [Cancel] button to return to the "Address" screen without saving your changes.