ARCS Data
- To manually input response codes from the Annual Refiling Survey (ARS) and/or any changes reported on the ARS.
To Update ARCS Data:
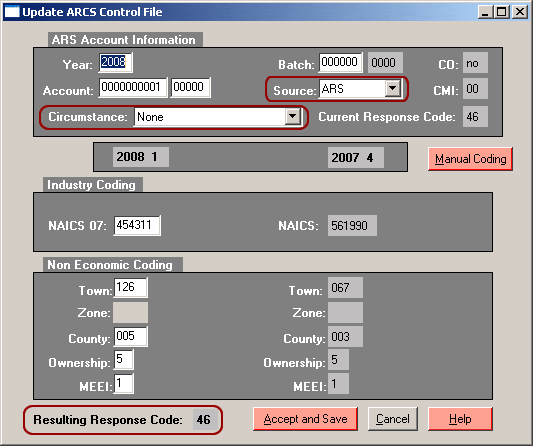
- Click on the [ARCS Data] button from the "Data Entry" screen. The "Update ARCS Control File" screen displays as shown below. This screen updates first quarter data with the last available previous quarter data.
- Input the year, UI Account Number and RUN.
- The Batch Number field is optional. To start a new batch, input a number greater than zero.
- Change the source if necessary. The default source is "ARS". Use "Other" if the code change is from a non-refiling source.
- Input any code changes. Note: The response code is automatically assigned based on the values entered on the screen. The code is displayed at the bottom of the screen as the "Resulting Response Code".
- Click the [Accept and Save] button. The quarterly codes are saved to the first quarter record. Note: If you click the [Cancel] button first, the screen will close and any changes made will not take effect.
- To override the automated response code selection click the [Manual Coding] button. The following warning message is displayed:
- Click the [Cancel] button on the Update ARCS Control File screen to close the screen or work on a different account by entering a new UI/RUN number. The code you manually entered is not viewable on the Update ARCS Control File screen, it displays on the ARCS screen only. Note: Selecting the [Accept and Save] button will overwrite your manual code with the system determined code.
- Click the [Help] button to view the online documentation for the Update ARCS Control File screen.
- When finished with the Update ARCS Control File screen, click the [Cancel] button to return to the Data Entry Screens menu.


Click [Yes] to view the Manually Override Response Code Screen shown below.

Enter the response code and select the [OK] button to make your change and return to the Update ARCS Control File screen.
ARCS Scan Entry
The purpose of this screen is to enter Annual Refile Control Survey information quickly into the WIN-202 system using a scan gun. When account refile data is entered this way, the system knows not to produce additional forms for subsequent mailings. Scanning a form that is part of the NAICS revision generates a message and does not update the control file. It is recommended that you have your computer's sound turned on in order to hear this notification. Note: If there are revisions on the ARS form, then updates will need to be made via the ARCS Data Entry screen.
To enter ARCS data via scanning:
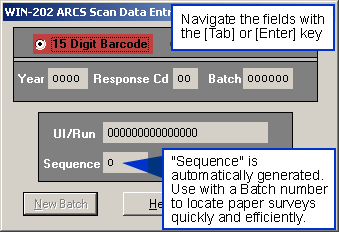
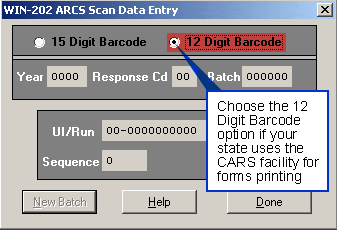
- Click the [ARCS Scan Entry] button on the "Data Entry" screen. The "WIN-202 ARCS Scan Data Entry" screen will appear (see below figures).
- Choose either the 15-digit or 12-digit barcode radio button. The 12-digit barcode option is for forms printed at the CARS print facility where the first 2-digits are the state’s FIPS code and the remaining 10-digits are the UI account number. If your state does not use the CARS facility, then choose the 15-digit barcode option.
- Use the [Tab] or [Enter] key to enter a year, response code and batch code.
- Press [Tab] or [Enter] to move into the UI/Run field.
- Assuming that a scan gun has been setup, data entry can begin.
- Position the form's bar code under the scan gun for the account number and associated information to be read and saved in the system. Repeat this step for all accounts with the same response code.
- If you want to start a new batch of response codes then click the [New Batch] button and follow steps 2-6.
- Use the [Help] button to view the online documentation for detailed information on the ARCS Scan Data Entry screen.
- Click [Done] when finished entering batches.


