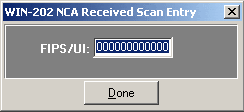
NCA Scan Entry
The NCA Scan Entry screen is used to quickly enter unemployment numbers from CA forms using a scan gun. Using a scanner, the bar code containing the state FIPS and UI number can be read which sets the received indicator in the NCA-control table to "Yes". However, employment data is not entered. This screen only allows the updating of records to exclude them from future mailings of NCA forms. If a scanner is not available, the UI/RUN numbers can be entered using the keyboard.
To Input CA Forms:
- Click the [NCA Scan Entry] button on the "Data Entry" screen. The "WIN-202 NCA Received Scan Entry" screen displays.
- Position the form's bar code under the scan gun for the account number and run to be read. If a scan gun is not available, type the account number and run.
- Click [Done] when finished.
New Accounts
This screen allows users to 1) create new accounts or 2) update existing ones for the current quarter only.
To create a New Account:
- Click the [New Accounts] button on the "Data Entry" screen. The "WIN-202 New Accounts Data Entry Screen" displays:
- Input the UI, run, zone (if applicable), residence, ownership, and NAICS information. Navigate among fields using the [Tab] key. The county code fills in automatically when a valid residence or zone code is entered. The LMA, WIA and MSA codes are derived from the residence or county codes.
- Use the [Tab] or [Enter] key to move to the [Create Account] button to activate it. Use the [Enter] key to update the system.
- Click [Exit] when finished.
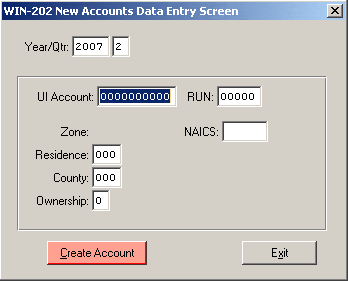
Note: When an account is created, the account’s setup date is assigned the value of the current day’s date and a transaction record is added to the status log with the User ID, the current date as the posted date, and "CREATE" as the table name. See Section 6, Administrative, Transactions Tab for more information.
To Modify/Update Values for an Existing Account:
- Click the [New Accounts] button on the "Data Entry" screen. The "WIN-202 New Accounts Data Entry Screen" appears.
- Enter the UI/Run number and press [Tab]. All of the account's information displays on the screen.
- Make changes to the fields of your choice.
- Use the [Tab] or [Enter] key to move to the [Create Account] button to activate it. Use the [Enter] key to update the system with your changes.
- Click [Exit] when finished
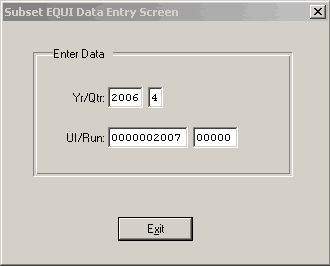
Subset EQUI Data Entry
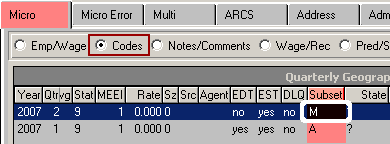
A Subset EQUI is used to report to BLS a limited number of micro record corrections. This is used instead of sending a full EQUI Update File. The Subset EQUI Data Entry Screen is used to mark micro records to be included in the Subset EQUI. Individual records can also be manually marked using the Subset EQUI field on the Micro Codes Screen (see Chapter 3, Screens, Codes Radio Button for more information). Records are selected for the BLS report via the EQUI Tab on the Quarterly Processing screen (see Chapter 4, Quarterly Processing on running a Subset EQUI).
To Create a Subset of Records:
- Click the [Subset EQUI Data Entry] button on the "Data Entry" screen.
- Enter the Year, Quarter, UI, and RUN Number for the record to be "marked"’ for inclusion. Use the [Tab] key to navigate between fields and to submit the record to be marked (i.e., tab the cursor to the Yr/Qtr field to complete the process).
- Click [Exit] on the Subset EQUI Data Entry Screen when you are finished marking accounts.
- If you open the Micro Codes screen, you can view the account you marked. Notice the "Subset" column for 2006/4 displays an M for manually marked. To view all the manually marked accounts on the subset file, run the Subset EQUI Listing from the Reports menu or the subset.p Progress query (click here to view information on running queries).
-
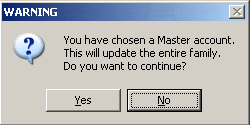
Note: When you enter a Master account UI/Run, a message box warns you that all sub-units for the family will be marked. Click Yes to mark all subunits or click No to mark only the master account.