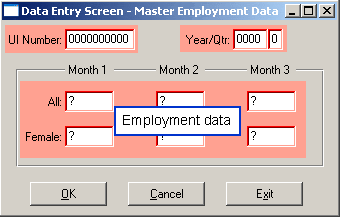
Master Employment Data
Uses:
- Entering employment data for non-reporting master or single accounts
- Changing employment data for master or single accounts
To Enter Employment Data:
- Click on the [Master Emp Data] button on the "Data Entry" screen. The "Data Entry Screen-Master Employment Data" screen displays.
- Double-click on the UI Number field. Enter the Unemployment Insurance Account Number and press [Enter].
- Input the year and press [Enter].
- Input the quarter and press [Enter]. Any existing employment for the account and quarter will appear.
- Input the correct employment information for each month and press [Enter].
- Click [OK]. Use [Cancel] if you decide that you do not want to add or update the information.
- Follow steps 2-6 if you wish to input data for another account.
- Click on the [Exit] button when you are done entering data and you will be brought back to the "Main Menu" screen.
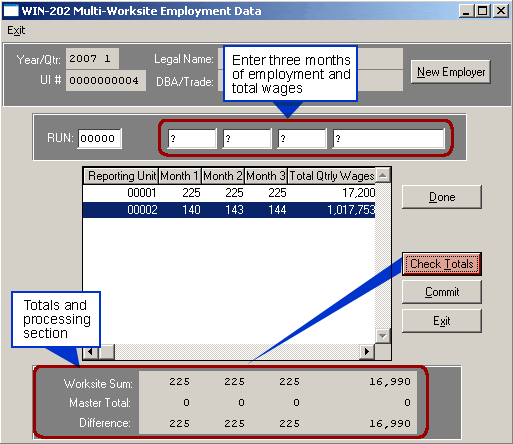
Multi Data – Site Entry
Uses:
- To enter data from the Multiple Worksite Report
- To enter employment and wage data for subunits of multis
- To compare reported data for master accounts with reported data of all subunits of the master account.
To Enter Multi Establishment Wage and Employment Data:
- Click the [Multi Data – Site Entry] button on the "Data Entry" screen. The "WIN-202 Multi-Worksite Employment Data" screen will appear.
- Double-click the ‘Year/Qtr’ field and enter a year/quarter.
- Enter the Unemployment Insurance Account Number (UI #) and press [Enter]. The Legal name and DBA for the account displays on the screen.
- Enter the RUN number and press [Enter]. Note: If the Master is closed, access is denied to the subunits or if the Master is active but a subunit is closed then access is denied to the subunit only.
- Enter the three monthly employment figures and the quarterly wages, pressing [Enter] after each. The information entered for the worksite will appear in the browser area.
- To work on another worksite, press [Enter]. Type another RUN number and press [Enter] to proceed.
- Click [Done] when you are finished entering worksite data for the account.
- Click [Check Totals] to compare differences between worksite and master totals. If a discrepancy exists then verify if data from the Multiple Worksite Report (MWR) was entered correctly.
- Click [Commit] if the data is accurate and you want to save it.
- Click the [New Employer] button to enter data for another employer or click [Exit]. Clicking [Exit] before [Commit] results in loosing the data just entered coupled with a return to the "Main Menu" screen.
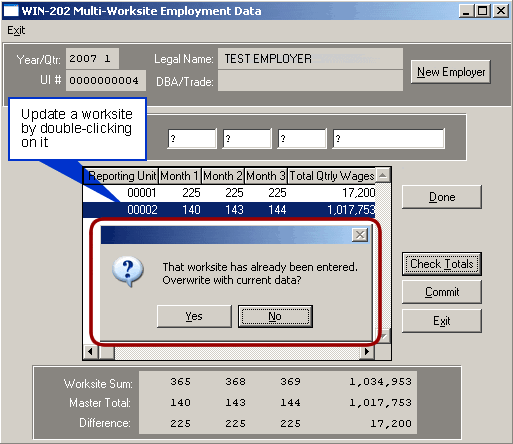
Modifying Employment and Wage Data
An analyst can modify data for any worksite previously entered as follows:
- Double-click on the worksite in the browser of the "Multi-Worksite Employment Data Entry Screen" (see figure below). This brings you to the RUN for that establishment.
- Input any changes to the employment and wage data. Press [Enter] after each change. When pressing the [Enter] key after the wages entry, a dialog box displays asking if you want to overwrite the existing data (see figure below). The default is "No".
- Click [Yes] if your changes are correct. Click [No] if your changes are not correct. If you click [No] your changes will be lost.
- When you are finished modifying data, click [Done].
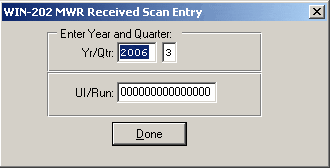
MWR Scan Entry
This screen functions much like the ARCS Scan Entry screen. Using a scanner the bar code containing the UI/RUN number can be read which sets the MWR received indicator to "Yes". Employment data is not entered. This screen only allows the updating of records to exclude them from the second mailing of MWR forms. If a scanner is not available, the UI/RUN numbers can be entered using the keyboard.
To Input MWRs:
- Click the [MWR Scan Entry] button on the "Data Entry" screen. The "WIN-202 MWR Received Scan Entry" screen displays. The year of the "Yr/Qtr" field is highlighted on this screen indicating a readiness to receive input.
- Input a year and quarter using the [Tab] key to navigate. Press [Tab] moving to the UI/Run field. Assuming that a scan gun has been setup, data entry can begin.
- Position the form's bar code under the scan gun for the account number and run to be read. If a scan gun is not available, type in the account number and run.
- Click [Done] when finished entering MWR's.